
TP-Link TL-WR844N-ConNENENECTION, SETTING WI-FI, FIRMware, IPTV, Operating Mode
This page contains detailed instructions on how to configure TP-Link TL-WR844N router (review of which you can see here). In addition to the basic settings (connecting to the Internet, setting up Wi-Fi network) we will consider the process of firmware upgrade and setting up additional functions.
Note that this router can be controlled from your phone, through a special app called Tether. Through the application you can perform the first configuration of the router. We will consider a more universal configuration process – through the web-interface. You can access it through a browser from any device that is connected to the router.
How to connect?
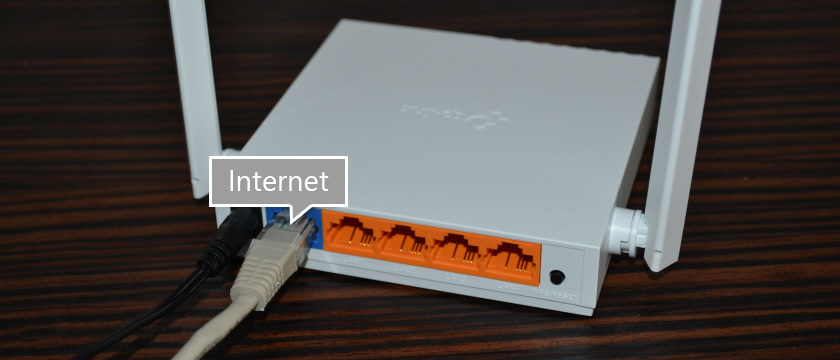
First of all, connect the power adapter to TL-WR844N and plug it into the socket. Next, plug the network cable from your Internet provider or modem into the WAN port (it’s blue).
Next step: connect the device from which we will perform the configuration to the router. There are two options here:
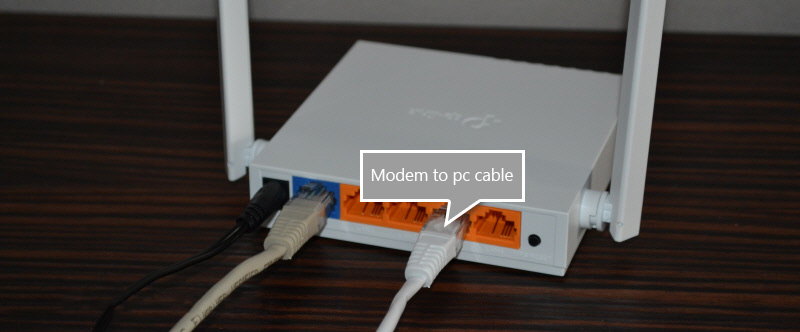
- Connect using the network cable (which comes with the router). This method is suitable only for devices with a network card.
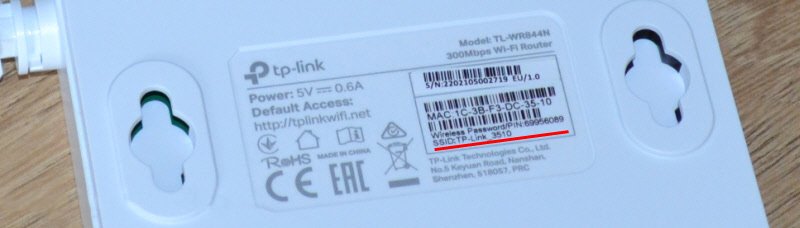
- Connect via wi-fi. From the same laptop, phone, tablet, PC (with a Wi-Fi adapter). To do this, open the wi-fi settings, select the Wi-Fi network (the name of which (SSID ) is indicated at the bottom of the router) and enter the password, which is also indicated at the bottom of the router (Wireless Password/PIN).
After connecting to the router you should open its settings and set the necessary parameters.
Configuring TP-Link TL-WR844N
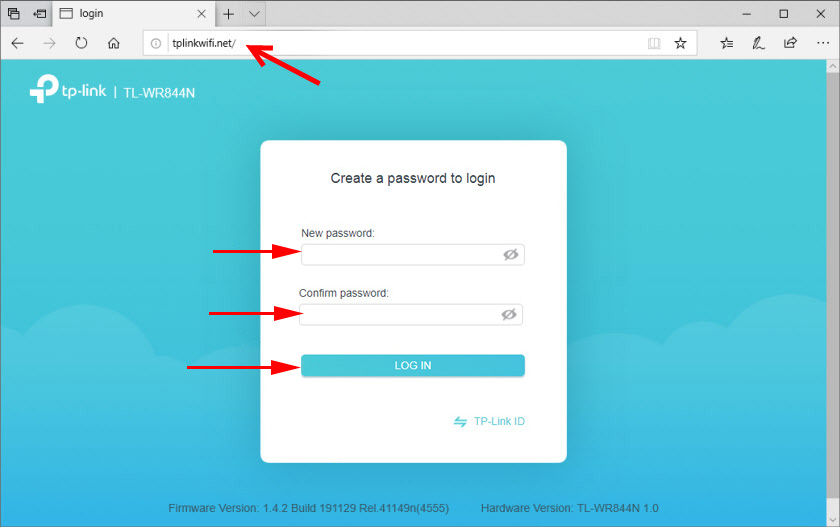
TL-WR844N settings can be accessed at the address tplinkwi-fi.net (it is indicated on the sticker on the photo above). To do it, open a browser, type the address (or copy it) and go to it (press Enter). Just in case I leave a link to the detailed instructions: tplinkwi-fi.net – enter the router settings.
If the router is on factory settings, it will immediately ask you to set (specify twice) the administrator password. This password should be memorized, because in the future it will have to be entered when entering the router settings.
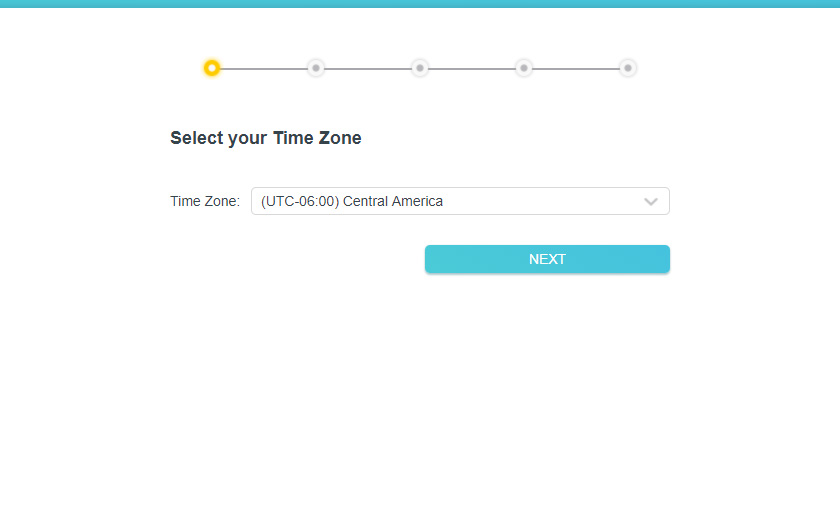
By default, the Quick Setup Wizard opens immediately, which allows you to perform step-by-step configuration. You can skip it by pressing the “Skip” button and set the settings in separate sections of the web-interface. I usually use the quick setup wizard. On the first step it asks you to select your time zone.
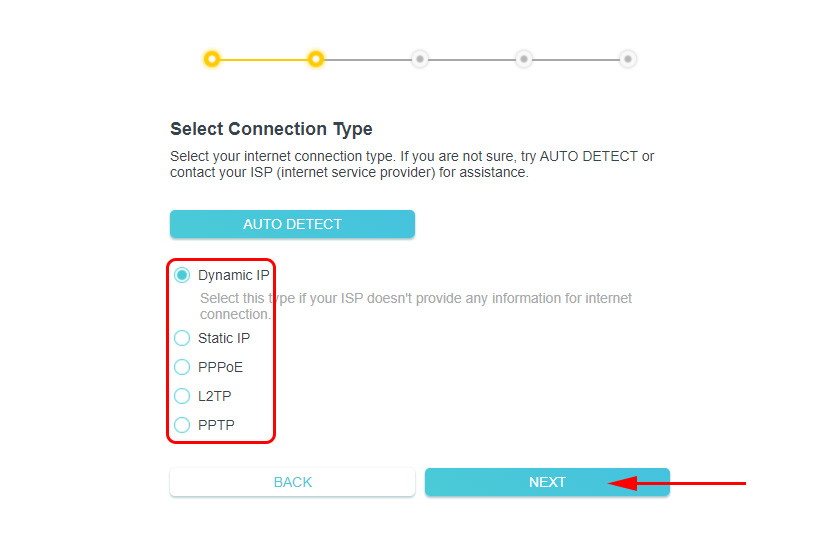
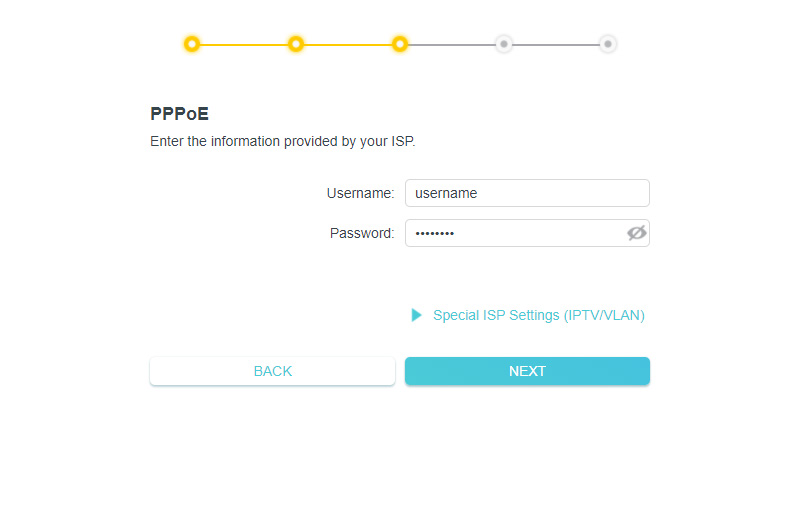
Next are the most important settings. You need to choose the type of connection your Internet provider uses. Mine is “Dynamic IP.” This is the only type of connection, after selecting which you don’t need to enter any settings. If you have PPPoE, you will need to enter a username and password. If you have PPTP or L2TP, you will also need to specify the server address.
For example, PPPoE configuration:
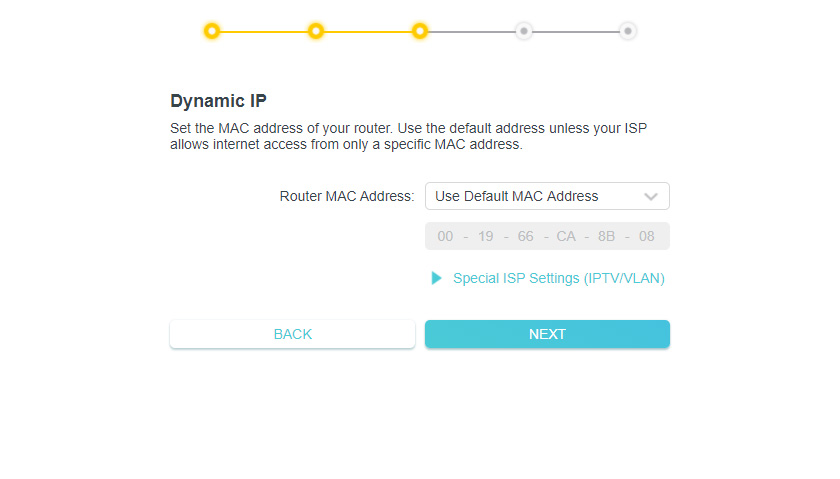
If you select “Dynamic IP”, the router will offer to clone the MAC address. If your ISP doesn’t do MAC address binding, you don’t need to change anything, just continue with the setup.
The next step is to configure wi-fi. You need to think up and set the network name (SSID) and password, which you will need to enter on the devices when connecting to your Wi-Fi network.
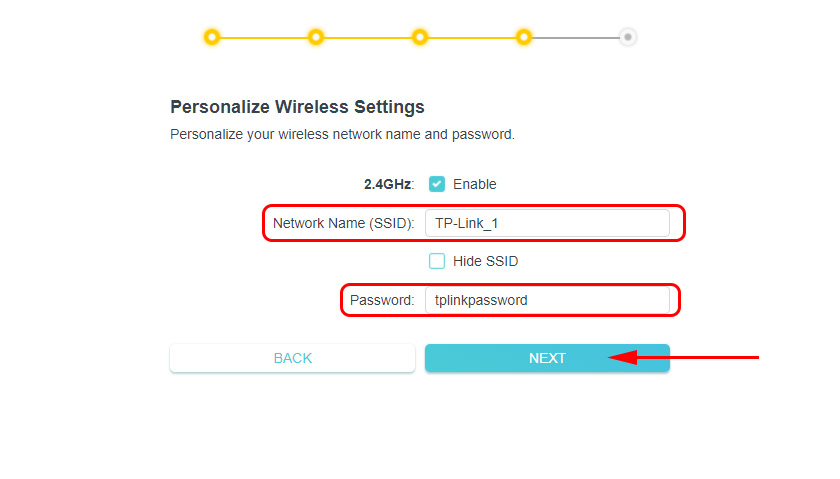
Save the settings.

During the saving process, a window will appear asking you to reconnect your devices to the Wi-Fi network (with a new name and password). Connect and confirm it in the web-interface.

After that we press the “Finish” button and get to the web-interface of the router.
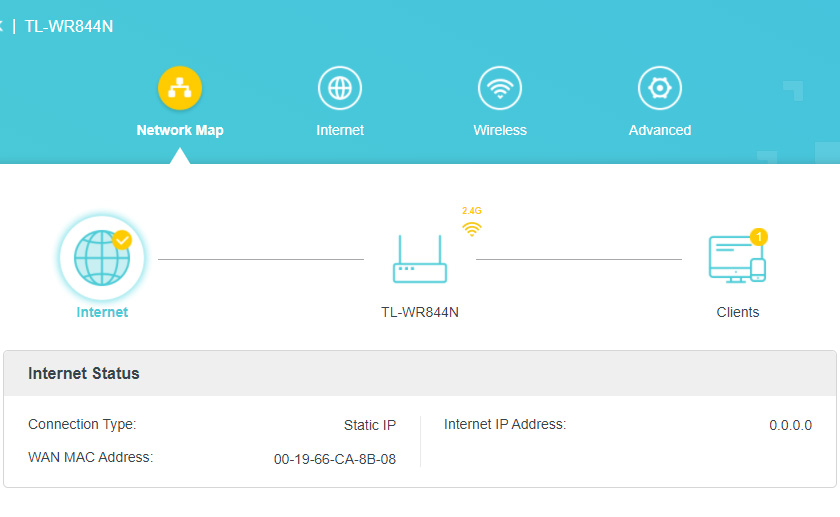
There are 4 sections: “Network Map” – network map. It displays information about the router, the Internet connection and connected devices (clients). “Internet” – quick settings for Internet connection. If there is no internet connection through the router, the network map shows an error, then in this section you can change the connection settings to the provider. “Wireless” – Wi-Fi network settings. You can change the network name or password. “Advanced” – advanced settings.
Operation mode (repeater, access point, WISP) on TL-WR844N
Since this is a multi-mode router, it has 4 operating modes: Router, Access Point, Range Extender (Repeater) and WISP. I told you about them in the review (the link is at the beginning of the article).
You can change the operation mode in the “Advanced” – “Operation Mode” section.
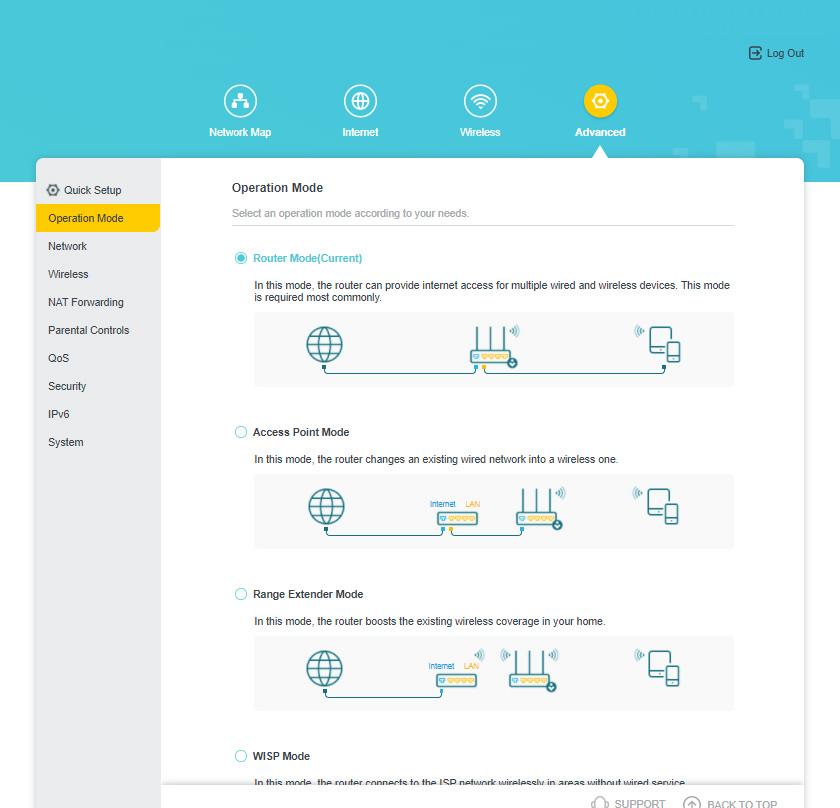
Just select the desired mode and save the settings. The connection diagram is shown next to each mode, which is very convenient.
IPTV/VLAN setup
TP-Link TL-WR844N supports IPTV. There are all the necessary settings. They are located in the “Advanced” – “Network” – “IPTV/VLAN” section. You can, for example, configure it in bridge mode. Select one or several LAN ports for IPTV set-top box connection.
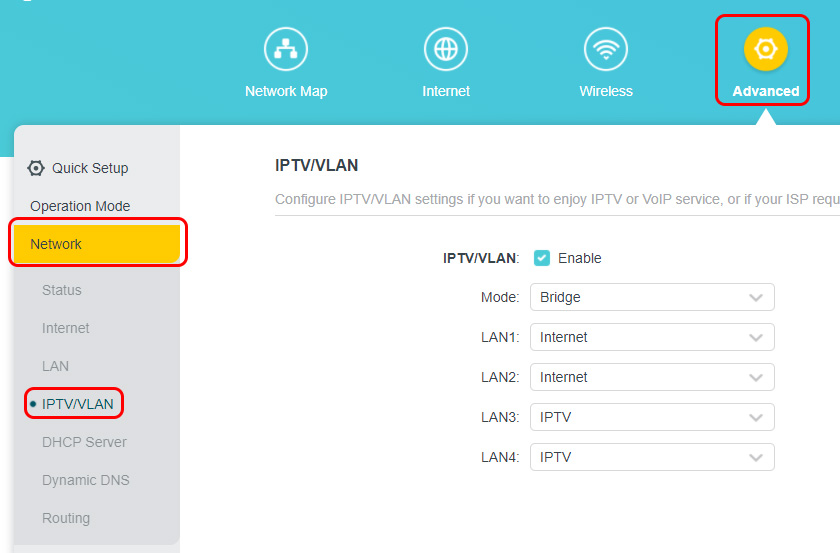
Or specify VLAN ID. I have already written in detail about IPTV setup on TP-Link routers.
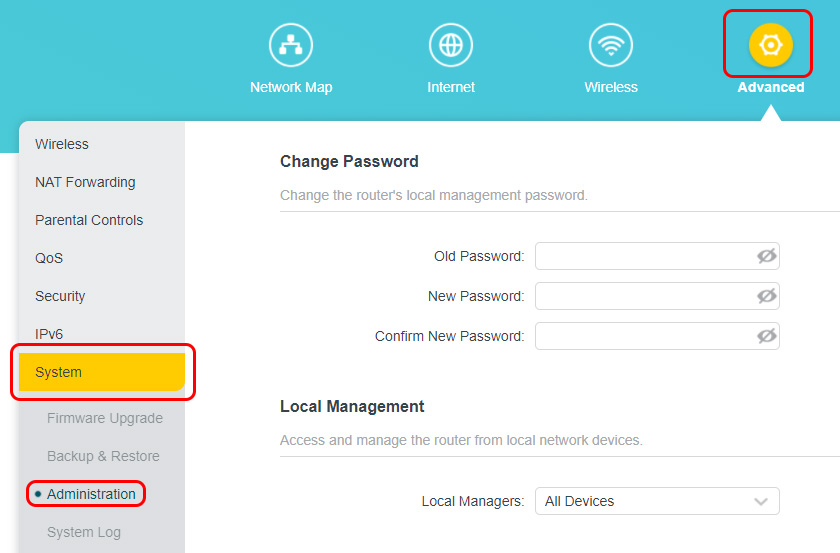
Changing the administrator password
A password is set to protect the router control panel. We set it at the very beginning, when we first entered the router settings. If you need to change it, you can do it in the “Advanced” – “System” – “Administration” section. You need to specify the old password and the new one twice. Then save the settings.
If you have forgotten the password, and you do not have access to the settings, then the only way out is to reset the settings. To do this, press and hold the “WPS/Reset” button for 8-10 seconds. After that the router will be as good as new.
TL-WR844N firmware
You can upgrade the software on TP-Link TL-WR844N router in the “Advanced” – “System” – “Firmware Upgrade” section.
But first you need to download the firmware from TP-Link website. Specifically for this model, hardware version and region. All this information is on the sticker on the bottom of the router. For example, I have a device for the region EU (Europe).
As it turned out, there is no new firmware for this router on the TP-Link website (at the time of writing). The reason is that it’s still new, it just went on sale.
You just need to download the firmware file from the site (when it appears there), select it in the router settings (in the “Firmware Upgrade” section) and click on the “UPGRADE” button.
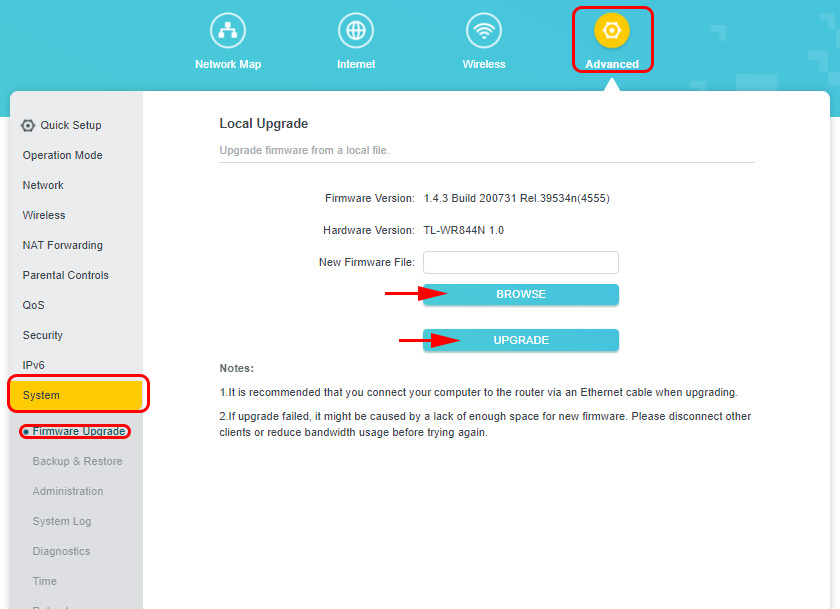
Wait for the upgrade process to complete and reboot the router. During the upgrade process, do not disconnect the cable, do not close the tab in your browser, do not turn off the router!
In comments to this article you can leave questions related to TP-Link TL-WR844N. Perhaps you are unable to configure the router, the Internet is not working, or some other problems.
 Review and Configuration of PowerLine Adaptors TP-Link TL-PA8010P KIT, OR HOW to do ...
  The TP-Link Adapter Does Not See the Network, Does Not Connect To Wi-Fi, The Utility Window Is Inactive. Who sod the adapter work?
 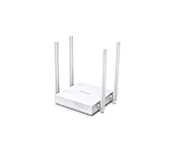 The TP-Link Archer C24 Review is an inexpensive Two-Band Router with Support for the Repiter Mode and Access Points
  TP-Link RE650 Review and Setting-A PowerFul, Two-Band Wi-Fi Signal