
TP-Link TL-WR720N: Connection and Setting Wi-Fi Router
Another instruction on how to configure a router from TP-LINK. And in this article we will configure a budget and popular model of router TP-LINK TL-WR720N. Its price is about 14 dollars, and it is the cheapest router from TP-LINK. It is even cheaper than the well-known TL-WR741ND model.
The process of setting up the TP-LINK TL-WR720N router is practically no different from setting up other TP-LINK routers. Everything is according to the standard scheme: connect the Internet to the router, then connect to the router from a computer (or other device), go to the settings, and set the necessary parameters (connection to the provider, Wi-Fi network configuration, setting the password).
The TL-WR720N router model is perfect for distributing Internet to several devices. Both via wi-fi and network cable (there are 2 LAN ports). This router will not withstand heavy load. If you like to play online games and watch videos in high quality, and also on several devices at the same time, it is better to buy a more expensive model. If you only choose a router, and accidentally came to this page, it is better to read the article tips on choosing a Wi-Fi router for home or apartment.
Installing and connecting the TP-LINK TL-WR720N router
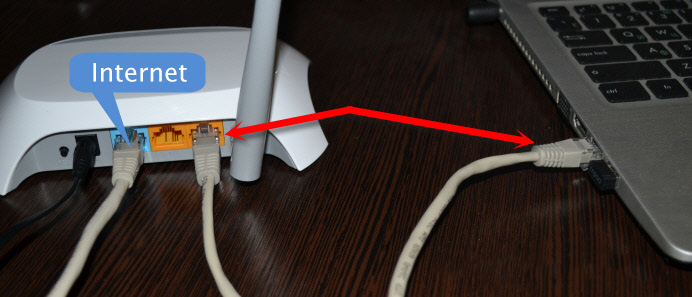
Connect the power adapter to the router, and plug it into a socket. Then, plug the cable from your Internet provider into the WAN port. And with the network cable that comes with the router, connect the router to your computer, or laptop. Like this:
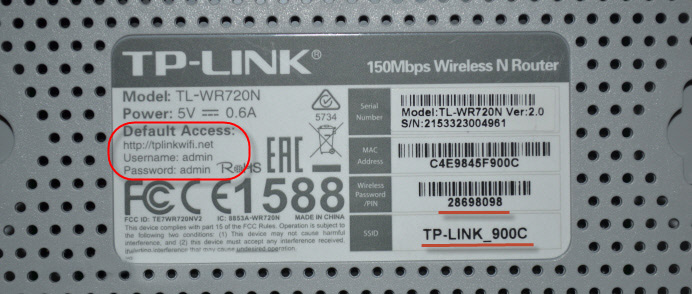
Next, from the device that we connected to the router, you need to go into its settings, which would set the parameters for connecting to the ISP, configure the Wi-Fi network, etc. If there is no possibility to connect to the router via network cable, you can connect via Wi-Fi network. The factory name of Wi-Fi network, password (PIN), address for entering the settings, and authorization data are indicated on the sticker at the bottom of the device.
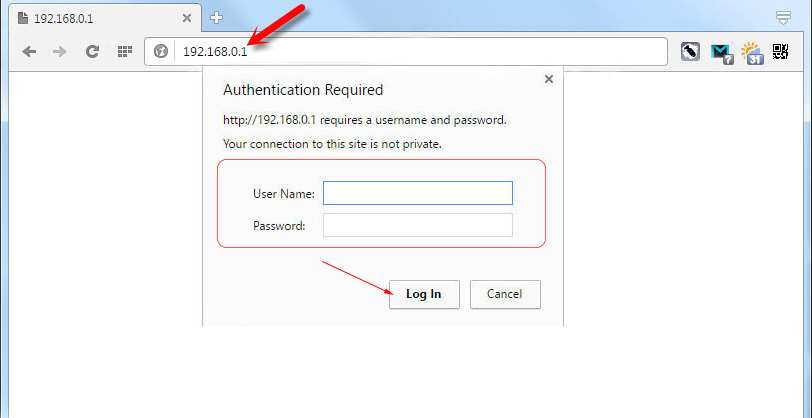
Open any browser and go to the address tplinkwi-fi.net or 192.168.0.1. In the authorization window specify the username and password (admin and admin), and get into the settings.
If you can’t enter the control panel, see the article: What to do if you can’t enter the router settings at 192.168.0.1 or 192.168.1.1?
Configuring Internet on TL-WR720N
First of all, we need to configure the connection to the Internet provider, so that the router will connect to the Internet and start to distribute it to our devices. If you already have Internet through the router, then most likely your ISP uses Dynamic IP connection type.
Well, if you have PPPoE, L2TP, PPTP, you will need to set the necessary parameters for connection (username, password, server address). These parameters are given by the Internet provider. If you don’t know them, you can look them up in the contract you were given when you connected to the Internet, or call the provider’s support.
These parameters can be set on the “Network” – “WAN” tab. If you want, you can use the quick setup wizard.
On the “Network” tab you need to select the type of connection (PPPoE, L2TP, PPTP, Dynamic IP, Static IP), set the necessary parameters and start connection to the provider. Then, save the settings by clicking on the “Save” button.
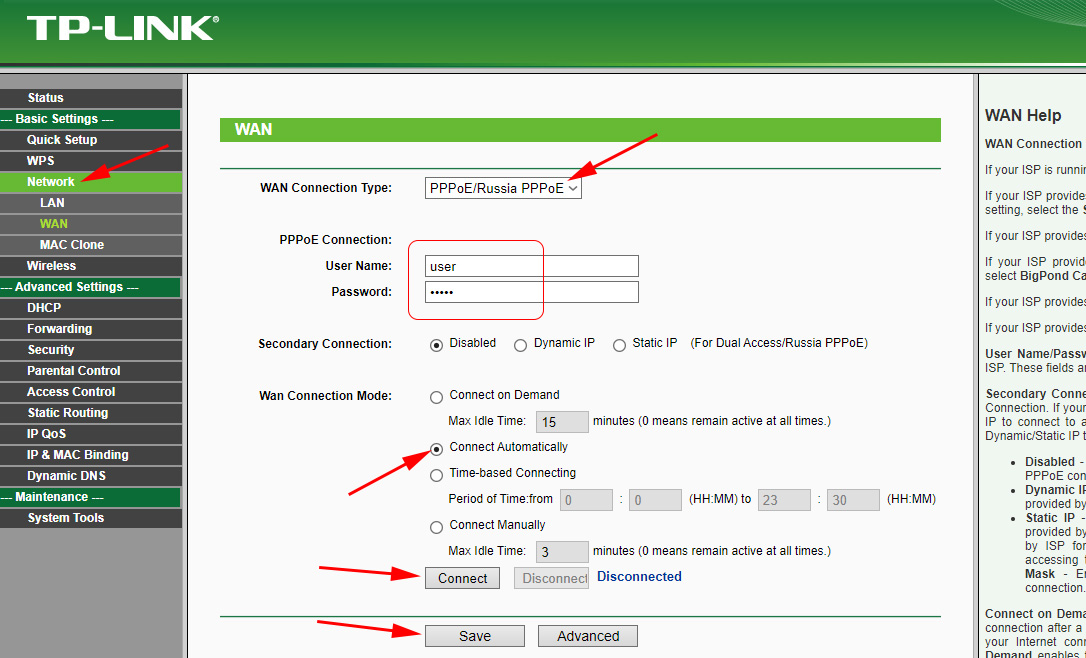
PPTP and L2TP connection is configured in the same way. And if you have a Dynamic IP, you don’t need to set any parameters. But it may happen that the provider uses MAC-address binding.
TP-LINK TL-WR720N: Wi-Fi network setup and password setting
The main thing is that the Internet through the router should work. If everything is fine, you need to set the Wi-Fi network settings and put a password on wi-fi. To do this, go to the “Wireless Mode” tab. Here you can change the name of the Wi-Fi network, and specify your region.
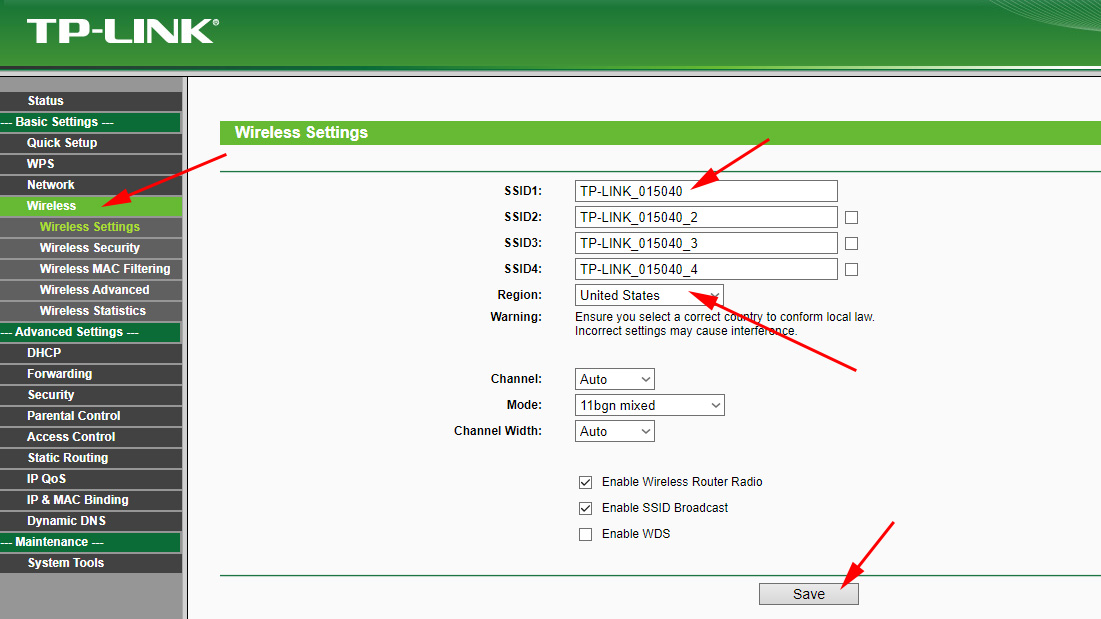
TP-LINK TL-WR720N router can activate up to 4 wi-fi networks with different settings.
To put a password on a Wi-Fi network, go to the “Wireless Mode” – “Wireless Mode Protection” tab. There you can select the network for which you want to change the settings (if you have activated more than one Wi-Fi network).
Then, select the “WPA-PSK/WPA2-PSK” item, and in the “PSK password” field specify the password that will be used to connect to your Wi-Fi network.
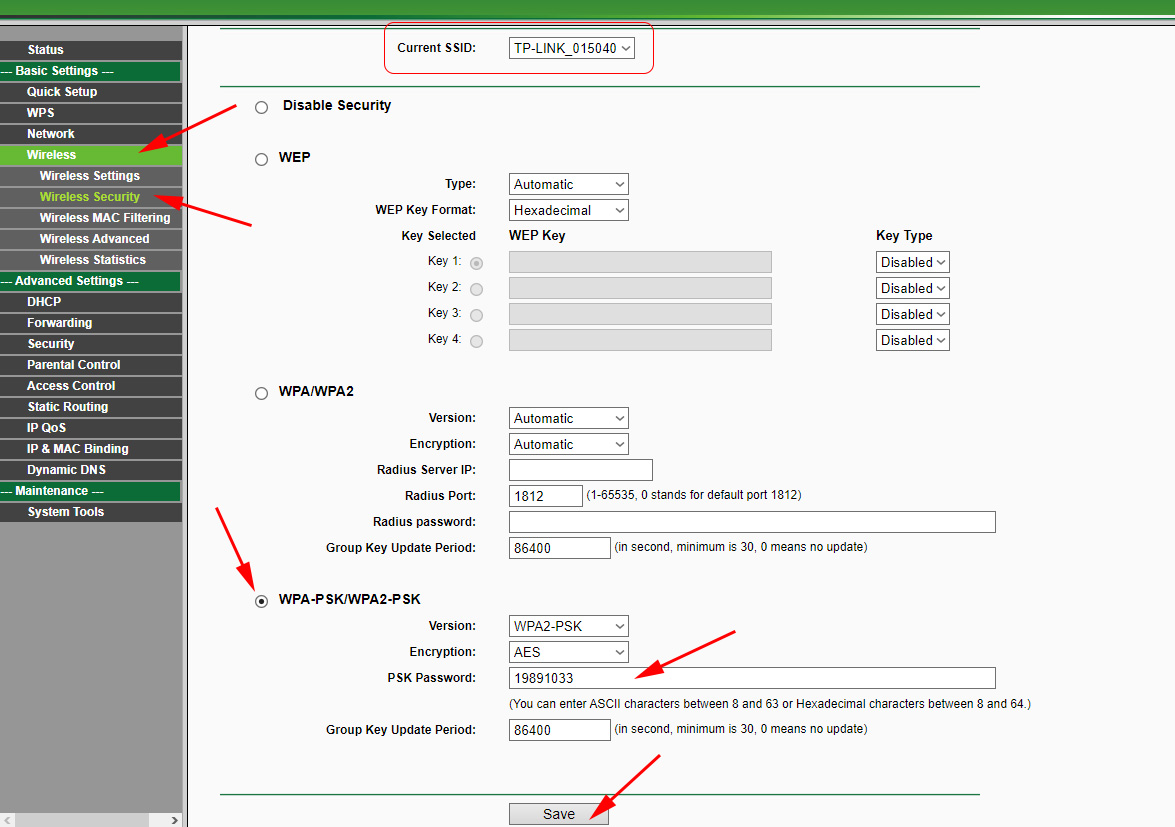
Save the settings, and reboot the router. Now, to connect to the Wi-Fi network you need to enter the set password.
And traditionally, I advise you to change the admin password, which is used to protect the router settings. How to do it, I wrote in the article: How to change the password on the router from admin to another?
If you encountered any problems and errors while configuring TP-LINK TL-WR720N, please write in comments, I will try to help you with the solution.
 Review of the Router TP-Link Archer C5 V4. Gigabit, PowerFul, Long -Range
  Instructions for setting up mobile router tp-link M5250
  TP-Link RE650 Review and Setting-A PowerFul, Two-Band Wi-Fi Signal
  How to Change the Wi-Fi Password on the TP-Link M5250 and M5350 Router