
TP-Link Router Setting in Bridge Mode (WDS). We Connect Two Wi-Fi Routers
We continue to understand how different routers work in repeater and bridge modes. In this instruction we will consider in detail how to configure Tp-Link router in bridge mode (WDS). I think that at once it is necessary to understand the question, what is WDS on Tp-Link routers and how it differs from the mode of operation “Repeater” (repeater).
I’ll tell you right away that on Tp-Link routers, there is no such mode as a repeater, such as Asus and Zyxel (there, routers really work as a real repeater). Only access points from Tp-Link are able to work as network repeaters. As for regular routers, such as TL-WR941ND, TL-WR740N, TL-WR841N, TL-MR3220, TL-WR842ND and other models, they have the ability to configure the bridge mode, aka WDS.
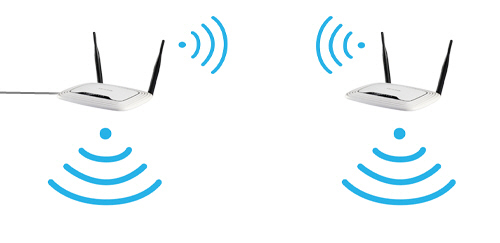
What is the difference between bridge mode and repeater mode? I explain in simple language: in bridge mode, we simply connect two routers via wi-fi. This mode can also be used to expand the Wi-Fi network. For example, we have some main router, which gives out internet via wi-fi. And we need to expand this network, to increase its range. We take a Tp-Link router, configure the bridge mode on it according to these instructions, it receives the Internet over Wi-Fi from the main router, and distributes it further. But, unlike a repeater, you will have one more wireless network with its own name and password.
Of course, a repeater (or router in repeater mode) is much better for this. It simply clones and strengthens the existing network, and in bridge mode you have another wireless network. And you get to choose which network you want to connect to.
I was recently asked this question in the comments:
Good afternoon. There was such a question, and how to configure the router tl-wr941nd to receive wi-fi, and the subsequent transmission of the Internet through the cable. That is, just use it as a receiver. Is it possible to realize this somehow?
By configuring your Tp-Link in WDS mode, it can be used as a receiver. That would connect to the Internet, for example, a TV, or a computer, which do not have a Wi-Fi receiver.
A few more things:
- With such a connection can drop the speed of connection to the Internet through the second router (which we will connect in bridge mode). About 2 times. This is a peculiarity of WDS.
- The main router can be any router you want. Of course, it is good if both devices are Tp-Link, and even better if they are the same model. My main router is D-link DIR-615/A, and I’m going to configure the bridge on TL-MR3220. By the way, I failed to make Tp-Link friends with the old Asus RT-N13U.
- We will also change the settings of the main router. We need to set a static channel.
- This method is ideal for wireless connection of two routers in bridge mode. For example, on the first floor you have a router, and on the second floor we put another one, and connect to the first one via wi-fi. There is no need to lay a cable.
Setting up the bridge (WDS) on the router Tp-Link
1 First of all, we need to change the wireless network channel on the main router. Note that the router to which we will connect in bridge mode must be configured. That is, the Internet must be working, it must give out Wi-Fi network.
My main router is a D-link DIR-615. It distributes Wi-Fi network with the name “DIR-615_wifiwiki.net“. So, we need to set a static channel for the wireless network on the main router in the settings.
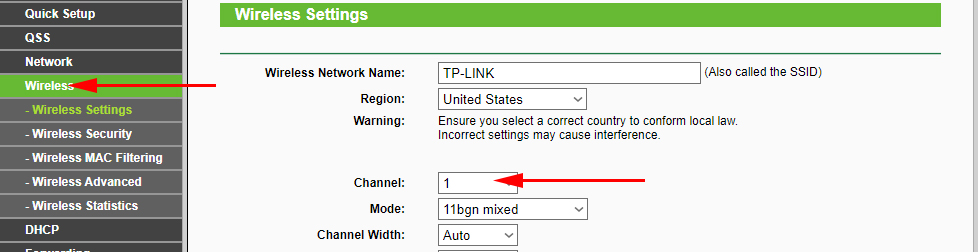
If you have Tp-Link as the main router, you can change the channel in the settings (which can be opened at 192.168.1.1 (192.168.0.1), or see this instruction), on the Wireless tab. In the Channel field, specify a static channel. For example 1, or 6. Click the Save button to save the settings.
The static channel has been set. You can exit the main router settings.
2 Let’s move on to configuring the router that will be configured in WDS mode. I have TL-MR3220 model. Go to the router settings. If you don’t know how, see the instructions on how to enter the control panel on Tp-Link.
First, we need to change the IP-address of our Tp-Link. This is necessary so that there would not be two devices with the same IP in the network. For example, if the main IP address is 192.168.1.1 and the second IP address is 192.168.1.1, there will be an address conflict. Go to the Network – LAN tab. In the IP Address field replace the last digit from 1 to 2. You will get the address 192.168.1.2, or 192.168.0.2. Click Save. The router will reboot.
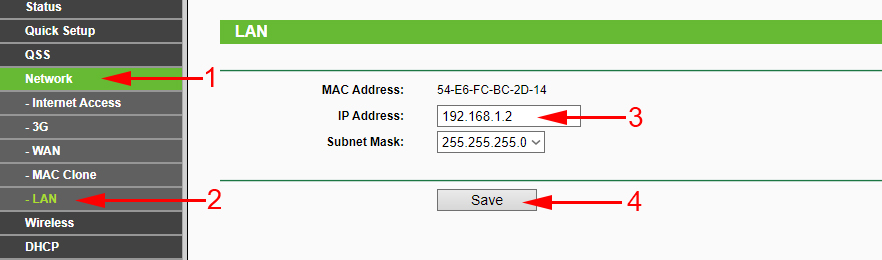
Go to the settings again, but the IP address will be different – 192.168.1.2, which we specified above.
3 Go to the Wireless tab. In the Wireless Network Name field you can specify the name of the second wireless network. And in the Channel field be sure to specify the same channel that you set in the main router settings. I have channel 1.
Next, check the Enable WDS Bridging box. And click on the Survey button.
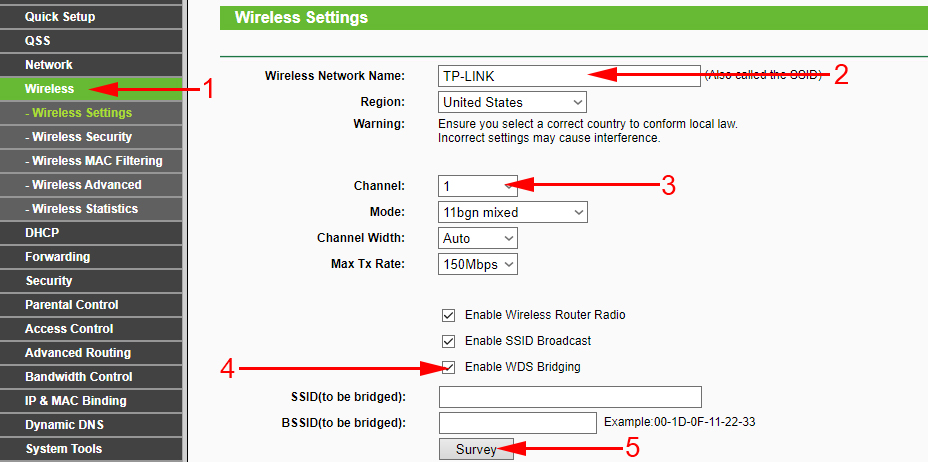
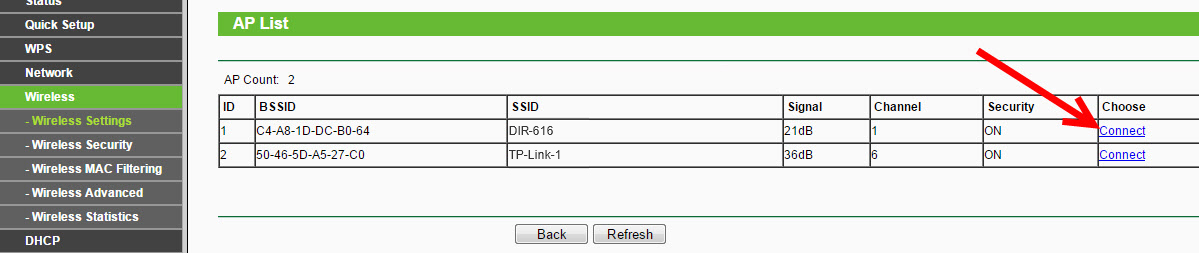
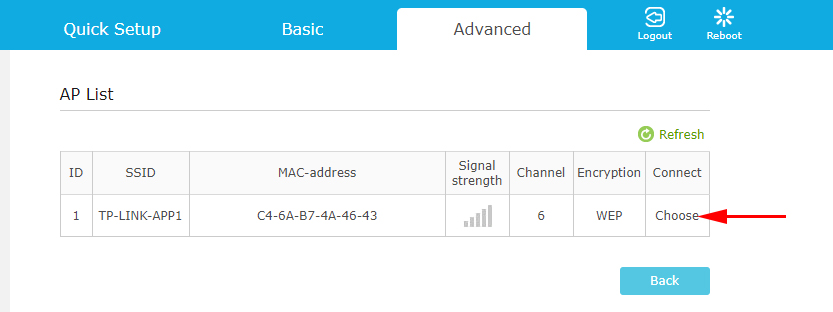
Select from the list the desired network from which the router will receive Internet. In front of the desired network, click on the link “Connect”.
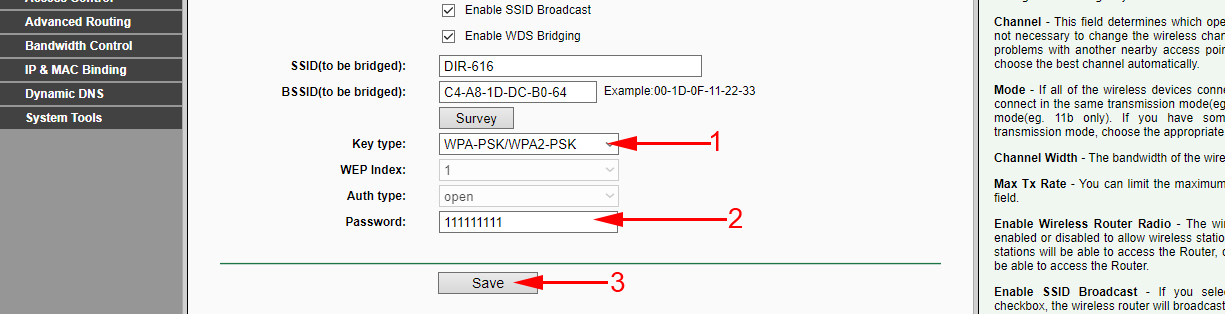
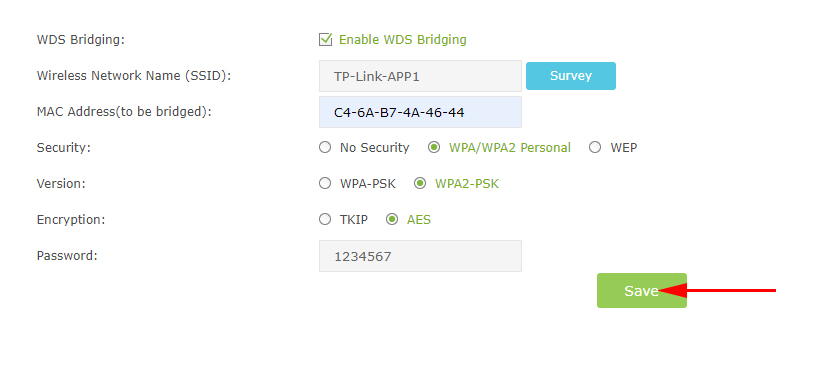
4 We only need to select the security type of your network (the one we are connecting to) in the Key type drop-down menu. And in the Password field specify the password for this network. To save, click on the Save button.
Reboot the router. By turning off the power, and turning it back on, or in the control panel by clicking on the “click here” link.
5 After rebooting, go into settings again. And right on the main screen (Status tab), look at the Wireless section. In front of the WDS Status, it should say Run.
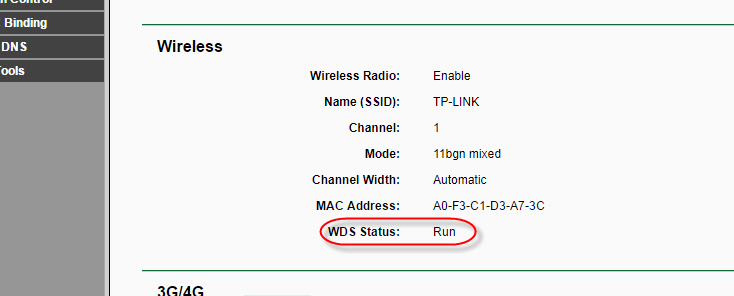
This means that our Tp-Link is already connected to the main router. And it should be distributing Internet via Wi-Fi and cable. The configuration is complete.
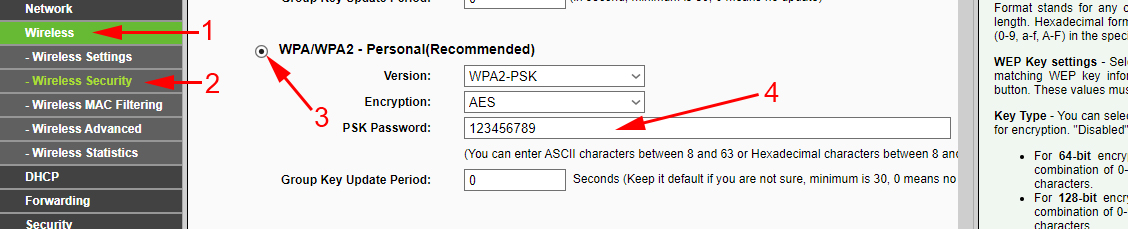
6 Don’t forget to put a password on the Wi-Fi network, which will be distributed by the router we have configured. You can see detailed instructions on how to secure Wi-Fi on Tp-Link. Everything is simple there. In the settings, on the Wireless tab – Wireless Security, select WPA/WPA2 – Personal(Recommended), in the Wireless Password field set a password (minimum 8 characters), and click the Save button below.
Now the Tp-Link router receives Internet from the main router and distributes it further. Choose the right place to install the second router so that it is within range of the main router.
Configuring Wireless Bridge (2.4 GHz and 5 GHz) on the new firmware version
I decided to update this article and add actual information on configuring WDS on TP-Link routers with new firmware. Which is in blue colors. Everything is configured a bit differently there. Let me show you.
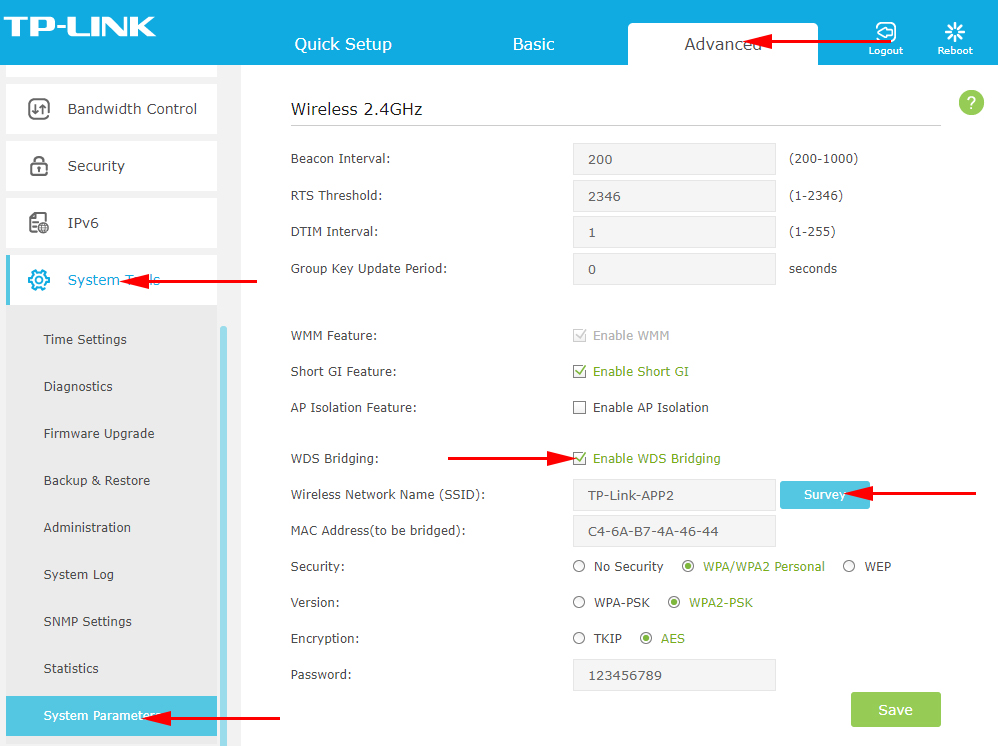
If you have a router with a new control panel, you need to go to “Advanced Settings” – “System Tools” – “System Settings”. If you have a dual-band router, there you will see the option to configure dual-band bridge mode. At 2.4 GHz and 5 GHz.
1 Check the box “Enable WDS bridge” near the desired frequency. I, for example, checked the box next to 2.4 GHz. Click on the “Search” button
2 Select the network you want to connect to from the list. Just click “Select” next to your network. I think you will have no problem finding your network in the list of available networks.
3 If necessary, you can change the security settings (Security, Password) and click on the “Save” button. If you are going to set a password, choose “WPA-PSK/WPA2-PSK”. You can also leave the network without password. If necessary.
The router will connect to another router via Wi-Fi and will receive the Internet via wireless network.
If you need to disable the DHCP-server, you can do it on the tab “Advanced Settings” – “Network” – “DHCP-server”.
If the Internet via cable does not work in WDS mode
If you perform the settings that I showed above, then the Internet will work only over wi-fi, and when you connect to the router (which is in WDS mode) by cable, the Internet does not work. With no internet access. This is certainly not the case, and using the router as a wi-fi network receiver, for example, will not work. So, I wrote a question to TP-LINK support, and they answered me.
When setting up the WDS function, you get IP addressing from the original router (the device to which the WDS-client is connected) both over a wired and non-wired network. To properly configure this feature, you need to be sure to disable the DHCP server on the equipment on which the WDS-bridge is configured. You also need its local IP address to be on the same subnet as the original router.
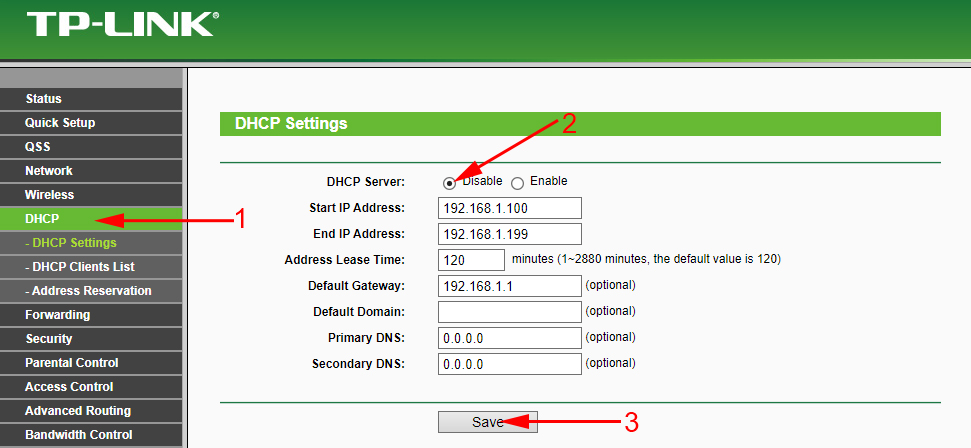
I checked everything on the TP-LINK TL-WR740N, and indeed, after disabling the DHCP server, the internet worked immediately over the network cable. Disabling DHCP is not difficult at all. In the router settings, open the DHCP tab, set the switch near Disable, and save the settings.
Reboot the router, and everything works fine. I immediately got Internet via cable. In the settings of this router you can go to the address that we set on the second step. I have it 192.168.1.2.
Update. One more solution to the problem when WDS connection is established, but there is no access to the Internet. In the DHCP server settings on the router that we are configuring in WDS mode, you need to specify the LAN IP address of the main router as “Default Gateway”. 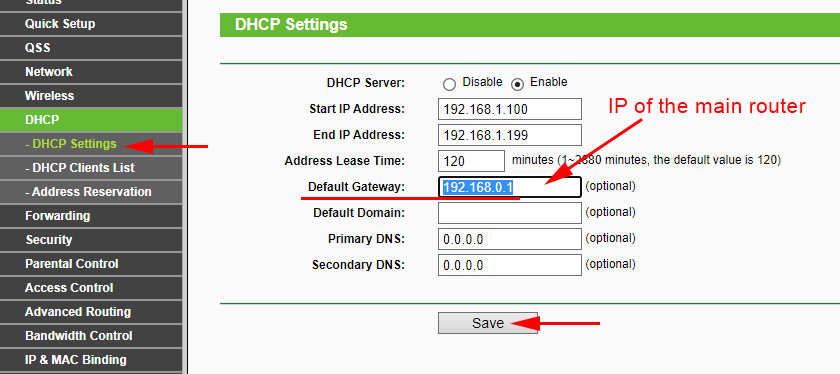 If it doesn’t work, try to set the IP address of the main router as DNS-server.
 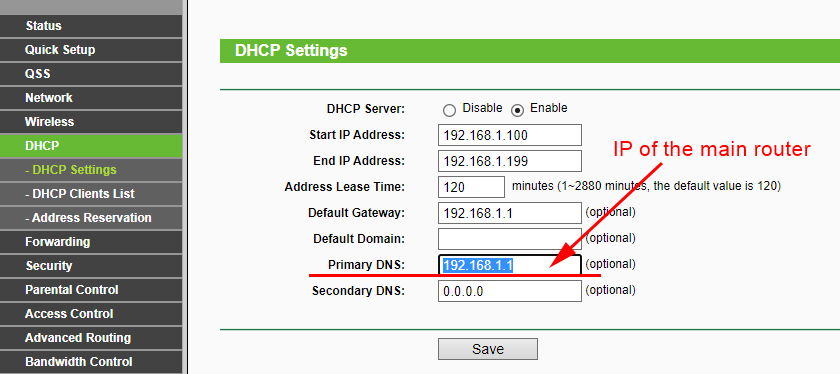 Save the settings and reboot the router.
If you cannot configure WDS connection
Update. There is often a situation when the router does not want to connect in bridge mode. The reasons, of course, can be many. In the comments Eduard suggested one interesting solution – disabling the WPS function on both routers. If you have problems in configuring WDS mode, you can try it. Especially since not many people use WPS connection and it is often recommended to disable this feature for security reasons and other wireless network problems. On TP-Link routers it is not difficult to do it. In the WPS (or QSS) section you just need to disable this function. 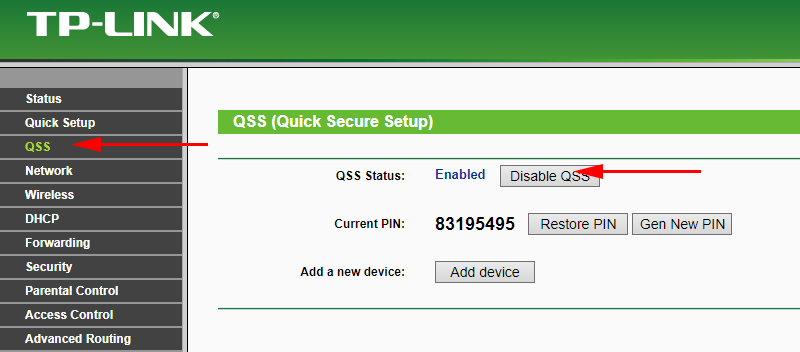 And in the new firmware.
 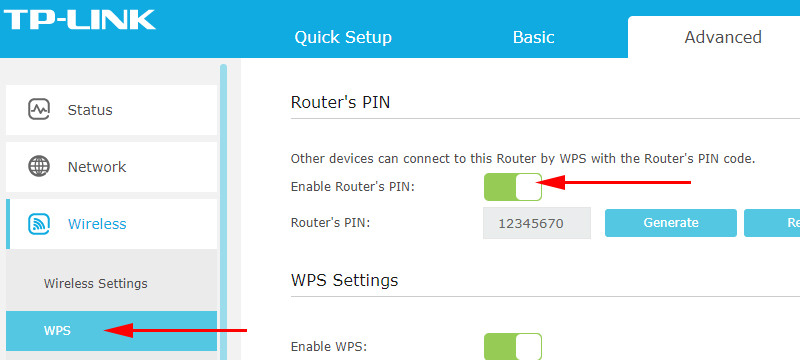 You need to disable it on both routers. On the main router, and on which we are trying to configure connection in bridge mode.
 How to Change the Wi-Fi Password on the TP-Link M5250 and M5350 Router
  TP-Link RE650 Review and Setting-A PowerFul, Two-Band Wi-Fi Signal
  Review TP-Link AC750 RE210. Two-Band Wi-Fi Amplifier
  How to Connect TP-Link TL-WR740N (TL-WR741ND)