
TP-Link Archer C20i Router Settings
Friends, specially bought a router Tp-Link Archer C20i (AC750) to see what kind of model it is, and tell you how to configure it. As it turned out, a good router, quite for a normal price. The main feature of Tp-Link Archer C20i (photo, review and reviews here), which we will now customize, is that it is dual-band. That is, it broadcasts two Wi-Fi networks: one at the familiar 2.4 GHz frequency and the other at 5 GHz. This is probably the most affordable dual-band router from Tp-Link.
There is also a USB connector for connecting flash drives and printers, to which you can organize shared access from the network. But about it in separate articles. By the way, I don’t understand why, if there is a USB connector, you can’t support 3G/4G USB modems.
I liked Archer C20i except for the case, or rather its front part. It is made of glossy black plastic. I haven’t had time to remove the film from it yet, as dust has already stuck to it, and I don’t even want to talk about fingerprints 🙂 But if you wipe the router and don’t touch it, it looks pretty. Separately I want to note the blue, not very bright indicators. On the black glossy panel they look cool.
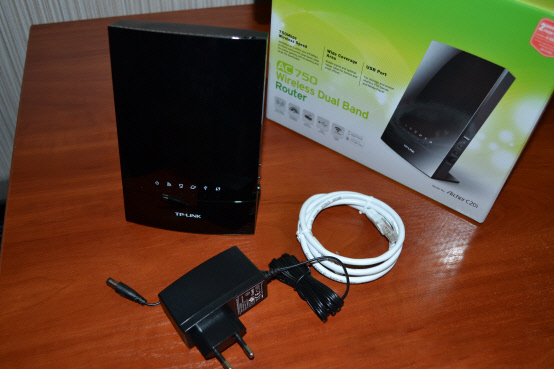
Tp-Link Archer C20i package
- The router itself.
- A white, beautiful network cable for connecting a computer, TV, etc.
- Power adapter.
- Various papers and a disk with a program for configuring Archer C20i.
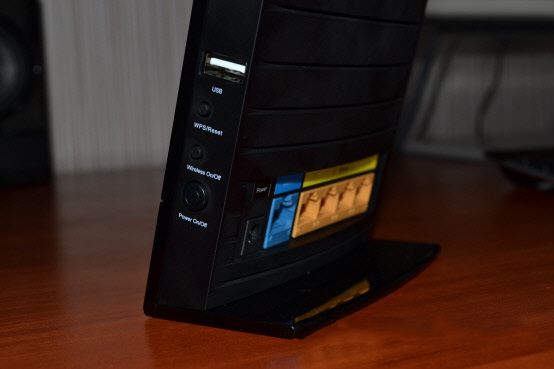
Controls and connectors
On the back side you will see 4 LAN connectors, 1 WAN connector, and a power connector. On the side panel you will find 1 USB connector, a power on/off button, a separate button for turning on/off the Wi-Fi network, and a combined button for turning on/off the Wi-Fi network. Wi-Fi network, and a combined WPS/Reset button (by pressing it for 10 seconds you can reset the Tp-Link Archer C20i).
That was a short review and my review. Let’s move on to the main part of this article, the configuration of our Archer C20i.
Connecting the Tp-Link AC750 Archer C20i router
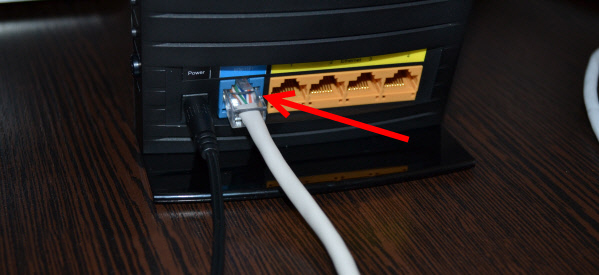
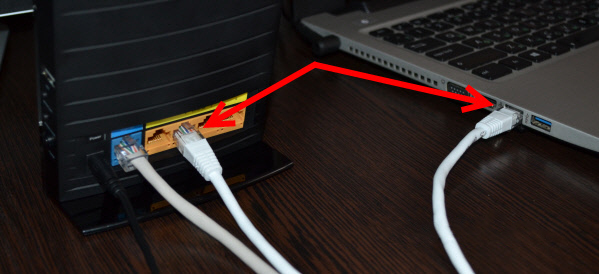
First of all, connect the power adapter to the router, plug it into a socket, and turn on the power with the button on the side of the device. The LEDs should light up. Next, plug the Internet into the blue WAN socket (it is labeled as Internet). Cable from our Internet provider or ADSL modem.
If you are going to configure the router from your computer via cable, just connect your computer or laptop to Archer C20i using the cable that comes with it.
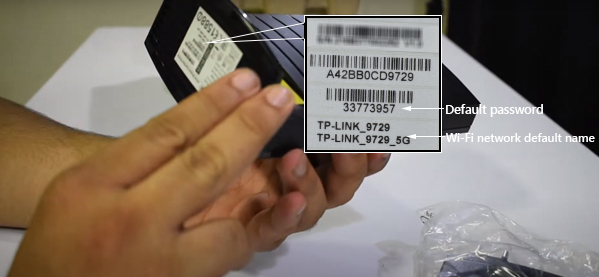
If you want to configure the router wirelessly, then connect to the Wi-Fi network that will appear after turning on the router. It will have a standard name, for example: “TP-LINK_9729”. Let me remind you that there can be two networks, the second one will have “5G” at the end of the name. But, not all devices see 5GHz networks (wrote about it here). By default, the Wi-Fi network is secured. The password is listed at the bottom of the router, on the sticker. The name of the wireless network is also listed there.
If you want to configure your router from a mobile device, you can do it using the TP-LINK Tether branded program.
Entering the Archer C20i control panel and setting up the Internet
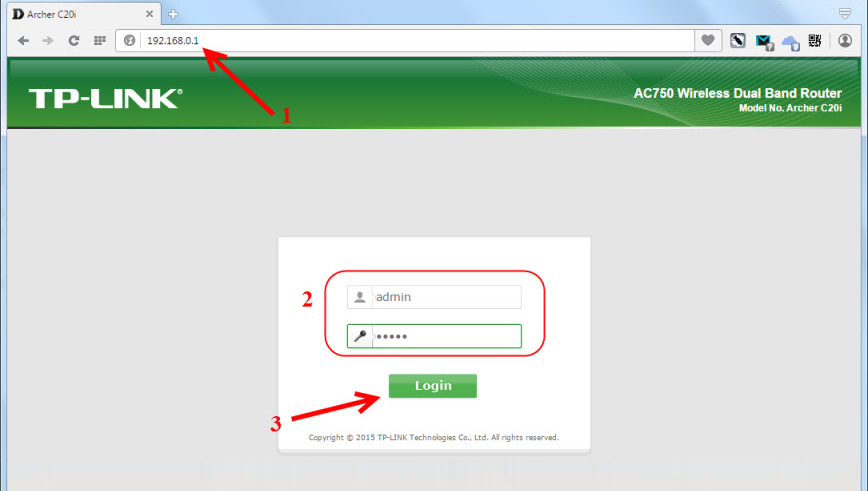
Open any browser and go to http://tplinkwi-fi.net, or 192.168.0.1. You will be prompted for a username and password (if you are connected to the router). By default, these are admin and admin (these data are also listed at the bottom of the router). The control panel will open, where we will configure the router. If you can not get into the settings, then see these instructions.
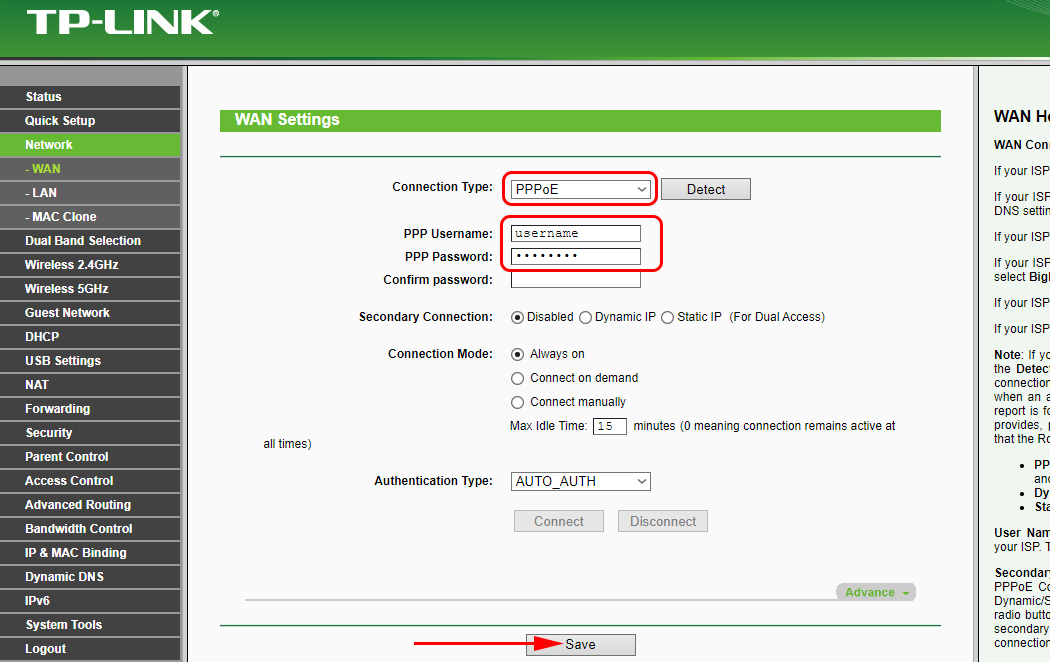
Configuring the connection to the Internet provider (WAN)
In the settings go to the Network – WAN tab. In the Connection Type drop-down menu we need to select the connection type: Dynamic IP, Static IP, PPPoE, L2TP, PPTP.
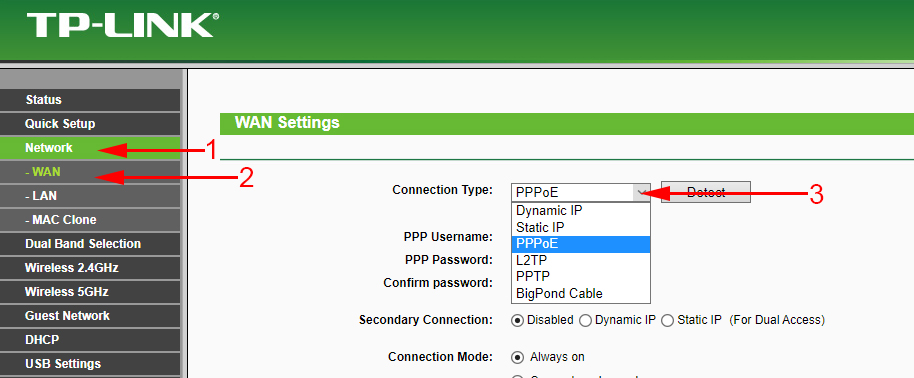
Depending on the selected connection type, we will need to set the necessary parameters that are provided by the ISP. Only if you have Dynamic IP, you don’t need to configure anything else. Just save the settings and everything will work.
If you have a popular type of connection PPPoE, you will need to set at least a username and password. And press the Save button.
If your provider binds you by MAC-address, you need to clone it.
Only after you have working internet through the router, you can move on to the next settings.
Wi-Fi setup and password setting on Tp-Link Archer C20i
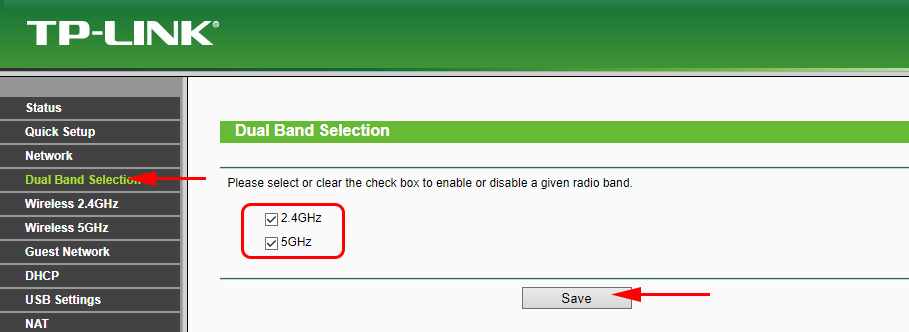
Since the router is dual-band, you need to configure Wi-Fi network and protection for the 2.4 GHz and 5 GHz bands separately. Or just disable one of the Wi-Fi networks. If you don’t need a wireless network at 5 GHz for example. To do this in the settings you need to go to the Dual Band Selection tab. Uncheck the network you want to disable and click Save.
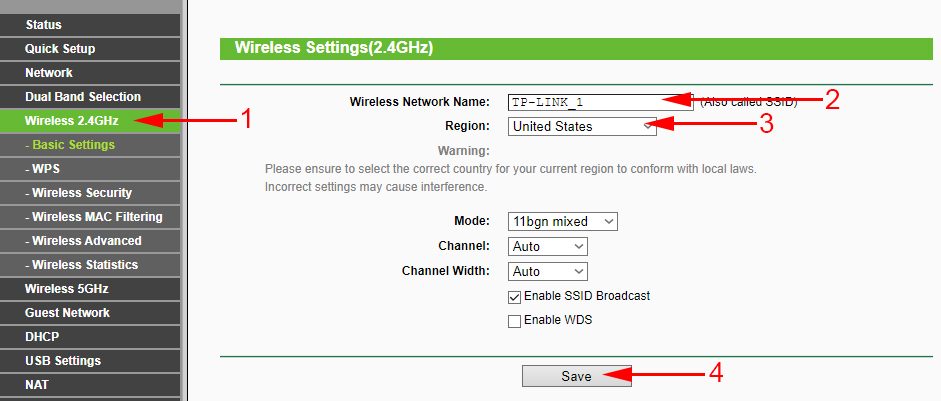
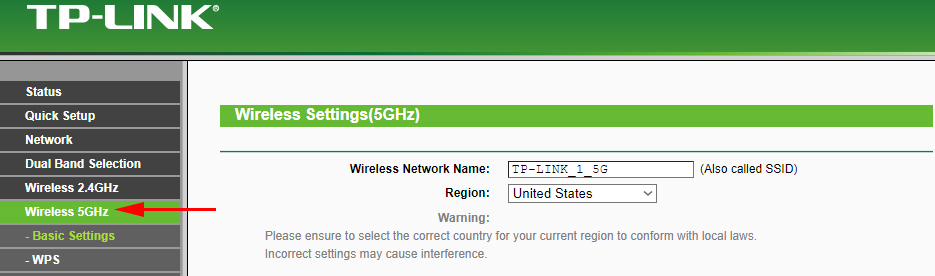
Let’s configure the Wi-Fi network. Let’s change the name of the network and set the password. To do this, go to the tab of the network you want to configure. First, let’s configure the network at 2.4GHz. Open the Wireless 2.4GHz tab. In the Wireless Network Name field specify the name of the wireless network. Specify your region and save the settings.
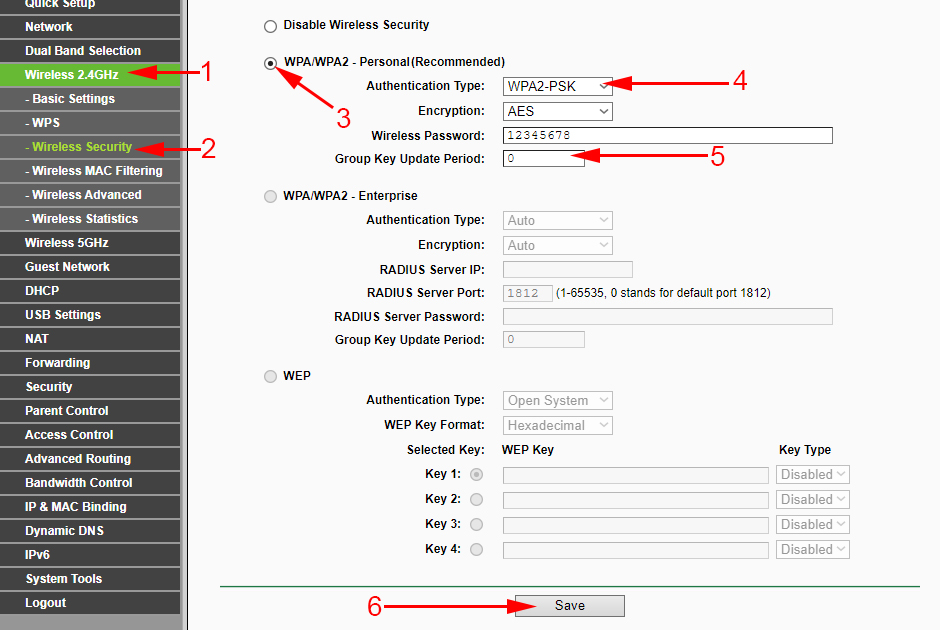
Go to the next tab Wireless Security to set the wireless network password. Choose the WPA/WPA2 security type – Personal(Recommended), set all the parameters as on the screenshot below, and in the Wireless Password field make up and write down the password. It should be at least 8 characters long. You can use English letters and numbers. Memorize or save the password you set so that you don’t forget it. Click Save to save the settings.
If you have not deactivated the 5 GHz network and will use it, you need to make the same settings for it. Change the network name and set the key. This is done on the Wireless 5GHz tab.
The wireless network has been configured and protected with a password.
Protecting the router settings with a password (change admin)
I have already written how to change the default admin password, which is used to protect router settings. Let’s consider it on the example of Tp-Link Archer C20i. In the settings you need to open the System Tools – Password tab.
There you need to specify the old username and the old password (let me remind you that by default it is admin). And you need to specify a new username (you can leave admin), and you need to specify a new password twice. To save, click on the Save button.
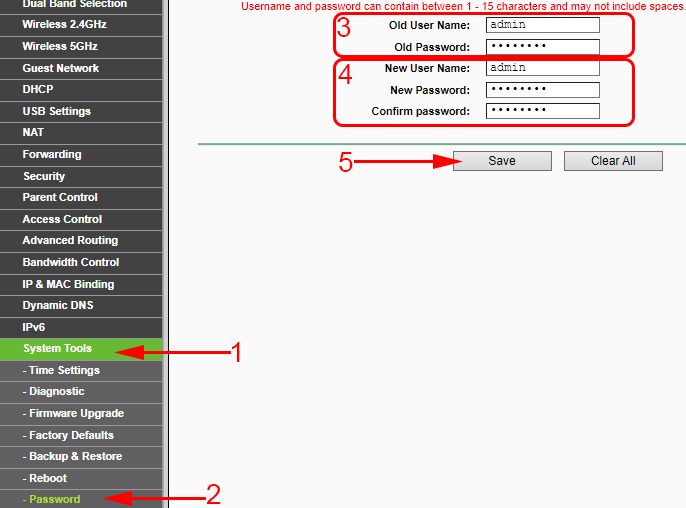
Now when logging into the control panel, you will need to specify a new password. And try not to forget it, or you will have to reset the settings to factory defaults.
Afterword
I have written only about the most important settings, which must be done without fail, and which are enough to use the router. Of course, there are a lot of settings. And they can not be considered in one article. Many instructions on routers Tp-Link you will find in a separate section on our site: /tp-link/. All of them will fit Tp-Link AC750 without any problems.
If you want to update the firmware of Archer C20i, for example, you can do it according to the standard instructions, which can be found here.
I would be grateful if you could share your review about Tp-Link Archer C20i router in the comments. And ask questions if you are interested in something, or if you are not able to configure it.
 192.168.0.254: Admin/Admin, Entrance, Setting, TP-Link Page sores not open
  tplinkrepeater.net and tplinkextender.net - Admin Password, Entrance to the Repiter Settings
  Cloud Swivel Wi-Fi Camera TP-Link NC450-REVIEW and Reviews
  Review TP-Link Archer Mr400-Two-Band Wi-Fi Router with A Built-in LTE Modem