
Setting Wi-Fi Router TP-Link Archer C20 (AC750)
Today we are going to configure TP-LINK Archer C20 router. This is a dual-band Wi-Fi router, which is very similar to the Archer C20i model in terms of specifications and price. They are practically the same devices, only in different housings. As for the setup process, everything is simple. We will consider the configuration of the router through the control panel. You can also configure the router from a smartphone or tablet. Through a browser, just like from a computer, or through the TP-LINK Tether app.
I wanted to configure this router through the quick setup wizard, where you can set the necessary parameters step by step (connection to the provider, Wi-Fi network configuration), but I failed. As soon as I finished the configuration, an error appeared that I did not set the parameters for connecting to the Internet via 3G/4G modem. But in the process of configuration, I turned off this item, as I do not have a modem.
In my case, the router settings were immediately in English. After the firmware update, the control panel became clearer. It is much easier to configure. If you want, you can update the firmware of the router at once. The update process itself was no different from other TP-LINK models. Therefore, you can watch this instruction. And if you don’t want to do it, you can configure the English version. True, the latest update adds a lot of new features and improvements. For example, support for 3G/4G modems.
Connecting TP-LINK Archer C20 router
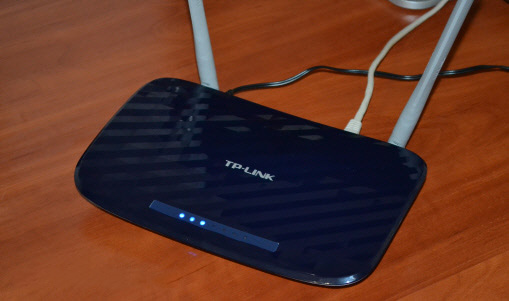
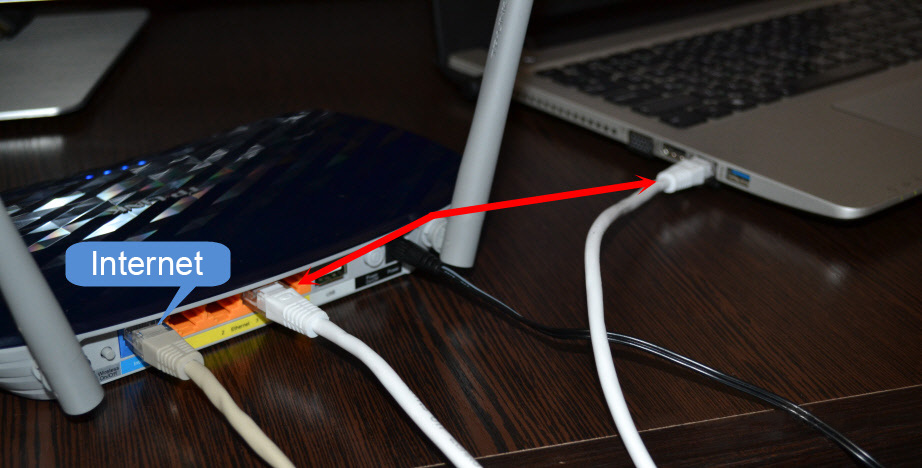
Here everything is according to the standard scheme. First, connect the router to the mains and turn it on so that the indicators on the front panel light up. Next, we connect the cable from our Internet provider or ADSL modem to the Internet port (it’s blue).
If you want to configure the router by network cable, connecting it to a PC or laptop, then take the network cable that comes with the kit, and connect your computer to the router. If possible, I advise you to configure it via cable. It is more reliable, and you can avoid many confusing moments.
If you want, you can connect to the router via wi-fi. After switching on, your devices should detect a Wi-Fi network with the factory name. To connect to this network you should use the password (PIN-code), which is indicated on the sticker at the bottom of the Archer C20 router. The standard names of Wi-Fi networks are also indicated there.
Entering the control panel
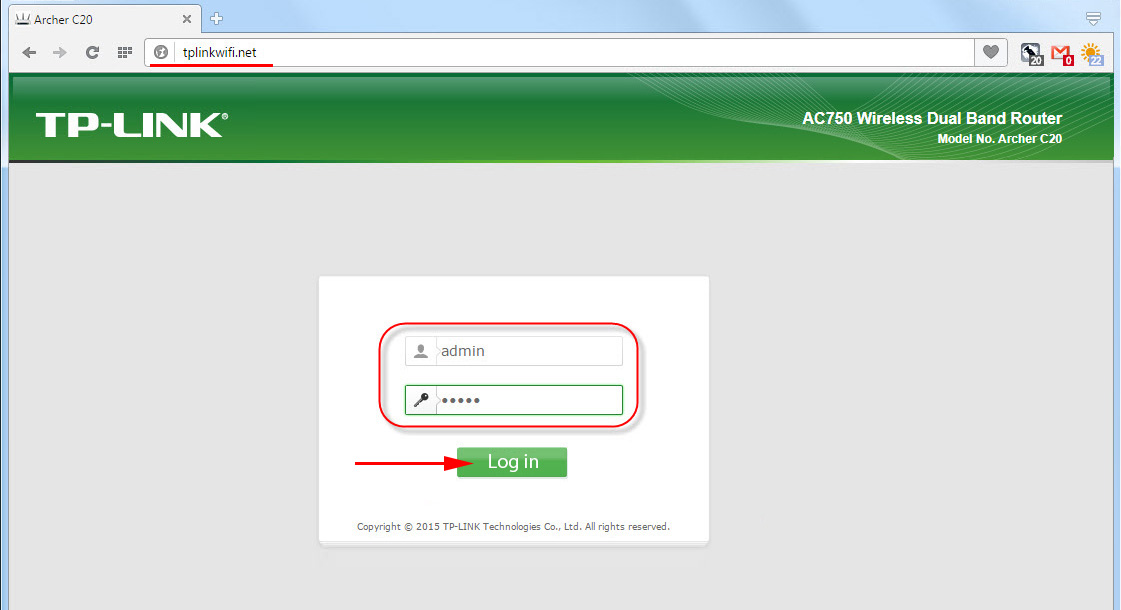
To enter the settings of TP-LINK Archer C20 router, it is enough to open any browser on the device connected to the router and go to the address tplinklogin.net. The authorization page will appear, where you need to specify your username and password. By default – admin and admin. The address for entering the settings and other factory parameters are also indicated on the sticker at the bottom of the router.
After that the page with router settings should open. Where we will set all the necessary parameters.
TP-LINK Archer C20: configuring Internet connection
In setting up any router, the main thing is to choose the right type of connection to the Internet, and set the necessary parameters. That the router would be able to establish a connection with the Internet provider. It is here that most people encounter the problem when devices are connected to the router, but the Internet does not work. Without access to the internet. This is all precisely because of improper internet settings.
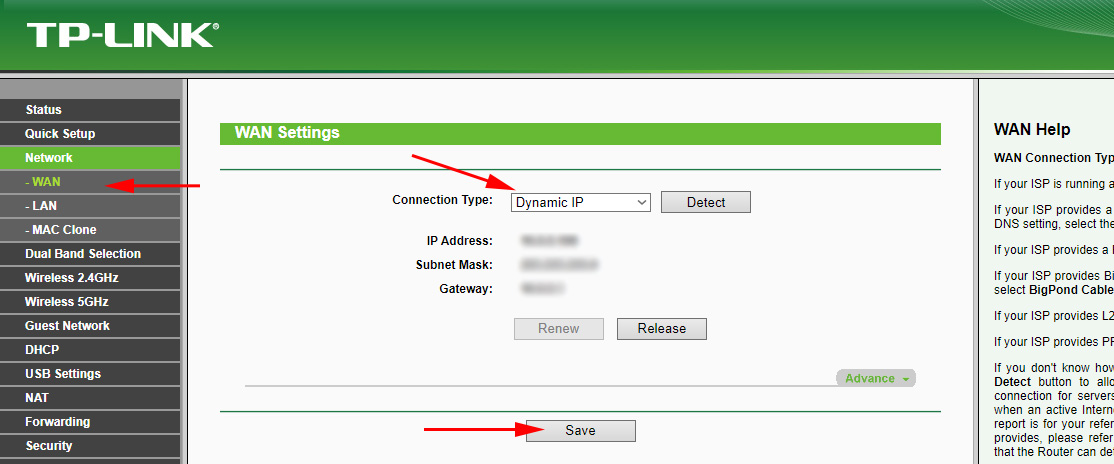
Before proceeding further, you must know the type of internet connection your internet service provider is using. And if it is not “Dynamic IP”, then you should have at least a login and password. These are issued by your internet provider.
In the settings, go to the “Network” – “WAN” tab. Here, the first thing you need to do is to select the type of connection. I have, for example, Dynamic IP. If you have the same method of connection, you do not need to choose anything, it is set by default. And the Internet through the router should already work, and the indicator on the router should be blue, not orange. The only thing is that if you have “Dynamic IP”, the provider can make binding by MAC-address. If the router does not connect to the Internet, then clarify this issue with the provider.
And if you have PPPoE, or L2TP, then choose the appropriate type of connection in the menu, and set the necessary parameters, which you were given by the provider. If anything, you can call the provider’s support and ask them for all the information about the configuration.
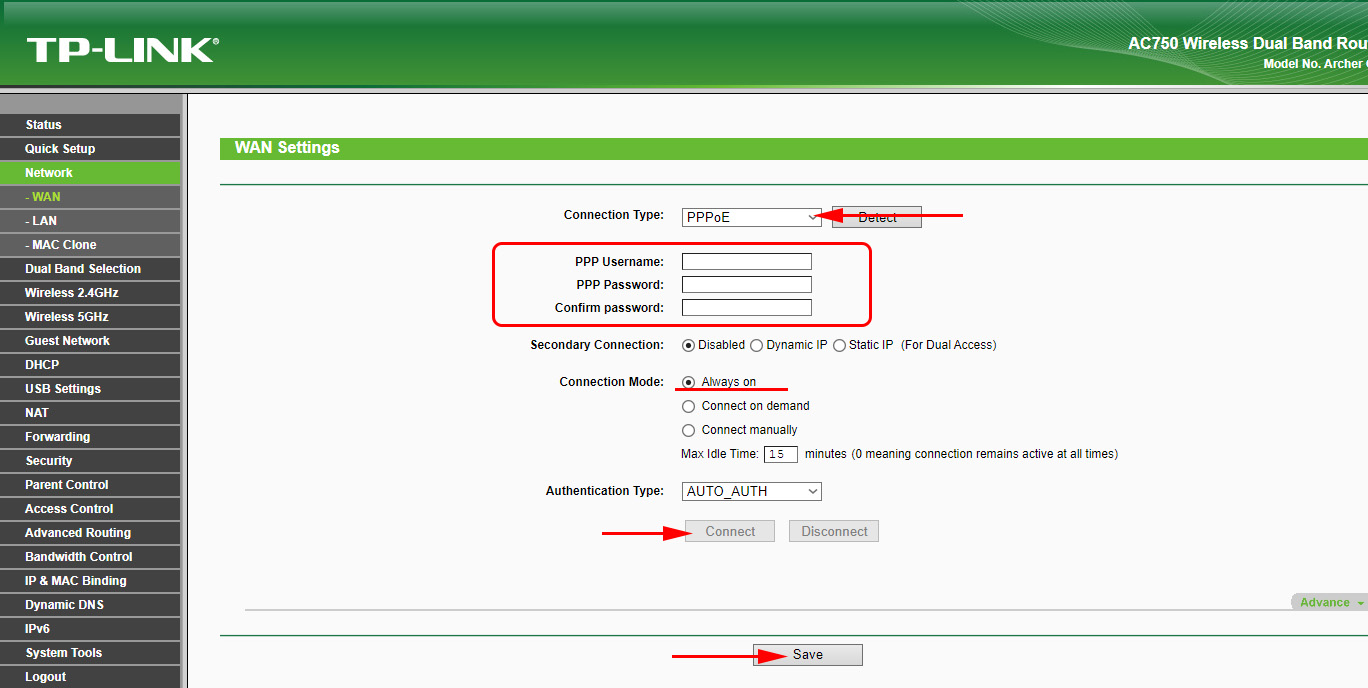
There is also a button “Detect”, clicking on which the router will try to determine the type of your Internet connection.
It is necessary for the Internet to work through our TP-LINK Archer C20. The “Internet” indicator should be blue.
If no way to configure, then read another article: when configuring the router writes “No Internet access” or “Limited” and no connection to the Internet. Well, if the Internet is already working, then you can move on to the configuration of the Wi-Fi network.
Setting up Wi-Fi and setting the password on TP-LINK Archer C20
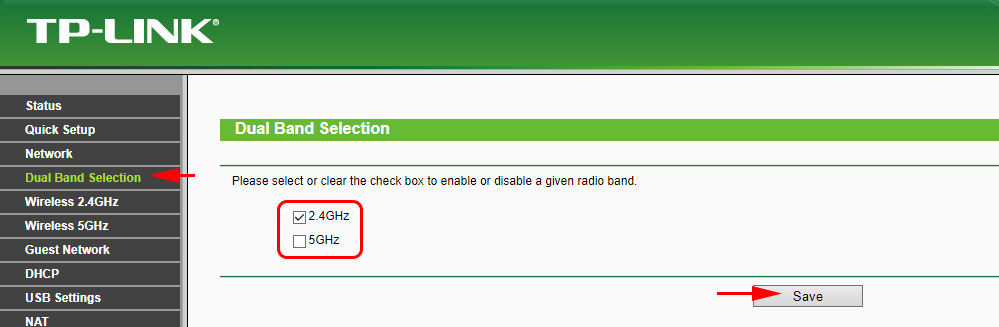
Since this is a dual-band router, it broadcasts two Wi-Fi networks. One at 2.4GHz and the other at 5GHz. If you don’t need either network, I suggest going to the “Select Operating Frequency” tab, and disable the network on the frequency you don’t need. Just uncheck the box and save the settings. Or you can leave both networks. For example, connect older devices to 2.4 GHz, and new devices that support, to wi-fi 5 GHz.
Next, go to the tab Wi-Fi network, which we need to configure. Set the name of the network, and choose your region.
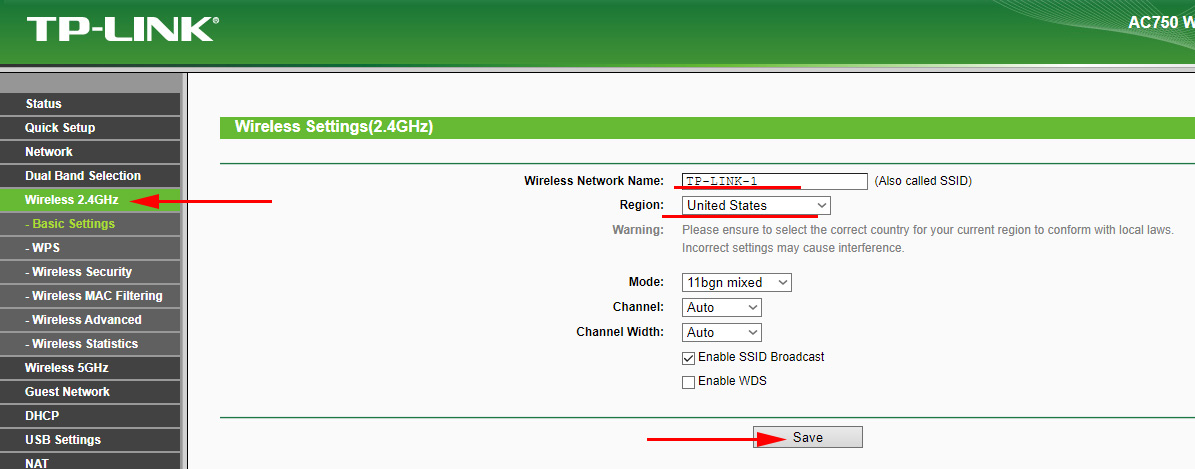
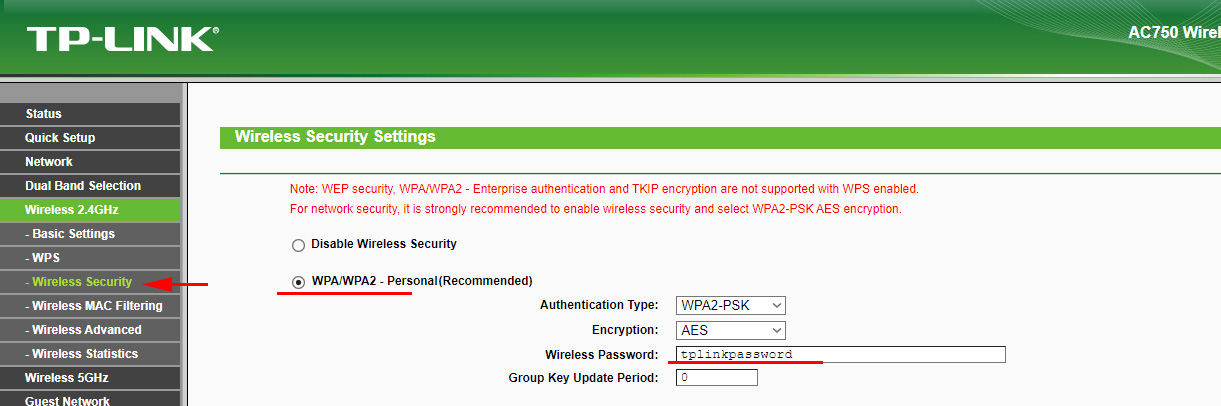
Don’t forget to save the settings. The next step is to set a password for the Wi-Fi network. Go to the “Wireless Security” tab. Set the settings as in the screenshot below, and in the “Wireless network password” field set the password that will be used to connect to your network. Save the settings, and reboot the router.
If you have connected some devices to the wireless network before setting up Wi-Fi, then after changing the password and rebooting the router, you will need to reconnect them, already specifying a new password.
This completes the configuration of the wireless network.
Changing admin password
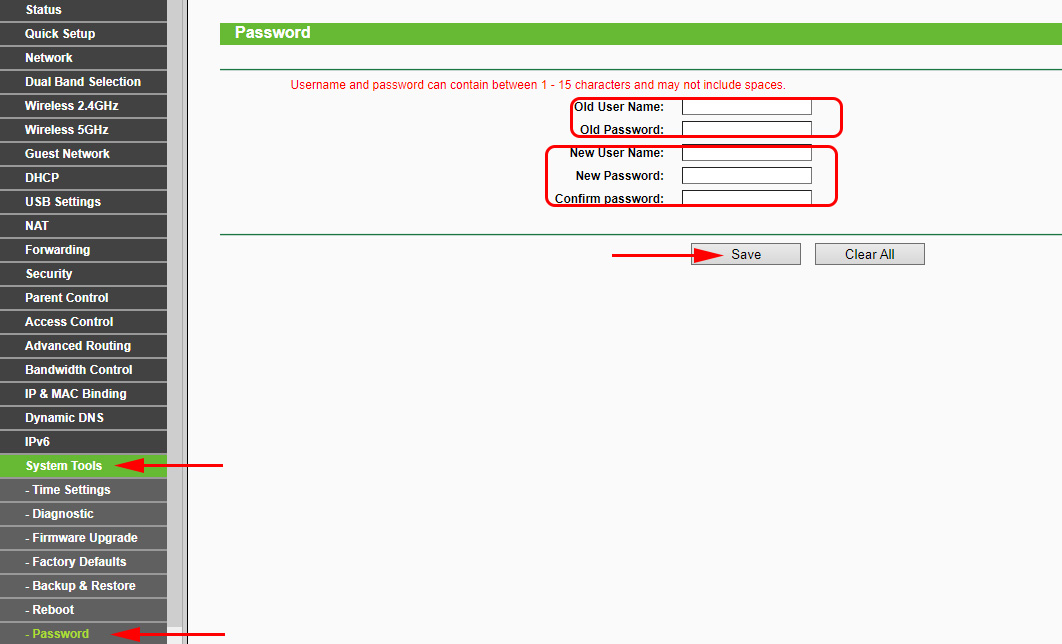
I strongly recommend changing the factory admin password, which is used to protect the router settings. You can do it on the “System Tools” – “Password” tab. Just specify the old password and username, and the new data. Save the settings.
Just try not to forget the set password, or you won’t be able to enter the control panel, you’ll have to do a reset and set up your TP-LINK Archer C20 again.
That’s all, you can use your router.
Afterword
The settings we have set are enough to use the router. You may want to configure some other features. We have a lot of instructions on our site, if you don’t find the one you need, ask in the comments, I’ll give you a hint.
And if you have any problems while configuring TP-LINK Archer C20 router, you can leave your questions in the comments. Although, I think, you’ve got it all worked out. I got the router working without any problems, and immediately began to give out the Internet. All the best!
 TP-Link: Wi-Fi does not work. The Router Does Not Give Out Wi-Fi Network
  Roter Firmware TP-Link TL-WR1043ND and TP-Link TL-WR1045ND
  Router TP-Link TL-WR940N (V3): Review and Reviews
  Indicators (Light Bulbs) On the TP-Link Router. What Shoup Burn, Blink and What Do they Mean?