
Setting up the router tp-Link TL-WR841N. Connection, Internet Setting and Wi-Fi
Now we are going to connect and configure Tp-link TL-WR841N Wi-Fi router. If you have a TL-WR841ND model, then this instruction will also work for you. Let’s consider the whole process of connecting the router, setting up the Internet, Wi-Fi network and setting up the password for the Wi-Fi network.
All this with photos, and a detailed description. So you should have no problems with setting up the router Tp-link TL-WR841N. Just follow the instructions.

A few words about Tp-link TL-WR841N (TL-WR841ND). A very successful model of Wi-Fi router, which is very popular. Indeed, a successful model, with an excellent price/quality ratio. It seems to me that for home use, an undemanding user can’t find a better router. I myself, in practice, checked the work of Tp-link TL-WR841N. It has been working perfectly for more than five years, gives Wi-Fi to a large number of devices. It works very stably, I can’t even remember that once it lost the Internet, or something else. You can read more about Tp-link TL-WR841N on this page. There you will find a small review and my review.
If you have already bought this router, then it’s time to move on to the configuration. Let’s do everything according to this scheme:
- Connecting the Tp-link TL-WR841N router.
- Setting up the Internet connection (WAN).
- Setting up Wi-Fi network on TL-WR841N.
- Setting password for Wi-Fi network protection.
- Changing the admin password that protects the router settings.
Connecting Tp-link TL-WR841N
Connect the power adapter to the router and plug it into the socket. If the LEDs on the router do not light up, then turn on the power using the button on the back panel.
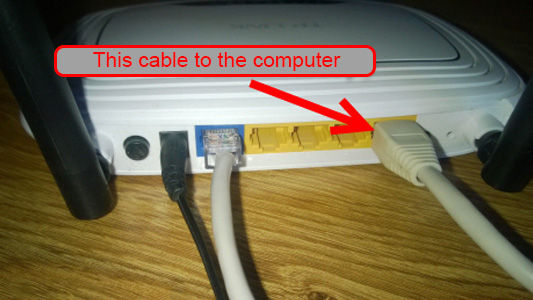
If you will configure the router by cable (which comes in the kit), connecting it to a computer or laptop, then take the network cable, and connect the computer with the router. On the router, connect the cable to the LAN connector (one of the 4):
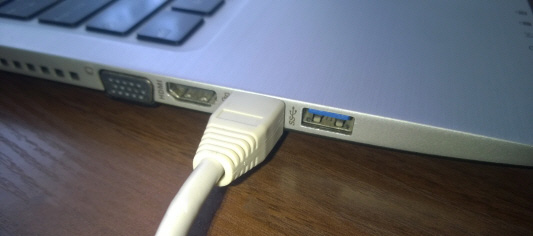
Plug the other end of the network cable on the computer into the network card connector:
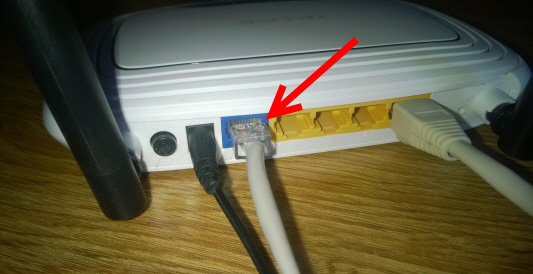
Further, to the router, in the WAN connector (it is blue) you need to connect the cable of your Internet provider, or from ADSL modem.
Connection and configuration via Wi-Fi network
If you want to configure the router by wi-fi, and not by cable connection, it is enough to connect to the Wi-Fi network, which will appear immediately after turning on the power on the router Tp-link TL-WR841N. The network will have a standard name (something like this: “TP-LINK_084313”) and will be unprotected.
You can even connect to this network from your tablet or phone and configure the router without a computer.
Internet must be connected to the router. And your computer, tablet, laptop, etc. must be connected to Tp-link via cable or wi-fi. The power of the router should be on. If everything is ready, then you can move on to the configuration.
Configuring Tp-link TL-WR841N router
We need to enter the settings of the TL-WR841N router. To do this, open any browser on the computer to which it is connected and in the address bar go to 192.168.1.1 or 192.168.0.1. You should be prompted for a username and password. Specify admin and admin (the default password and username). By the way, this information is listed at the bottom of the router on the sticker. Here’s more just in case, detailed instructions on how to enter the settings on Tp-link.
The router settings will open.
Internet (WAN) setup
The most important thing is to configure the router to work with your Internet provider. If you don’t do this, or do it incorrectly, the Internet through the router will not work. Wi-Fi network will appear, but without access to the Internet.
In the settings, go to the Network – WAN tab. In the WAN Connection Type drop-down list, we need to select the type of connection your Internet provider uses. This can be: Dynamic IP, Static IP, PPPoE, L2TP, or PPTP. I have Dynamic IP for example, so I chose that. To save the settings, click the Save button.
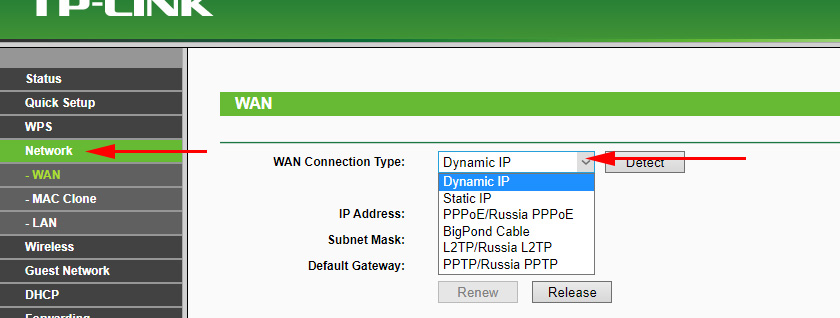
If you have Dynamic IP like me, you don’t need to set any parameters. Select, save, and the router starts distributing Internet.
Configuring PPPoE, L2TP, and PPTP
If your provider uses one of the above-mentioned connection methods, then choose the necessary one and set the necessary parameters that your provider should give you: username, password, IP-address. This depends on the type of connection you have chosen and the provider.
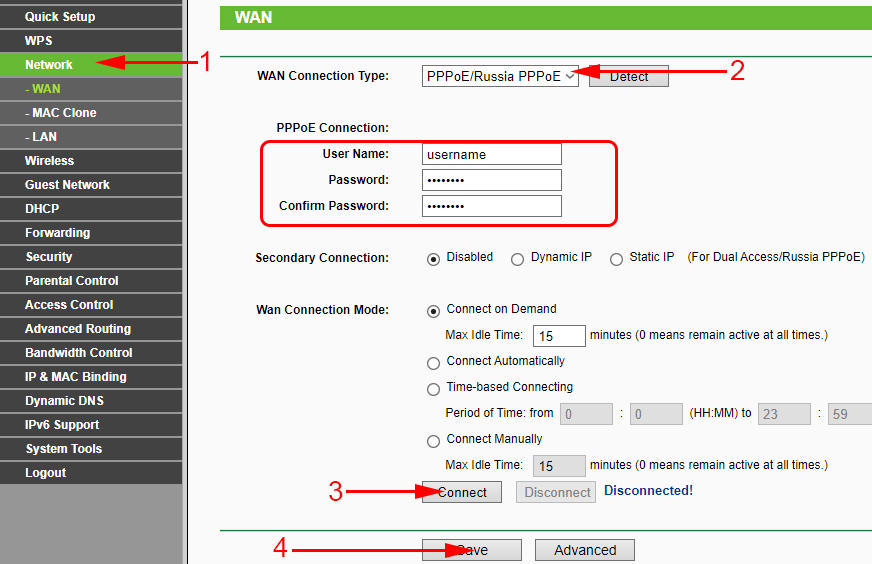
The main thing that you need to achieve from the settings on this page is that the Internet through the router would work. If the Internet works, then click on the Save button and continue. If you are unable to configure, call your Internet provider and ask him for all the information you need to configure the router.
It may be that the provider makes binding by MAC-address (you should check with the provider), in this case you can clone MAC in the router settings, on the Network tab – MAC Clone. Or, you can change the MAC address of the router there.
If you still can not make friends with the router with your ISP, then perhaps you will still useful article: When setting up the router writes “No Internet access”, or “Limited”.
And if the router is already connected to the ISP and gives out internet, then you can continue with the configuration.
Setting up Wi-Fi network and setting a password on Tp-link TL-WR841N router
To configure Wi-Fi you should open the Wireless – Wireless Settings tab on the settings page. On this page we need to write down the name for your wi-fi network in the Wireless Network Name field and select the country where you live in the Region drop-down menu. Leave the rest of the settings as I did in the screenshot below.
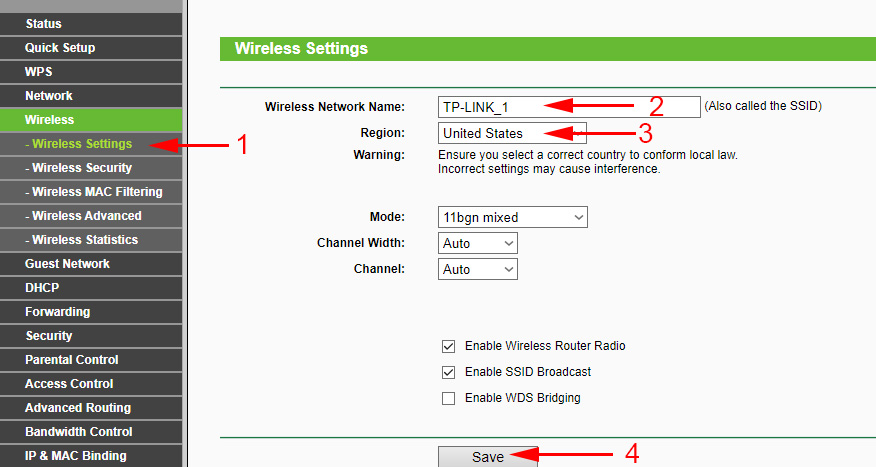
Don’t forget to save the settings by clicking on the Save button.
To password protect our wireless network, go to the Wireless – Wireless Security tab. There you should select the WPA/WPA2 security type – Personal (Recommended).
In the PSK Password field think up and write down the password that will protect your Wi-Fi network. You can read more about setting a password on your TL-WR841N router in this article.
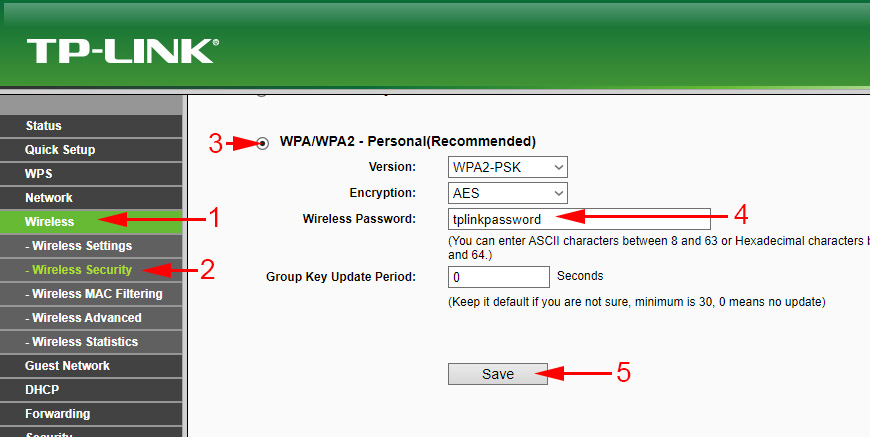
Save the settings by clicking Save.
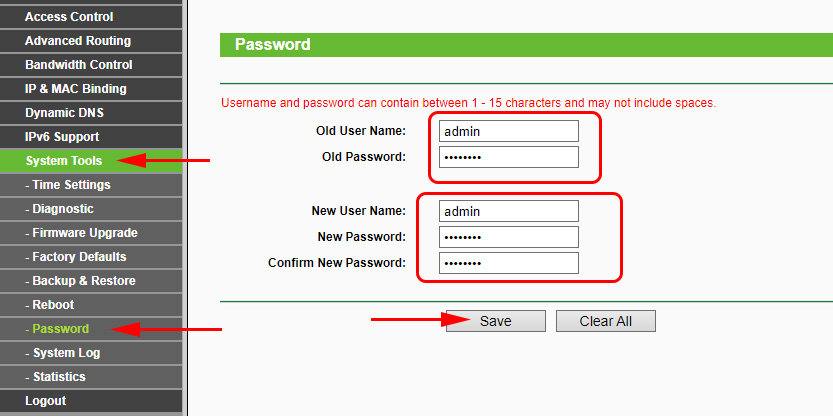
Change admin password. Protecting router settings
I have already written in a separate article about how to change the default admin password in the router settings. While we are in Tp-link TL-WR841N settings, let’s change the password that is used to protect the settings page. So that everyone who will connect to your network will not be able to enter the router settings and change them.
Open the System Tools – Password tab. First, specify the old username and password (admin by default). Then, below that, enter the new username (you can keep admin) and the new password. I recommend that you write down the password somewhere so that you don’t forget it. Save the settings with the Save button.
That’s all, the configuration of Tp-link TL-WR841N router is finished. All that’s left is to reboot the router. You can do it by turning power off/on or from the settings. On the System Tools – Reboot tab you should click the Reboot button.
After the configuration and reboot, the Wi-Fi network will appear, with the name that we set during the configuration process. And to connect to the wireless network, use the password, which we also set when configuring the router.
You can already connect your devices to the router. If you configured by cable, but want to connect via wi-fi, you can disconnect your laptop from the router and connect wirelessly.
I’ll leave a link to an article with a solution to a popular problem that I hope you haven’t encountered – “Connection is limited” in Windows 10.
Feel free to leave your feedback and questions in the comments!
 Review of the TP-Link Archer a7 Router
  How to Flash The TP-Link TL-WR841N (TL-WR841ND) Router?
  Router TP-Link TL-WR940N (V3): Review and Reviews
  Detailed Instructions for setting up the tp-Link Archer C6 Router