
Setting TP-Link TL-WR841ND: Connection, Wi-Fi, Internet, IPTV
Despite the fact that the TP-Link TL-WR841ND router has already been discontinued, I decided to prepare a detailed instruction on how to configure it. With photos, screenshots, and a detailed description of the configuration process. It should turn out to be a guide for dummies. Which, as it seems to me, will be useful not only for configuration, but also in the process of solving some problems with the router. Since this is a very popular router, I’m sure that this guide will be relevant for many years to come.
The TP-Link TL-WR841ND is indeed a very popular model. This router, together with its “little brother” TL-WR841N (which differs in fact only by its non-removable antennas) almost always occupied the top of sales in the most popular online stores. And their popularity is noticeable even by the instructions on this site and by the questions in the comments. This model has been updated and improved many times. There are 11 hardware versions. A really successful router with a good price/quality ratio.
As for setting up TP-Link TL-WR841ND, everything is very simple there. You can configure it from the disk that comes with it or through the web-interface. I’m going to configure it through the control panel (through the browser). As with any router, the main thing is to set the correct parameters for connecting to the Internet. Then, you need to configure the Wi-Fi network and preferably change the password to enter the control panel. If you have IPTV, you will also need to make some settings.
I will try to describe everything in as much detail as possible. In some cases I will give links to other useful articles. So as not to collect all settings (which many people will not need) on one page, and so that the instruction was not very large and confusing.
It is desirable to do before configuring:
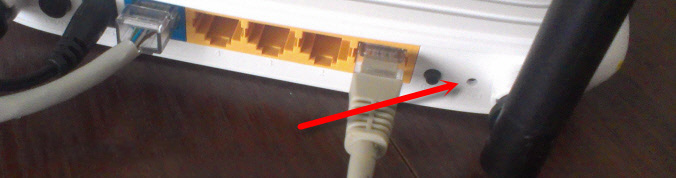
- If the router has already been configured, or you have already set some parameters, I recommend doing a reset. You need to press the Reset button (which is recessed in the case) for 10 seconds.
 This will delete all old and unnecessary settings.
 - It is also advisable to check for new firmware, and if it is available, then flash your TP-Link TL-WR841ND. How to do this, I wrote in a separate article: how to flash the router Tp-link TL-WR841N (TL-WR841ND).
How to connect TP-Link TL-WR841ND and enter the settings?
You can immediately connect the power adapter to the router, and plug it into a power outlet. If the lights on the router don’t light up, check if the power is on with the button near the power adapter socket.
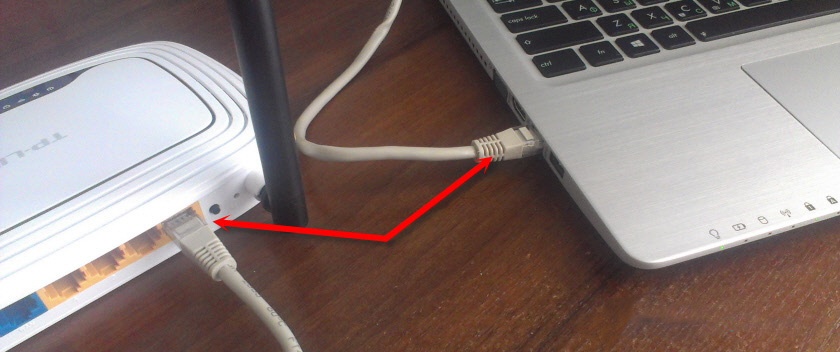
If you have a desktop computer, or a laptop, then I suggest setting up the router over a network cable by connecting it to the computer. Connect the TP-Link TL-WR841ND to your computer with the network cable that comes with it.
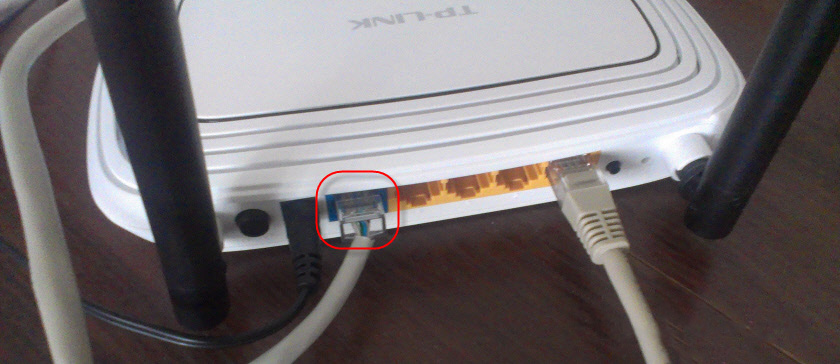
Then plug the cable from your Internet Service Provider, or ADSL modem, into the WAN port of the router.
Make sure you have connected everything correctly.
What should I do if I don’t have a computer/laptop?
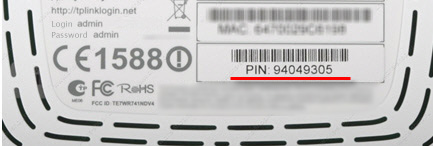
In this case, you can configure TL-WR841ND from your phone or tablet. It is clear that you can’t connect via network cable. That’s why you need to connect to the Wi-Fi network, which will be distributed by the router as soon as it is turned on. The factory name of the Wi-Fi network is indicated (though not always) on the sticker at the bottom of the router. If the network will be locked with a password, the password (PIN) is also indicated on the router itself.
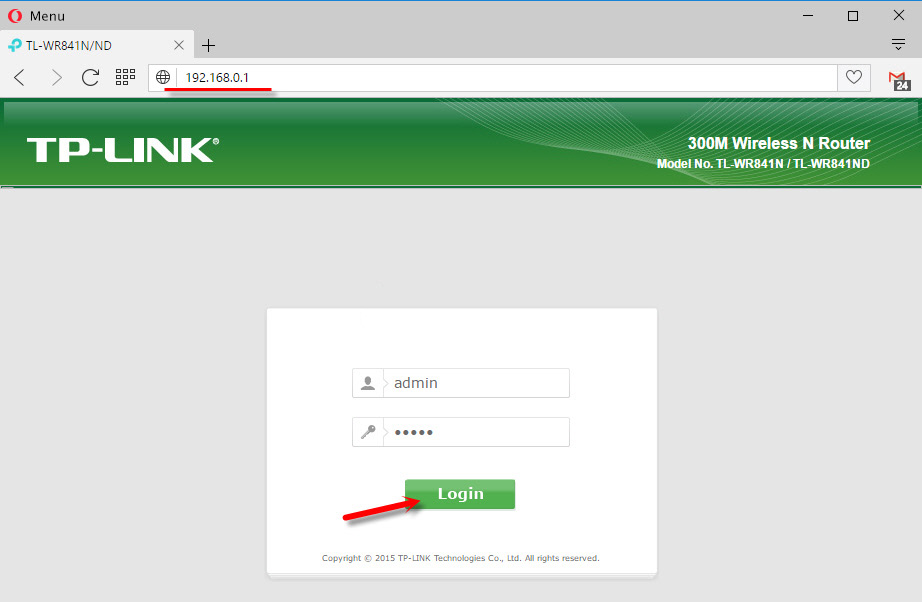
When everything is connected, sit down at the computer, or take a mobile device from which we will configure TP-Link TL-WR841ND, open any browser, and go to the address tplinkwi-fi.net. You can also open the settings at 192.168.0.1, or 192.168.1.1 .
The address may depend on the hardware version of the router. On the authorization page you need to specify login and password. The factory ones are admin and admin.
Articles that may be useful at this stage:
- How to enter the settings of the TP-Link router
- What to do if you can not enter the router settings on 192.168.0.1 or 192.168.1.1.
You can use the wizard ” Quick Setup” (Quick Setup) to configure the settings. You may find it more convenient.
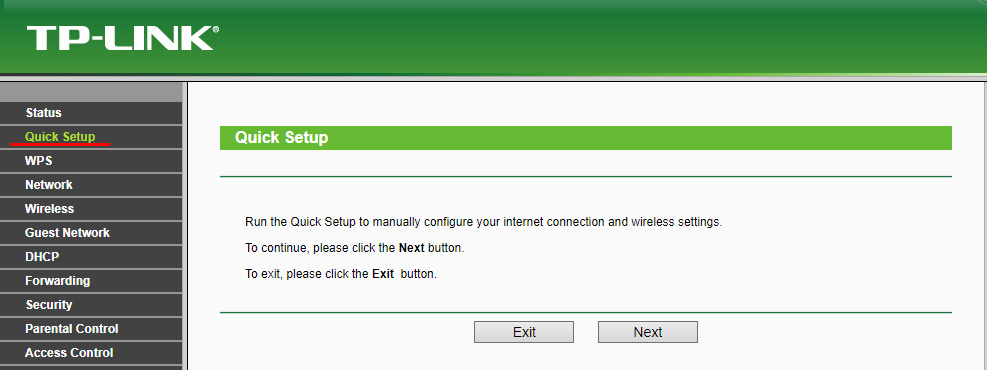
I will show you the setup process without the wizard.
Setting up the Internet connection
Once we have entered the router’s web-interface, the first thing we need to do is to configure the Internet connection. Simply put, in the router’s settings, select the type of connection your ISP uses and, if necessary, set the necessary parameters.
Only when you have the necessary information, you can proceed to configuration. Otherwise, there may be a lot of fruitless attempts.
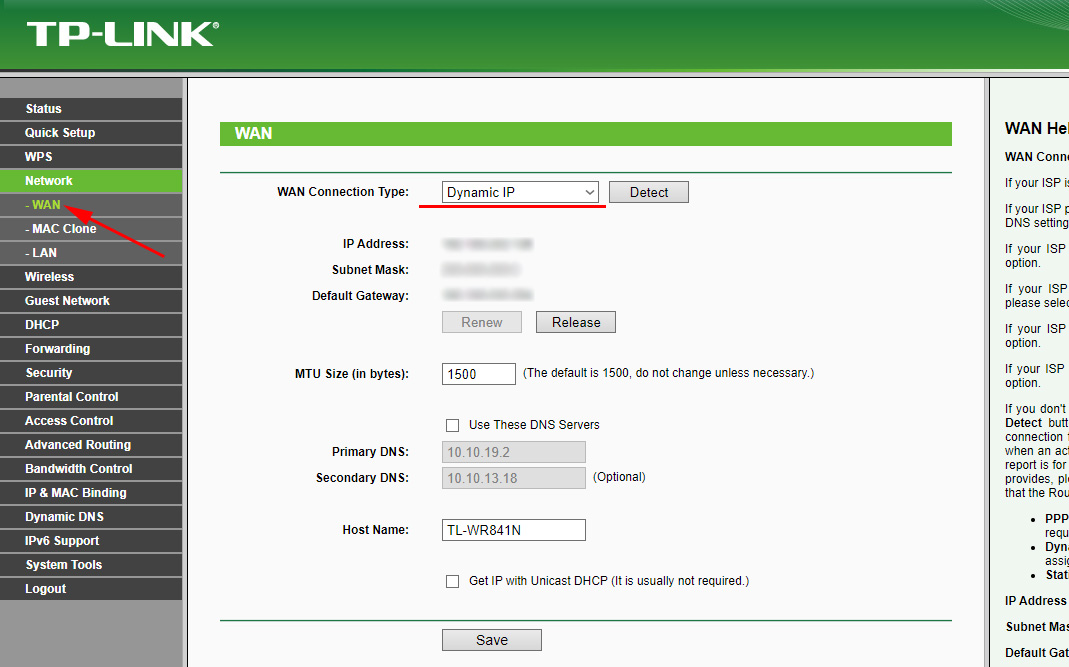
Dynamic IP (DHCP)
If you have a provider using this type of connection, then the Internet through the router should work without additional configuration (if the router is at factory settings). Since “Dynamic IP” is set by default.
In the “Network” – “WAN” section you should check whether the required connection type is set.
If everything is connected and configured correctly, but the Internet through the router does not work, then most likely your provider makes binding by MAC-address. Clarify this point. If there is a binding, then you need to clone the MAC-address on the router from the computer to which the Internet was previously connected, or to prescribe the MAC-address of the router from your provider. It is indicated at the bottom of the sticker.
You can clone the MAC on the “Network” tab – “Clone MAC address”.
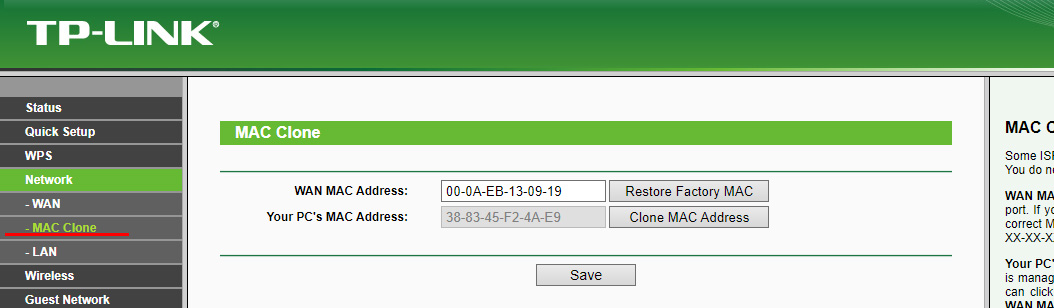
The router must be connected by cable to the PC to which the Internet has been bound.
PPPoE and PPTP on TL-WR841ND
In the WAN section, select the appropriate connection type PPPoE, or PPTP. And below, specify the necessary parameters. Usually it’s user name and password. Also, most likely, you should set “Dynamic IP” and make sure that “Connect automatically” is set.
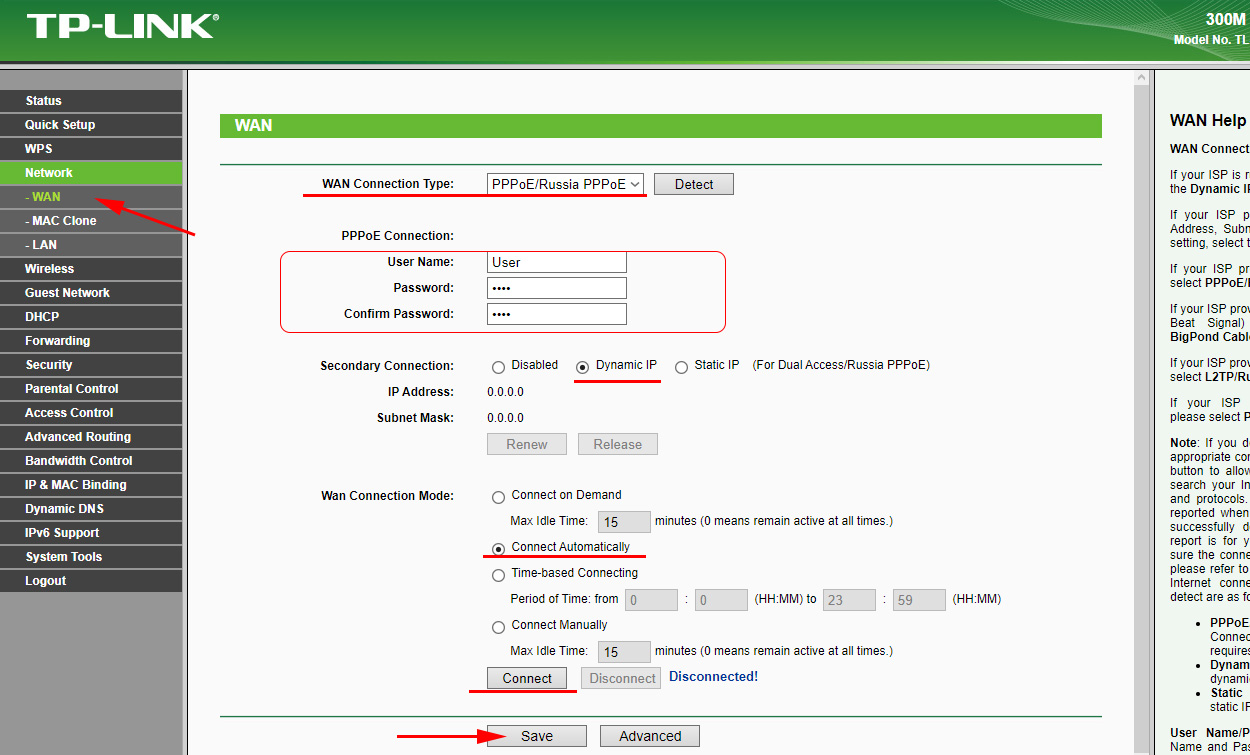
After that you can try to start the connection. And if the connection is established, then save the settings.
PPTP is configured in the same way. Only there you may still need to specify the address of the server (it, as well as other parameters is given by the provider).
What to do if there is no Internet connection?
Check the cable connection to the WAN port. Make sure that you set the correct parameters. And check if there is a binding by MAC-address. All this you can find out from your provider. Also pay attention to how the Internet indicator behaves. On TP-Link TL-WR841ND it should be actively blinking green. Make sure that the Internet is working directly (without a router).
If the Internet through the router does not work, then there is no point in continuing the configuration.
Useful articles on the topic:
- There is no internet access through the Tp-Link router
- The router does not see the Internet cable. WAN port does not work – if the router does not react at all to the connection of the cable from the provider.
TP-Link TL-WR841ND: Wi-Fi network and password
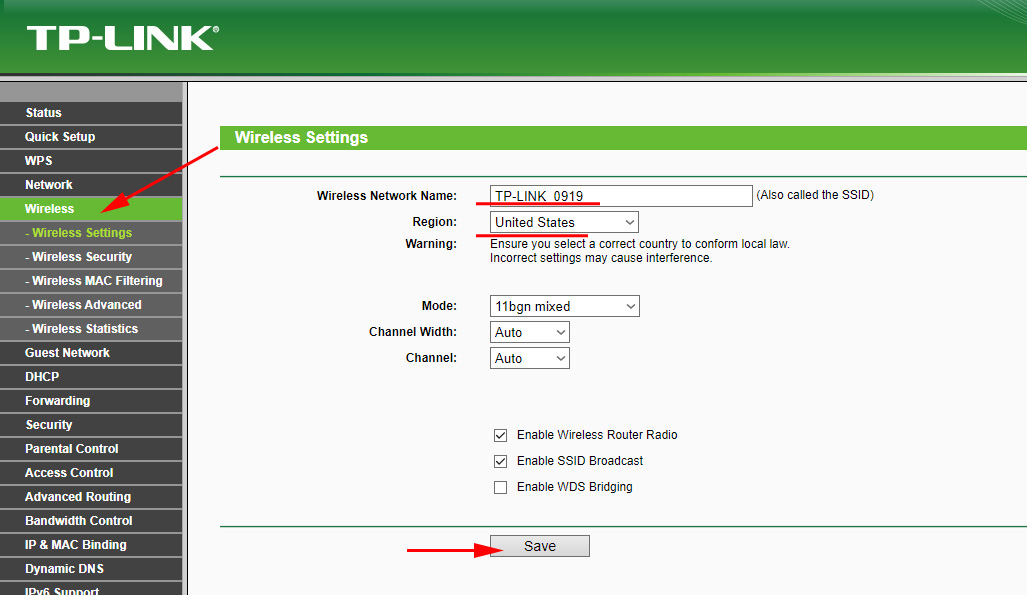
To set the Wi-Fi network settings, we need to go to the “Wireless” section. Here we need to specify our region and change the name of the Wi-Fi network. I do not recommend leaving the factory name.
On the left side go to the next section “Wireless Security” and set a password for our Wi-Fi network. Set the security type to WPA/WPA2 – Personal, and set the password. The password should be in English letters. It should be at least 8 characters.
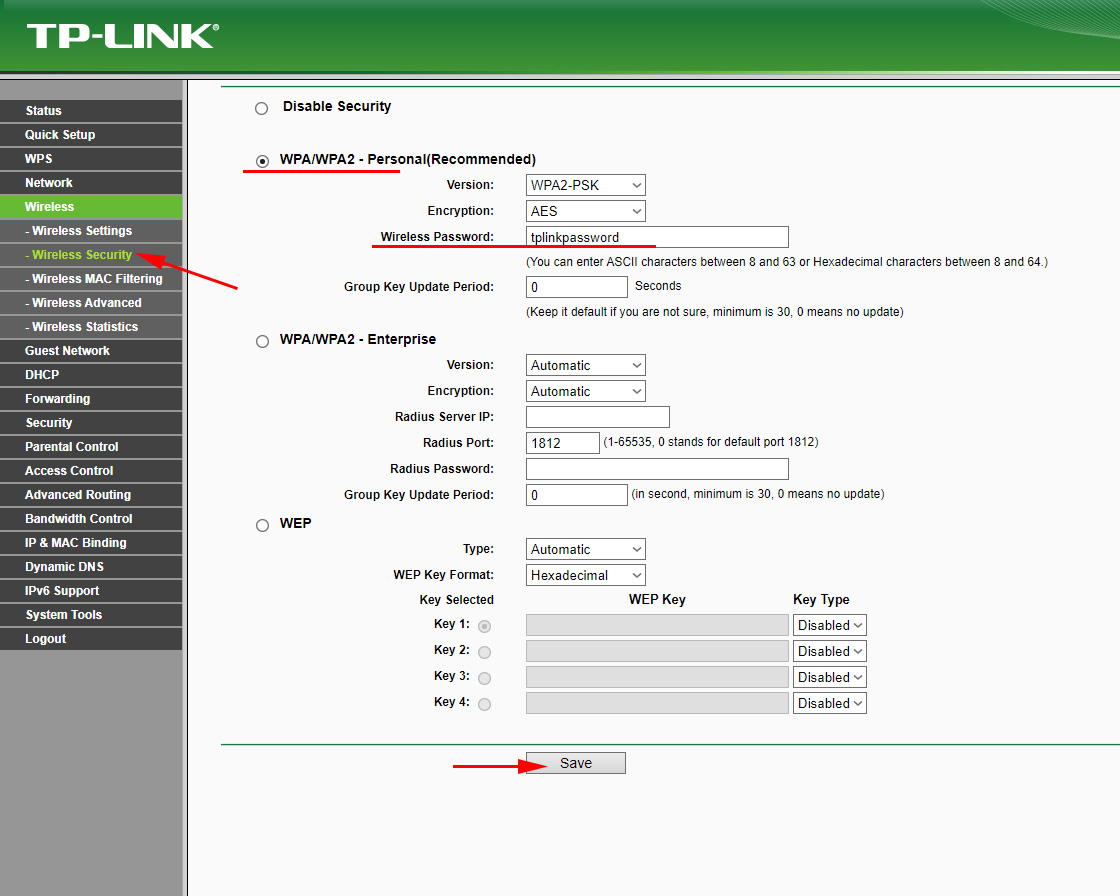
Save the settings. It is desirable to write down the password at once. If you forget it in the future, you can look it up in the control panel or change it. You can add an article to your bookmarks: how to change or set the Wi-Fi password on TP-Link.
This is the end of the basic configuration of the router. You can reboot it. You can do this on the tab “System Tools” – “Restart”.
You need to connect devices to Wi-Fi with a new password, which you set in the settings.
Protecting the control panel
I advise you to go to the settings again and change the factory password admin, which you need to enter when entering the router settings. You can do this in the “System Tools” – “Password” section. You need to specify the old admin and admin. Then set a new user name and a new password twice.
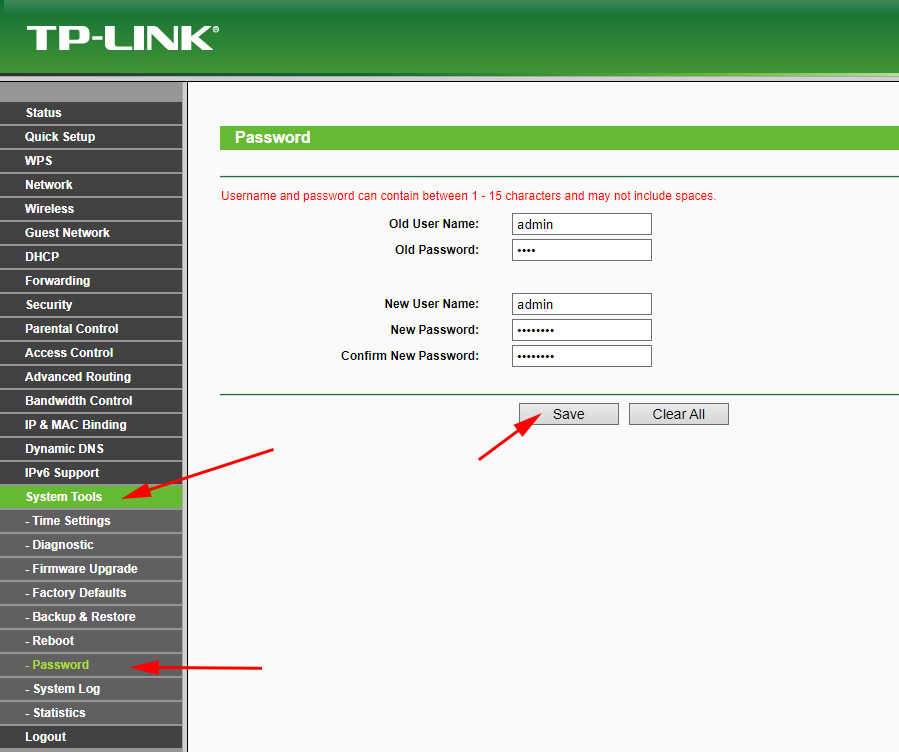
After saving the settings, you will have to specify a new password and name (if you have changed it) to access the web-interface.
Configuring IPTV on TP-Link TL-WR841ND
In case your provider provides digital interactive television service, you need to set some settings on the router. You can do it on the “Network” – “IPTV” tab.
Check whether “IGMP Proxy” is enabled, select “Bridge” mode and choose the number of LAN port which (or which) will be allocated for IPTV. The set-top box should be connected to this port.
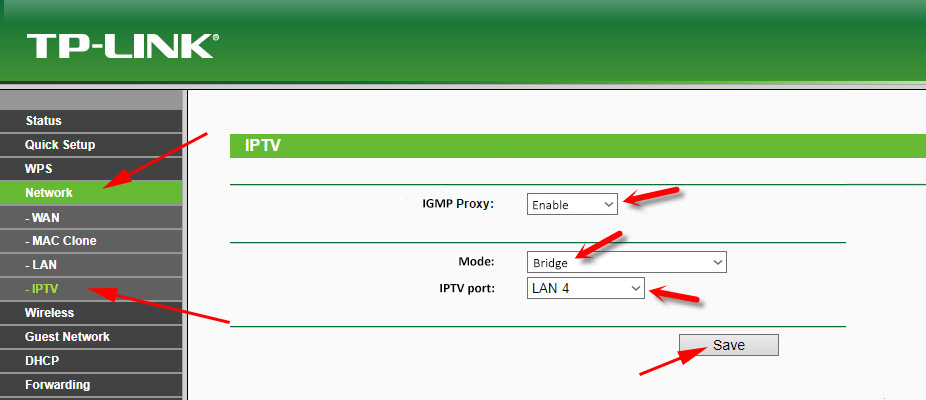
If after saving the settings and rebooting TL-WR841ND IPTV doesn’t work, please refer to the article: Configuring IPTV on TP-Link routers. There I described everything in more detail. Perhaps, in your case you need to specify VLAN ID.
That’s all. As usual, feel free to leave your questions in the comments. I will answer them all!
 TP-Link Archer C20 and Archer C20i Roter Firmware
  Router Firmware TP-Link Archer C8
  How to Connect TP-Link TL-WR740N (TL-WR741ND)
  How to Change the Password for a Wi-Fi Router TP-Link TL-WR841N?