
Setting Adsl Wi-Fi Modema TP-Link TD-W8951ND
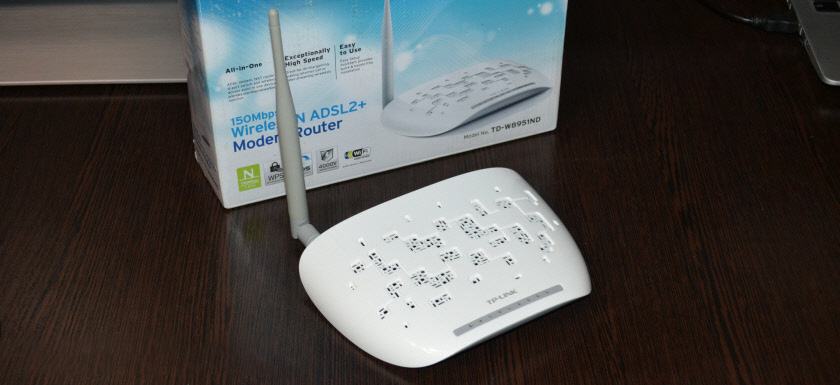
TP-Link TD-W8951ND is an ADSL modem that can give out internet via wi-fi, or a wireless router with a built-in ADSL modem, to connect to the internet via phone cable. I think both options are correct. This wireless modem from TP-Link is an ideal solution for all ADSL Internet subscribers.
There is no need to install a modem and Wi-Fi router. The phone cable is connected directly to TP-Link TD-W8951ND. In the control panel we set the parameters for connecting to the Internet (they are given by the provider), configure the Wi-Fi network, IPTV (if there is one) and that’s it, use the Internet via wireless network or cable. Since the page with settings and the process of setting up is not the easiest and may cause a lot of questions, I decided to prepare a detailed instruction. This instruction will be suitable for other wireless routers with built-in ADSL2+ modem from TP-Link.
First we’ll connect everything, then we’ll go into the ADSL modem settings and set the necessary parameters.
Connecting and entering TP-Link TD-W8951ND settings
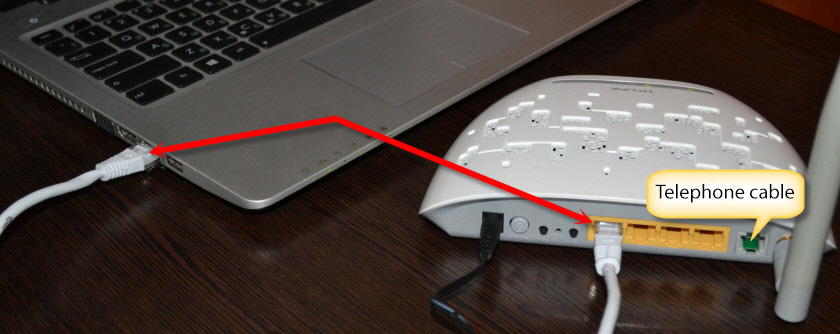
Connect power to the modem and turn it on with the button (if it is off). Connect the modem to a computer, or laptop with a network cable. Or connect to the modem’s Wi-Fi network. It is open by default. If a password request appears, look at the bottom of the device on the sticker. The factory password (PIN) should be listed there.
Connect the telephone cable to the ADSL port of TD-W8951ND.
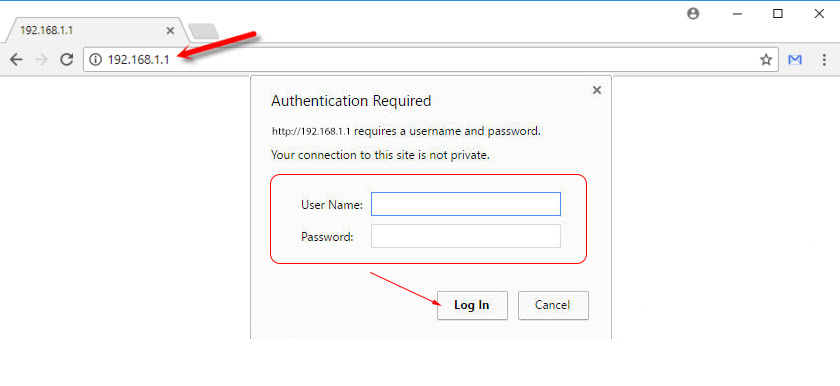
Next you need to open the modem settings. To do this, open any browser on the device you have connected and go to 192.168.1.1. Enter the address in the address bar. If you are not prompted for login and password, try to go to 192.168.0.1. IP-address is indicated on the sticker at the bottom of the modem itself (the address tplinkmodem.net may also be indicated there). If you can not open the settings, an error will appear, then see the article: does not enter the router settings.
In the authorization window you need to specify login and password. Factory admin and admin. If you changed them and do not remember, then you will have to do a factory reset. Press the Reset button for 10 seconds with something sharp.
The web-interface of the wireless ADSL modem will open. There we need to configure the Internet and Wi-Fi network. And also change the factory password admin. Which you have just entered.
Setting up the ADSL modem TP-Link to connect to the Internet
Before proceeding to the configuration:
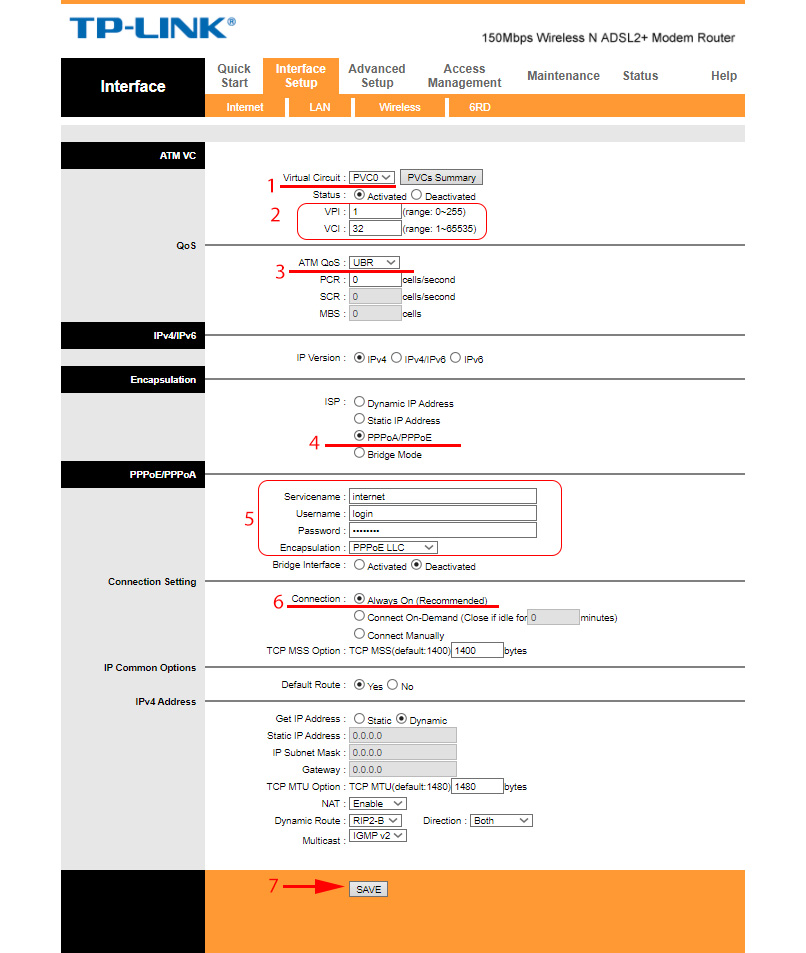
Go to the “Interface Setup” – “Internet” section.
- In the drop-down menu “Virtual Circuit” select the virtual channel “PVC0”.
- Set the VPI and VCI values.
- Opposite “ATM QoS” select “UBR”.
- Next you need to select the connection type. For example: PPPoE.
- If you have PPPoE, you need to specify login and password (issued by the provider). “Encapsulation”: “PPPoE LLC.”
- And for the connection to be always active, check that “Always On” is selected next to “Connection”.
- Save the settings by clicking on the “Save” button.
See screenshot.
If you have “Dynamic IP”, for example, it is even easier. You don’t need to specify login and password.
Setting up Wi-Fi network on TP-Link TD-W8951ND
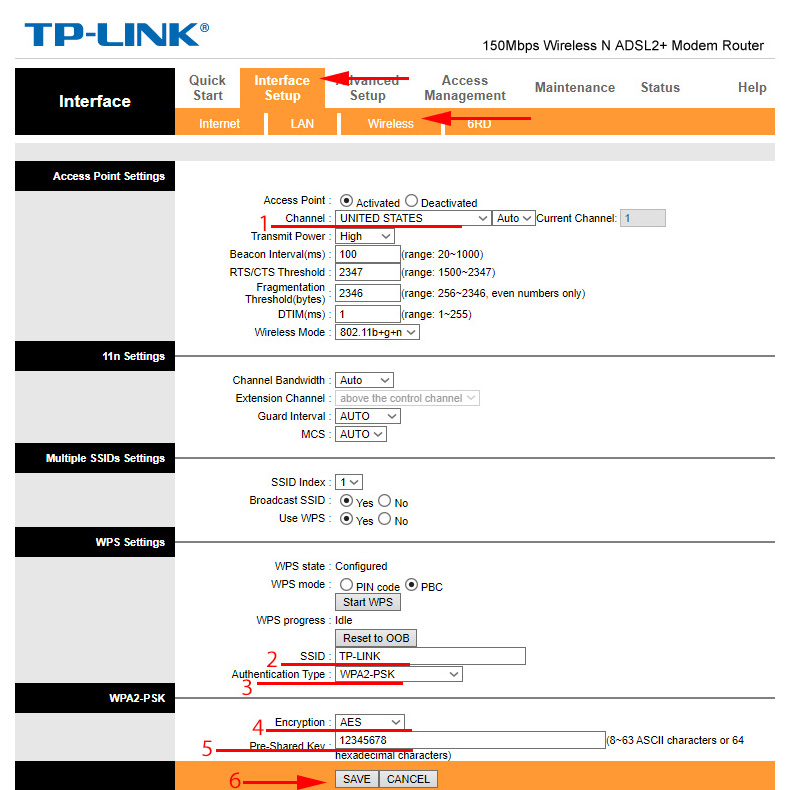
You can configure the wireless network in the “Interface Setup” – “Wireless” section.
- In the “Channel” drop-down menu, select your country.
- Change the Wi-Fi network name (SSID). It is possible to leave the factory name, but not desirable.
- Set the Authentication Type to “WPA2-PSK”.
- “Encryption: AES.
- In the “Pre-Shared Key” field specify the password that will protect your Wi-Fi network. The password should be entered in English letters. You can use numbers. Minimum 8 characters.
- Save the settings.
Like this:
It is advisable to write down the Wi-Fi network password somewhere so that you don’t forget it.
Protect the modem settings with a new password
By default, the login and password admin is used to enter the modem settings. This means that everyone who will be connected to your wireless modem will be able to access its control panel. That’s why I recommend changing the factory password.
Go to the “Maintenance” – “Administration” section. Write the new password twice and save the settings.
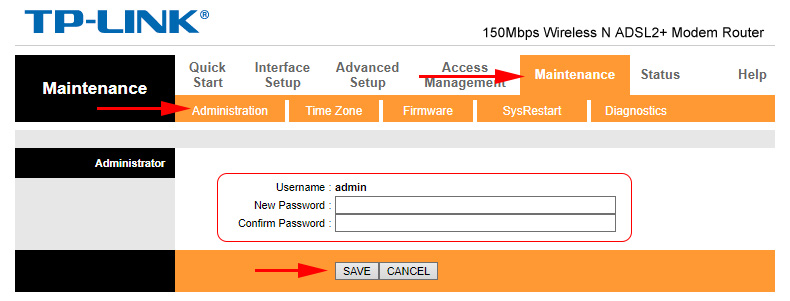
Be sure to write down the password. If you forget it and need to enter the modem settings, you will have to do a reset and configure everything again.
IPTV settings
These settings will be useful for those who have the digital TV function connected and plan to use it. TP-Link TD-W8951ND supports IPTV. Now I will demonstrate how to set up digital TV.
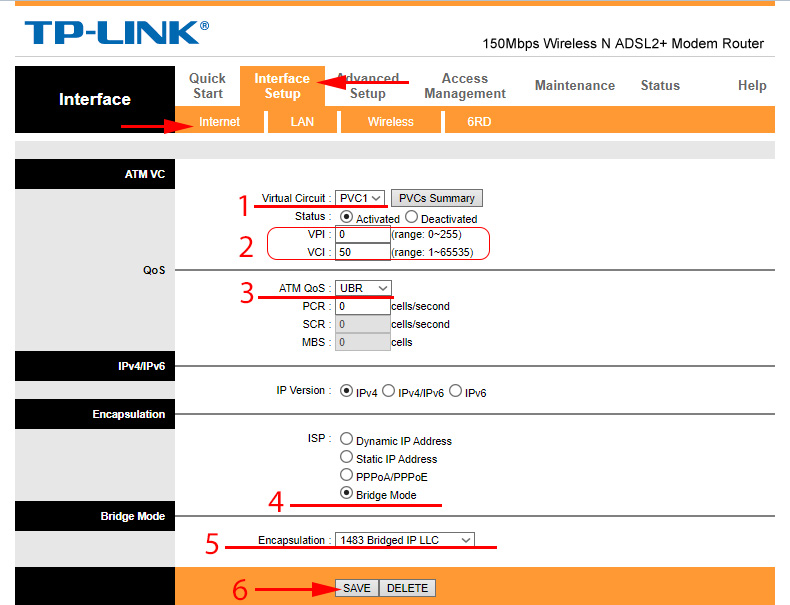
Let’s go back to “Interface Setup” – “Interne”.
- In “Virtual Circuit” select “PVC1”.
- Set the VPI/VCI values. You can check them with the provider.
- “ATM QoS: UBR.
- Set the connection type (ISP) to “Bridge Mode”.
- “Encapsulation”: 1483 Bridged IP LLC.
- Save the settings.
See the screenshot (on the example of setting up digital TV from Vodafone).
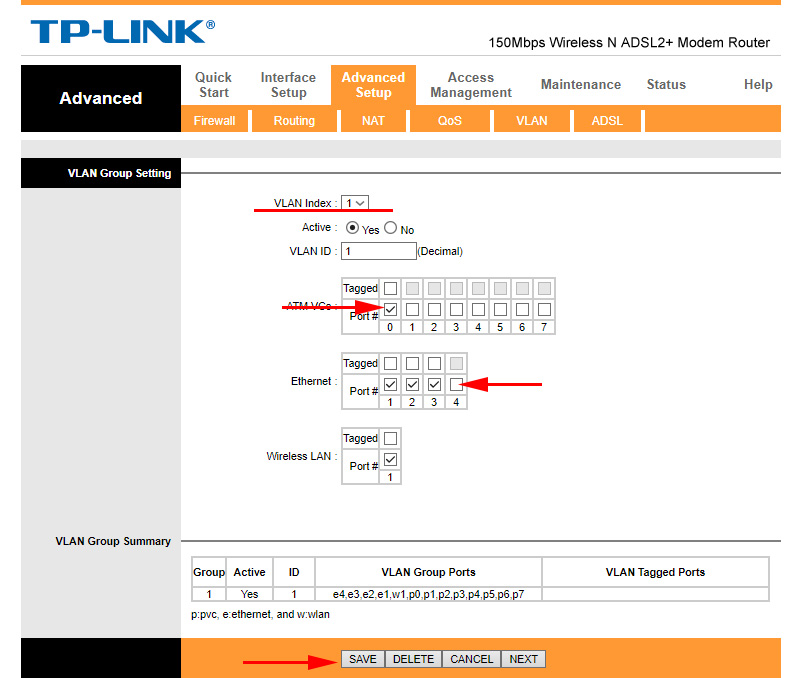
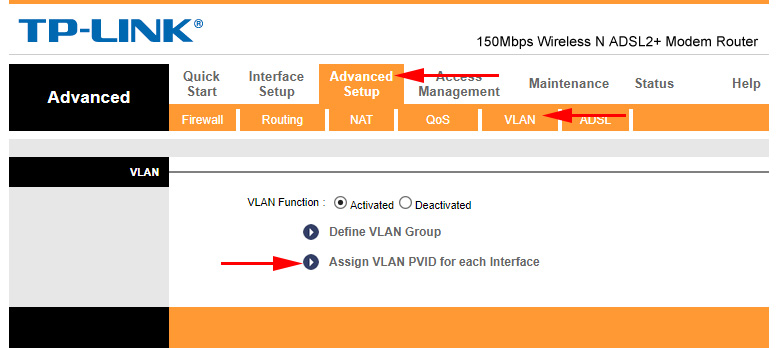
Next you need to configure LAN ports. You can do this in the “Advanced Setup” – “VLAN” – “Define VLAN Group” section.
Select “Vlan Index”: 1. Set the ports as shown in the screenshot below. Three LAN and Wi-Fi ports for Internet. Leave one LAN port for IPTV. Save the settings.
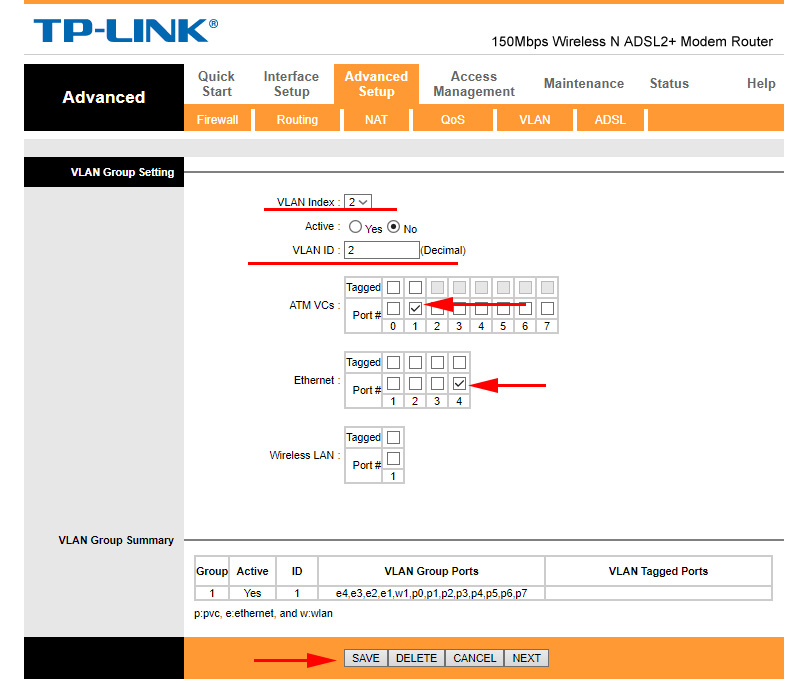
Next, select “Vlan Index”: 2. There is a field “VLAN ID”, put the number 2 in it. Set the port settings as shown in the screenshot below. Save the settings.
Go to the “Assign VLAN PVID for each Interface” section.
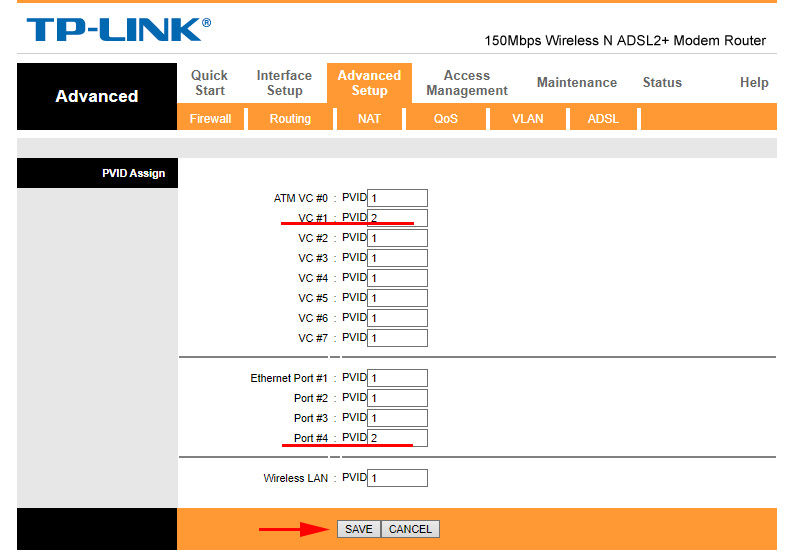
For “VC #1” set the value to 2. For “Port #4” set the same value to 2. The set-top box will be connected to this port. Save the settings.
This completes the configuration of digital TV.
We have configured our TP-Link TD-W8951ND. I hope you have done it and everything works. If anything, please ask in the comments.
 TP-Link Archer T2uh Ac600-Review, Driver Installation, Setting
  How to Connect and Configure a Wi-Fi Router TP-Link Archer C2300?
  Review TP-Link AC750 RE210. Two-Band Wi-Fi Amplifier
  The TP-Link Archer C24 Review is an inexpensive Two-Band Router with Support for the Repiter Mode and Access Points