
How to Connect TP-Link Archer MR400 and Configure the Internet via A Sim Card or Cable?
I decided to prepare a small guide on how to set up the TP-Link Archer MR400 Wi-Fi router. If you are not familiar with this router yet, I recommend you to read my review of this model. Since Archer MR400 is mainly bought to connect to the Internet via 3G/4G network, I will definitely show you how to connect a SIM card to this router and make the necessary settings for connecting to the Internet and Wi-Fi network. Also just in case we will consider the option of connecting to the Internet not through 3G/4G network, but Ethernet-cable. This router also has such a possibility.
There are two operating modes available in the settings: “3G/4G Router Mode” – when the router connects to the Internet via SIM-card (3G/4G network). And “Wireless Router Mode” – when we connect the Internet to the router via cable (directly from the provider, or from the modem) in the WAN-port. By default, the router works in “3G/4G Router Mode”. By inserting a SIM card into a separate slot on the router, it immediately connects to the network of the mobile operator and starts to distribute the Internet. Settings of Wi-Fi network and other functions on Archer MR400 are practically no different from other TP-Link routers. A new version of the web-interface is installed on this router.
Configuring TP-Link Archer MR400 with SIM-card
The router has a Micro SIM slot. If you have a Nano SIM, you can use the adapter that comes with the router.
You need to insert the card into the adapter and fix it with a sticker on the back side. Then insert the SIM card into the slot on the router.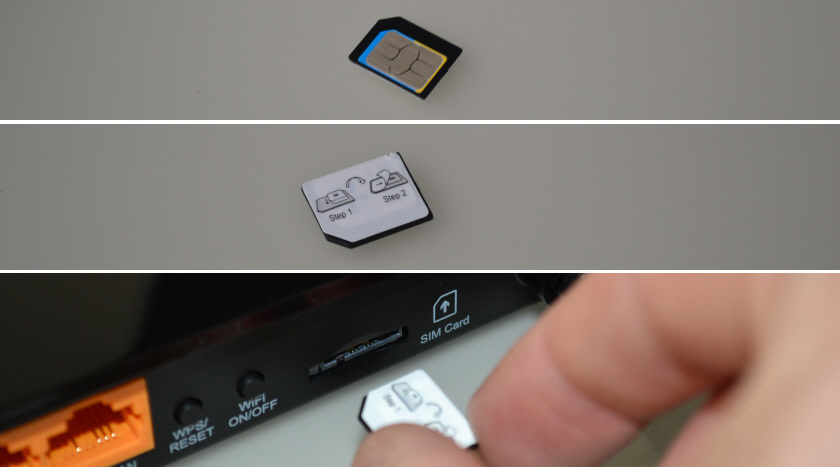
Turn on the router and watch the indicators on the front panel. In about a minute the indicator of cellular network signal strength (divisions, I have three of them on the photo) and the indicator of Internet connection should light up. This is provided that the router was able to configure the Internet connection itself, there is 3G/4G network coverage and there are no restrictions from our operator.

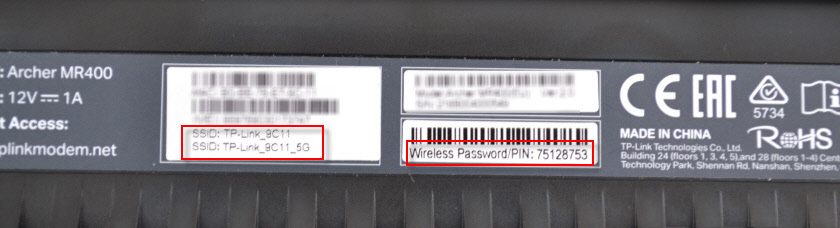
You can already connect devices to the router and use the Internet connection. You can connect both via network cable and wi-fi. The factory Wi-Fi network name (SSID) and password (Wirelles Password/PIN) can be found on the sticker on the bottom of TP-Link Archer MR400.
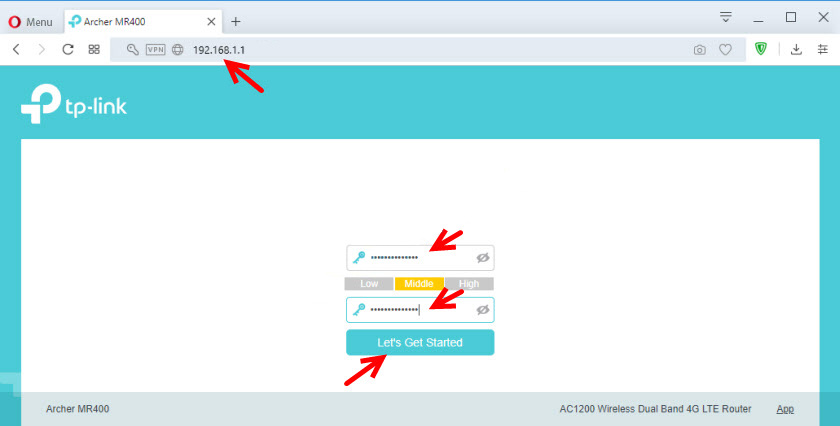
You just need to select the Wi-Fi network in the list of available networks on your device and specify the password. To enter the router settings (for example, to change the Wi-Fi network name and password), you need to connect to the router itself first. You can access the settings using any browser. Including from your phone and tablet. But on mobile devices, you can install and use TP-LINK Tether application to configure and manage the Archer MR400 router.
You can enter the settings via a browser at tplinkmodem.net, or 192.168.1.1. When entering the web-interface for the first time, the router will ask you to set an administrator password, which will protect the router settings. You need to think up and specify the password (2 times). Be sure to write it down somewhere.
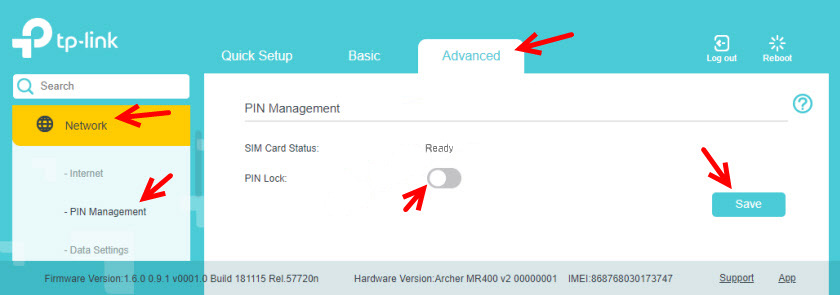
All the parameters related to connecting to the Internet via mobile operator’s network are located on the “Advanced” tab, in the “Network” section. If the message related to PIN-code appears at once, it means that the SIM-card is blocked. You need to go to “Network” – “PIN Management” section and enter your PIN-code (it is indicated on the SIM-card card, if you have not changed it). Or disable PIN locking with the switch opposite “PIN Lock”.
In the “Network” – “Internet” section you can change the parameters of connection to the cellular network. If necessary. I have all the settings automatically prescribed.
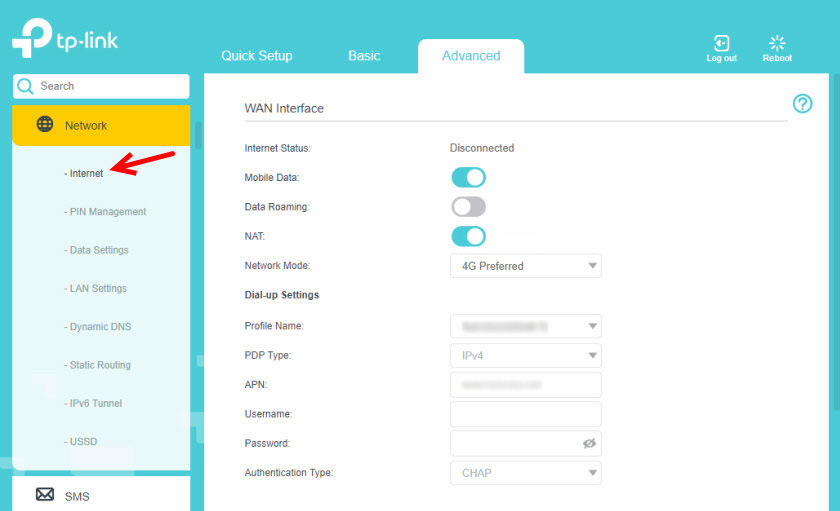
I recommend you to pay attention to the item “Network Mode“. The default setting is 4G Preferred. This means that the router will connect to a 4G network if there is coverage. If there is no coverage, it will connect to a 3G network. I recommend changing the settings to ” 3G Only” only when there is no 4G coverage at all. And “4G Only” – when there is 4G coverage, but for some reason the router periodically switches to 3G (at the same time the speed in the 4G network is higher than 3G).
In the “USSD” section you can send USSD requests. For example, to check the balance, to connect some tariffs, etc. SMS messages can be managed in a separate section “SMS”.
I will talk about Wi-Fi network setup in one of the next sections in this article. Just scroll down the page below.
Setting up in regular router mode (Internet over cable)
If you want to connect TP-Link Archer MR400 to the Internet via a network cable, you should first connect to the router from your computer or mobile device via cable or wi-fi, go to the settings and switch it to the appropriate mode of operation.
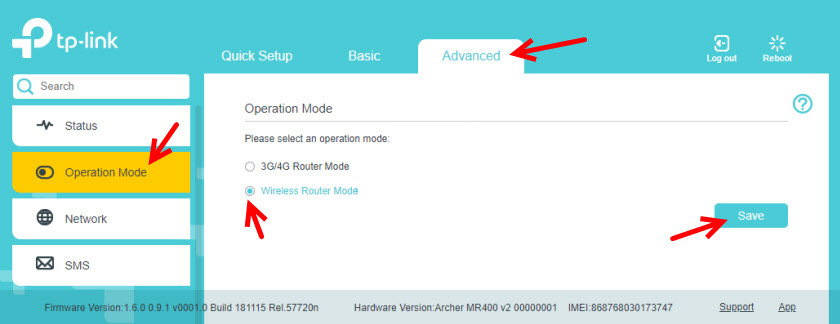
I have already written above that you can go to the settings at http://tplinkmodem.net or http://192.168.1.1. On the “Advanced” tab, in the “Operation Mode” section you need to put a switch next to “Wireless Router Mode” and click on the “Save” button.
Confirm the change of operation mode. Wait until the router is rebooted. After that, if the page with settings is not automatically opened – open it manually.
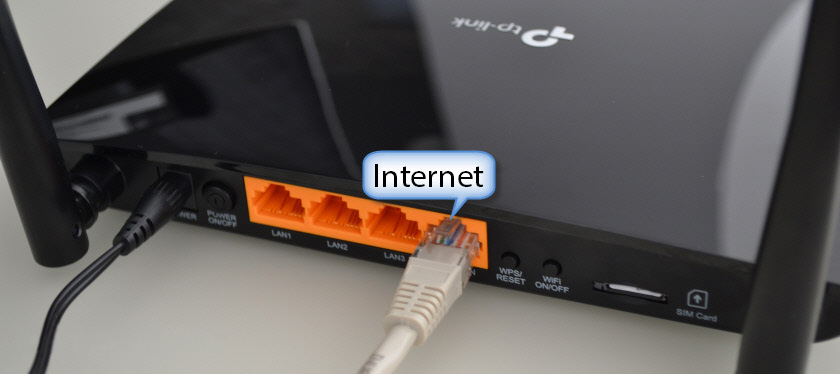
Connect the Internet to the router. Connect the cable to the LAN4/WAN port.
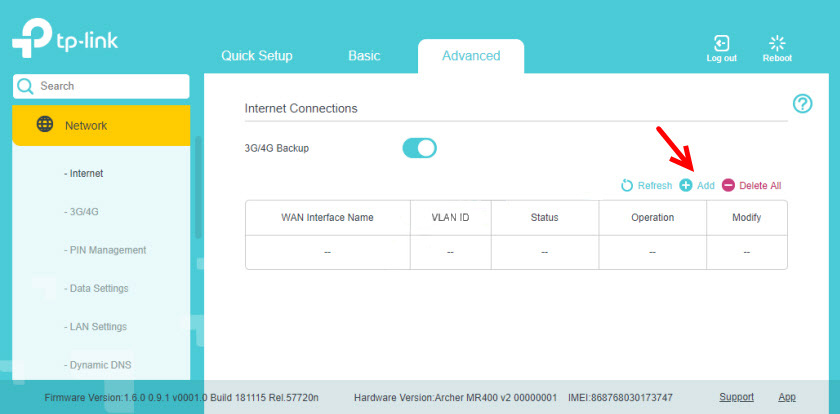
In the settings (web-interface) open the section “Advanced” – “Network” – “Internet”. The switch “3G/4G Backup” catches your eye right away. I understand that if this function is enabled and a SIM card is connected to the router, then in case of loss of connection to the Internet via cable, the connection via cellular network will be used as a backup.
To set up a connection to an Internet provider, you need to create a new profile (click on the “Add” button).
First you need to select the correct Internet Connection Type. If you don’t know what type of connection your ISP uses, there is no point in continuing the configuration. Be sure to check with your Internet Service Provider.
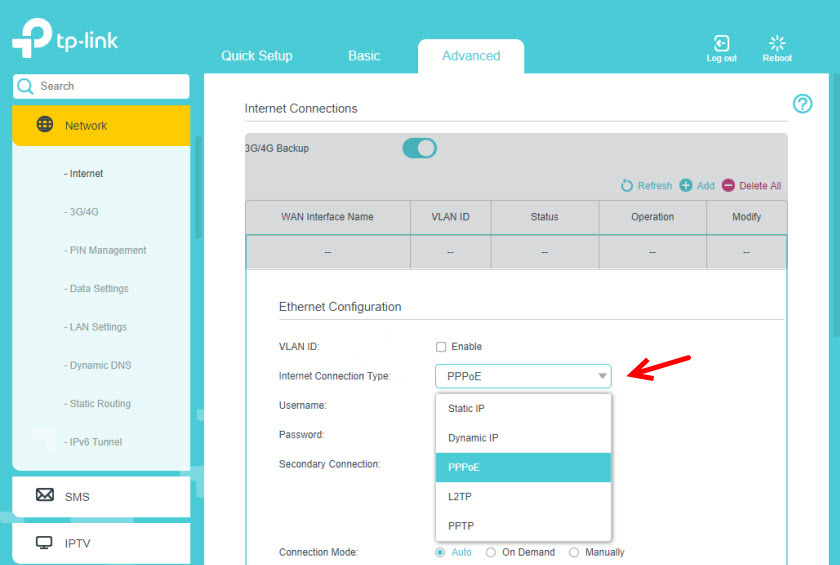
In all cases other than ” Dynamic IP ” (DHCP), you must configure the settings. Please note that your ISP may also do MAC address binding. If the Internet does not work, you need to find out this point from the support. For PPPoE you need to specify the user name and password. And for L2TP and PPTP also the server address. All these addresses and passwords are given by the provider.
PPPoE settings, for example.
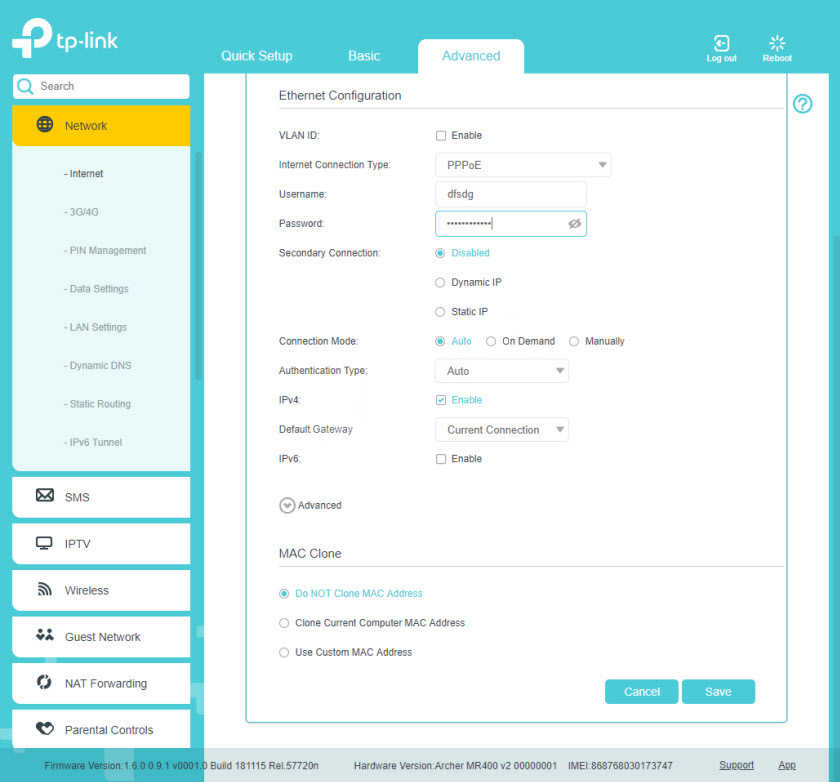
Save the settings and look at the connection status. If the router cannot connect to the Internet, check all the parameters again. If necessary, check with your ISP. And find out if there are no restrictions from its side.
Setting up Wi-Fi network on TP-Link Archer MR400
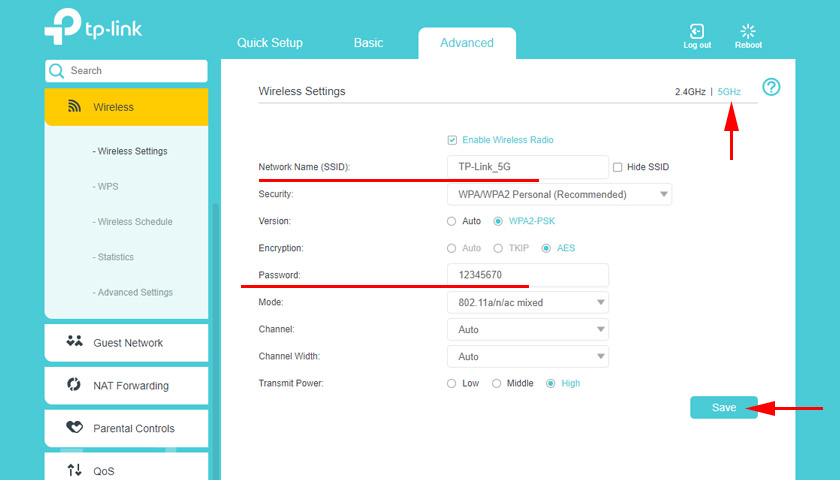
All wireless network settings are collected in the “Advanced” – “Wireless” – “Wireless Settings” section. Since our router is dual-band, there are two tabs:“2.4GHz” and “5GHz“. Each network is configured separately. We only need to change the Network Name (SSID) and Password. The rest of the settings should not be changed unnecessarily. We configure the network for 2.4GHz:
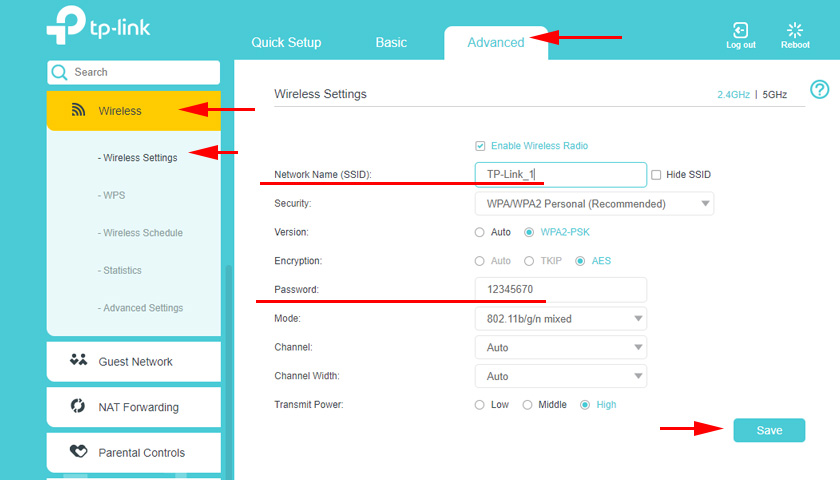
And 5GHz. In the same way, change the Network Name and Password. I recommend setting a different network name. The password can be left the same.
After saving the settings, don’t forget to reconnect your devices to the Wi-Fi network. If you connected them to the network with the old (factory) network name and password.
Resetting the settings
You can always restore factory settings on TP-Link Archer MR400 and start the setup process again. To do this, press and hold the WPS/Reset button for about 5 seconds.
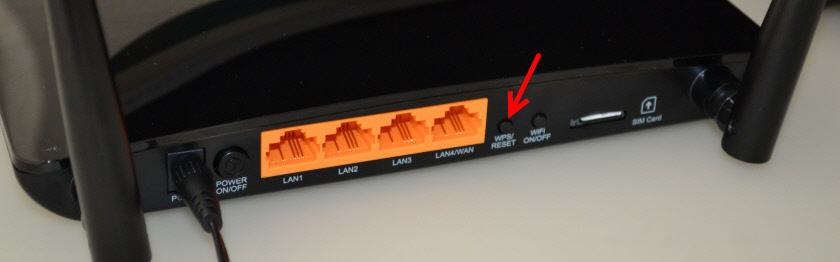
The power indicator will start blinking. After a few more seconds, the router will reboot and the settings will be reset to factory defaults.
 TP-Link EAP245 AC1750 Access Point. Wi-Fi Solution for Restaurants, Hotels, Shops
  TP-Link: Wi-Fi does not work. The Router Does Not Give Out Wi-Fi Network
  TP-Link TL-WN781ND-Setting and Installing the Driver
  Instructions for setting up mobile router tp-link M5250