
How to Connect a Wi-Fi Router TP-Link?
Hi! Very often people ask how to connect a router? Here you bought a router, brought home, and how to connect it, and what in general to do with it further that it would give out the Internet over Wi-Fi and cable. In this article we will talk specifically about TP-Link routers. I will tell in detail, and even make a photo of TP-Link connection. Where and what cable to connect, how to connect the router with your ISP, computer, modem, etc.
In fact, there is nothing complicated about it. You just need a little time and patience:) After buying any router, in our case it is a TP-Link device, it will have to be properly connected and configured. If you connect incorrectly, you will not be able to configure it. The very process of customization, this is a topic for another article, or for the instructions for a particular model. Well, in this article, we will detail the process of connecting the TP-Link router.
The article will be suitable for all models: TL-WR940N, TL-WR740N, TL-WR841N, TL-WR842ND, TL-WA701ND, TL-WR743ND, etc. I’m going to show you TL-MR3220 as an example. I would like to show how to connect TL-WR841N (it is more popular), but I have only TL-MR3220 at hand now. But come on, they are practically no different.
Connecting the computer to TP-Link via network cable
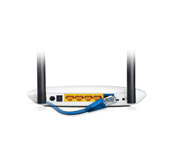
The first thing we need to do is to connect the power adapter to the router. Simply plug it into the POWER jack. You definitely won’t miss there 🙂 Well, and plug it into the mains. If the lights on the router don’t light up, then check, maybe there is a power button on the router and it’s off.
Next, if you will be setting up (and/or using the internet via cable) the router from a computer? Or laptop, then take the network cable that comes with the router and plug one end of the cable into your computer’s network card and the other into the LAN jack on the router. On TP-Link, LAN connectors are usually yellow and there are usually 4 of them.
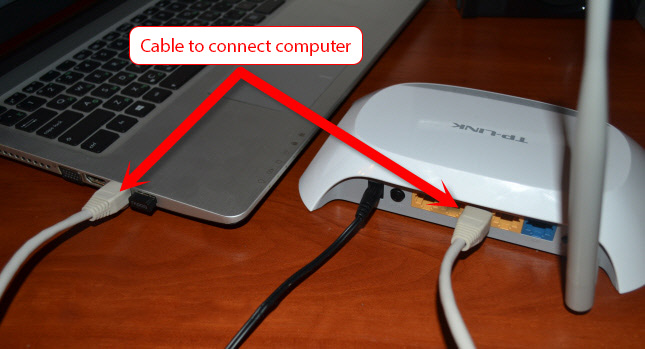
You can plug into any LAN connector. In them you can also connect TVs via network cable, game consoles, etc. Well, and on Wi-Fi of course you can connect (both to use the Internet, and to configure the router).
Connect the TP-Link router to an Internet provider or modem.
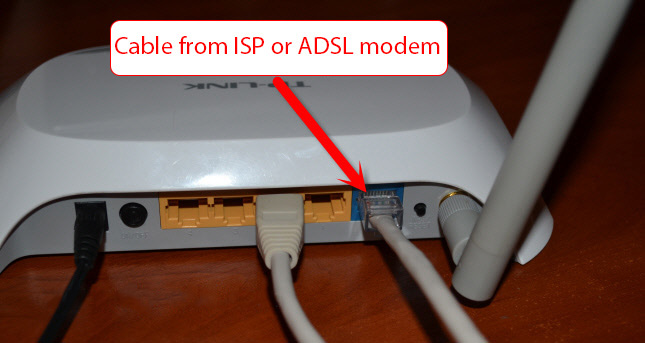
Here everything is clear. For the router to be able to distribute the Internet (and this is its main task), you need to connect the Internet to it. Most likely, you have an ordinary network cable in your apartment, or you have internet from an ADSL modem.
We need to plug the cable from the Internet provider into the WAN socket of the TP-Link router. The WAN connector is usually blue. Or, plug the cable from the modem into the WAN jack (you can use the cable that comes with the router for the connection).
This one looks like this:
That’s it, the internet is connected, and you can start setting up the router. Go into the settings of your TP-Link (see this instruction) and configure the router. You can configure it according to the instructions on the example of TP-LINK TL-WR940N settings. The configuration will most likely be the same.
It may happen that immediately after connecting the router, the Internet will work on your computer and other devices that you connect. This is possible if your ISP uses Dynamic IP connection type, or if you have a modem connection. Either way, you’ll need to set up a Wi-Fi network and set a password.
And just in case, I give you a link to an article on solving the most popular problem that often appears when setting up a router: “No Internet access” or “Restricted”.
I don’t seem to have forgotten anything. As you can see, the instruction is simple and clear, everyone will be able to connect. If something does not work – write in the comments, we’ll figure it out.
 Two-Band Access Point TP-Link Eap320. Wi-Fi Business Solution
  tplinkrepeater.net and tplinkextender.net - Admin Password, Entrance to the Repiter Settings
  How to Connect and Configure a Wi-Fi Router TP-Link Archer C2300?
  Fast Setting Wi-Fi Router TP-Link Archer C7 (AC1750)