
How to Change, Or Put a Wi-Fi Password on Tp-Link
Today’s article will be devoted to TP-Link routers. I will tell you how to put a password on the Wi-Fi network of TP-Link router. If you just need to change the password, then according to these instructions you will be able to do it. Let’s consider the process of setting, or changing the password specifically to protect the Wi-Fi network. Simply on the router there is another password that protects the settings. You can change it according to these instructions. And how to additionally protect TP-Link router settings, I wrote in this article.
Protect your Wi-Fi network must necessarily. Moreover, it should be done in the process of configuring the router. I always write about it in the instructions for configuring routers of specific models. If you do not set a Wi-Fi password and leave your network open, anyone can connect to it.
Someone from the neighbors will definitely not miss this opportunity:) Yes, now providers offer normal speed and full unlimited, and it seems not even sorry, let them use the Internet. But, if everything was so simple, there are several nuances: all the devices that will connect to your router (in addition to yours) will load the router itself, and it can simply not withstand the load, will drop the speed of the Internet connection, and there is a risk that someone can access your local network, and your files on your computer. I think that this is enough to secure your wi-fi, and put a good password, which is what we will do now on the TP-Link router.
This article will be useful for all models of Tp-Link routers: TL-WR740N, TL-WR841N, TL-WR940N, TL-WA701ND, TL-WR743ND, TL-WR842ND, TL-MR3220 and other models. I have recently updated the article, and added information on how to configure protection in the new web interface.
Before I forget, I’ll give you a link to the article on Wi-Fi network setup: /setting-up-wi-fi-networks/setting-a-wireless-wi-fi-network-on-the-tp-link-router/ where I told you how to change the network name, configure the channel and other parameters.
How to set a Wi-Fi password on the TP-Link router
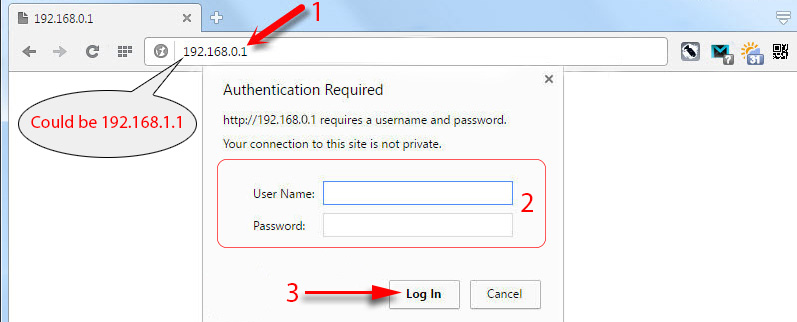
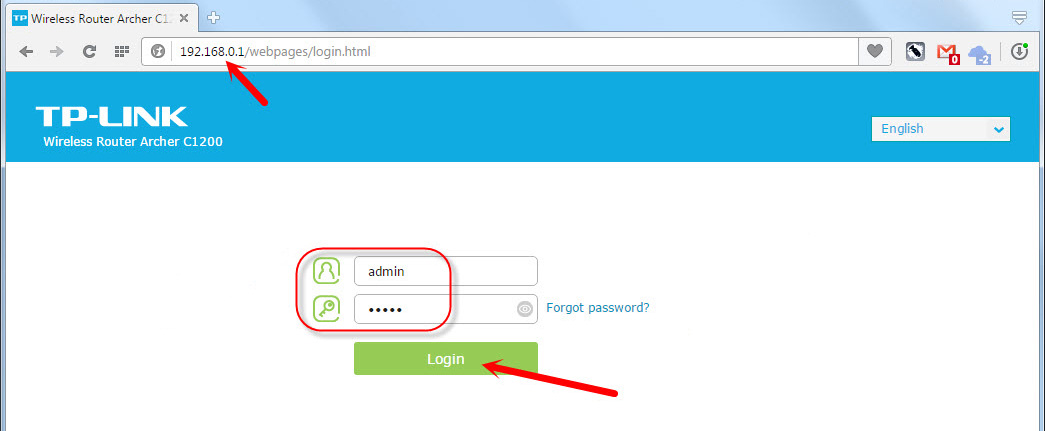
You can do this in the control panel of the router itself. First, we need to go into the settings. To do this, connect to the router via wi-fi, or with a network cable, open any browser and type the address 192.168.1.1. On some models, the settings can open at 192.168.0.1. See this information on the router itself, on the sticker. Or see the instruction: How to enter TP-Link router settings?
You should be prompted for a username and password. By default – admin and admin. Perhaps you have already changed them, so specify your own. If you have changed them and forgot them (standard ones are not suitable), you will have to reset the settings.
Next, in the settings, set the password for the Wi-Fi network. Here’s how to do it:
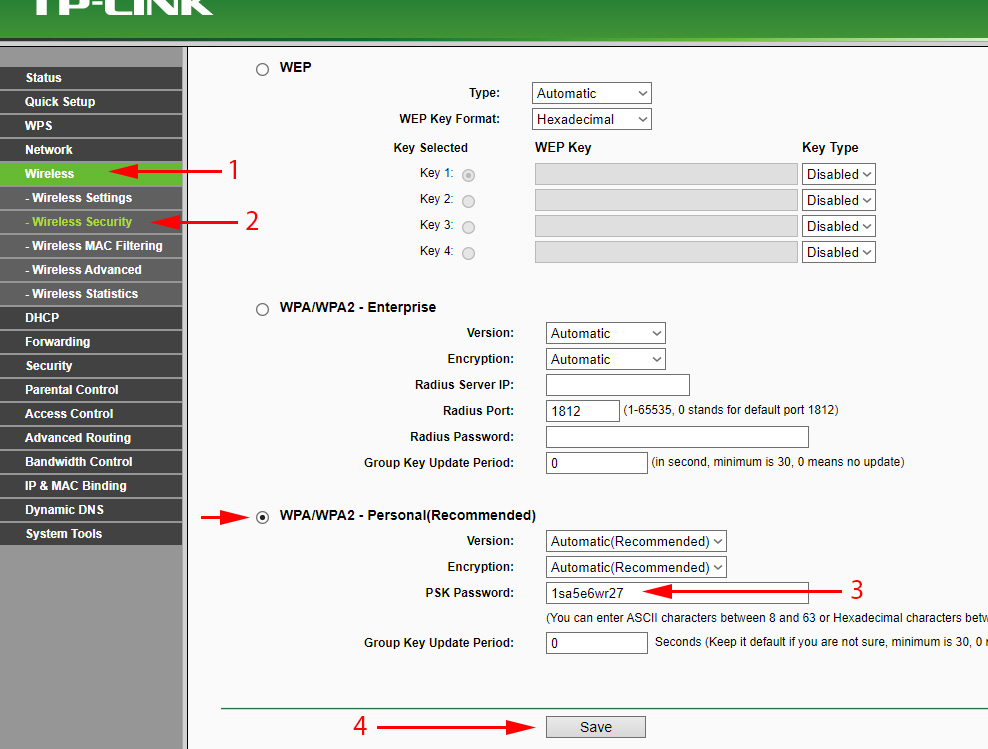
- Open the Wireless tab – Wireless Security.
- Highlight WPA/WPA2 – Personal(Recommended).
- In the Version and Encryption items, I suggest you leave Automatic so that you don’t have problems connecting to wi-fi later.
- And in the Password (PSK Password) field, specify the password you will use when connecting to your wi-fi. The password should be at least 8 characters long and preferably complex. Try not to forget the password, or better yet, write it down.
- Click the Save button to save the settings.
- That’s it, we have set a password for wi-fi! Now our TP-Link router is protected.
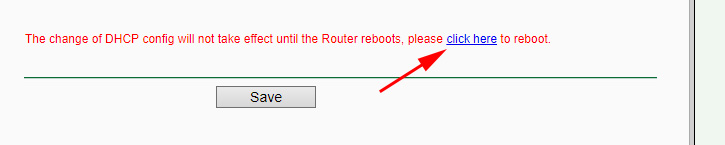
Then, click on the “click here” link to reboot the router. Or reboot under “System Tools” – “Reboot”.
If you just wanted to change the password on your Tp-Link, do everything exactly the same way, but delete the old password, set a new one and save the settings. After rebooting, you need to connect to your network with the new password we just set.
How to change the password on TP-Link router (new control panel)
If you have a new TP-Link router with updated web-interest, which is in blue colors, then entering the settings and changing the password of the Wi-Fi network will be a little different. Go to tplinkwi-fi.net or 192.168.0.1 to enter the settings.
You can change the password on the Basic settings – Wireless tab.
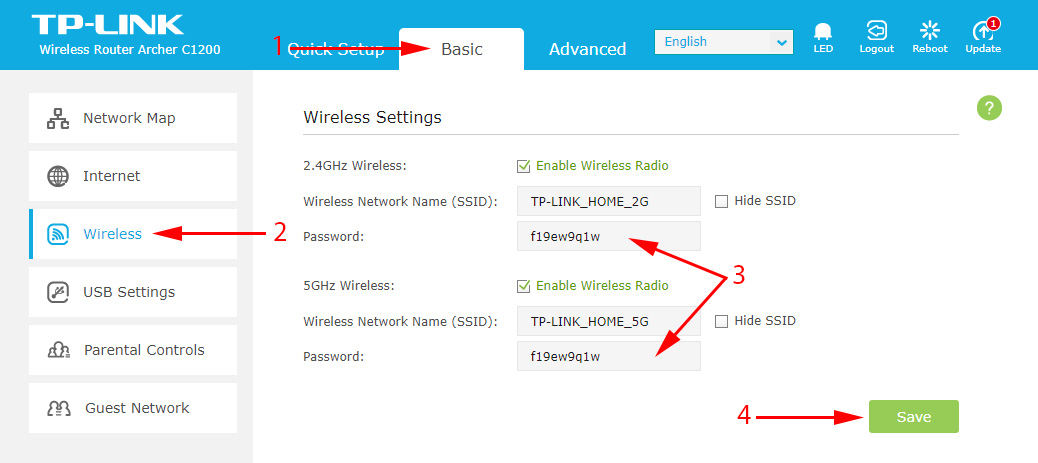
Note that if you have a dual-band router, which distributes two Wi-Fi networks at 2.4 GHz and 5 GHz, then the password must be set for both networks. It can be the same, or it can be different. It doesn’t matter, whichever is more convenient for you.
TP-Link Wi-Fi devices do not connect after changing the password
A very popular problem. After you have changed or set a new wireless network password, your devices (computers, laptops, phones, tablets, TVs, etc.) may simply fail to connect to wi-fi. A very popular error usually appears on your computer: “The network settings saved on this computer do not match the requirements of this network”.
As a rule, this small problem is solved by simply deleting the Wi-Fi network and reconnecting, already with a new password. It is not difficult to delete the network. On a mobile device it is enough to click on the network itself and just hold it, and then select “delete network”. On how to do this on a computer, I wrote in the article: delete Wi-Fi network on Windows 7, and a separate instruction for Windows 10. There, this function is called “forget network”.
After these simple steps, everything should work. If anything, ask in the comments.
 TP-Link Archer a6: Mu-Mimo Router with Gigabit Ports
  TP-Link TL-WN781ND-Setting and Installing the Driver
  Review and Configuration of PowerLine Adaptors TP-Link TL-PA8010P KIT, OR HOW to do ...
  The TP-Link Archer C24 Review is an inexpensive Two-Band Router with Support for the Repiter Mode and Access Points