
How to Block Social Networks (Vkontakte, Classmates), Or A Regular Site in the Settings of the TP-Link Router
Often, there is a need to deny access to popular social networks. For example, for employees of the firm, or even at home. There are many ways to do this. You can, for example, block with the help of special programs, in the settings of antivirus, or firewall, or in the same hosts file.
But, there is another interesting way, it is to block social networks (and any sites), through the router. In this article, I will tell you how to block access to social networks if your devices are connected via a Tp-Link router. This way you can block not only social networks, but almost any site. The big advantage of this method is that access will be closed on all devices such as: tablets, smartphones, laptops, and other equipment that has the ability to connect to the Internet through the router.
In Tp-Link routers, there are two ways to block access to websites (or to allow access only to certain resources). Through Access Control, or through Parental Control. We are going to do it through Access Control, since Parental Control is for a slightly different purpose.
The instructions are suitable for all Tp-Link routers. All of them have almost the same control panel, including such popular models as TL-WR740ND, TL-WR741N, TL-WR841N, TD-W8968, TL-WR843ND, TL-WR842ND, etc.
Blocking social networks via Tp-Link router
To block social networks or just websites we need, we need to enter the router control panel first.
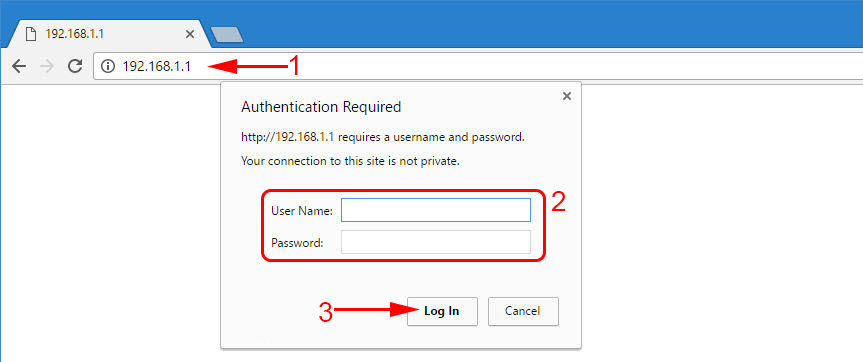
Everything is as usual: connect to the router, open a browser and in the address bar type 192.168.1.1 or 192.168.0.1.
A window will open asking for login and password. By default, in Tp-Link, these are admin and admin. But, if you have already changed the password to access the router settings, you need to enter the data you have set. If the default login and password are not suitable, then you will have to do a factory reset and configure the router again.
Enter the login and password and enter the settings.
 Create a list of sites to block
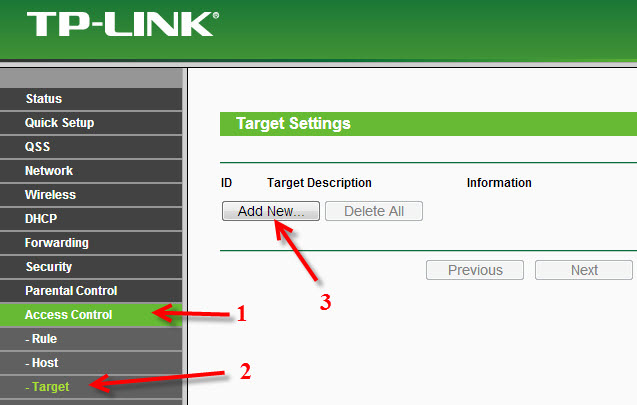
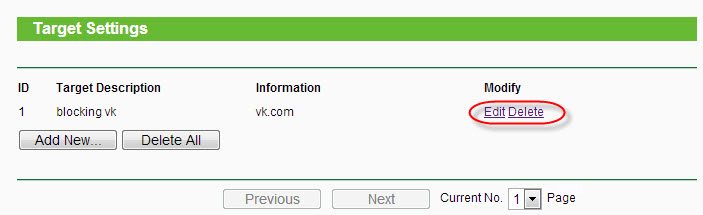
In the control panel, go to the Access Control – Target tab. We will first create a list of social networks (or common sites) that we want to block access to, and then we can apply this rule to any devices.
Click on the Add New… button . (button.)
In the Target Description item you should specify any description for the rule, in English. Let’s write something like “blocking facebook”.
In the Domain Name fields we specify the addresses of the sites we want to block access to (we specify addresses without http://).
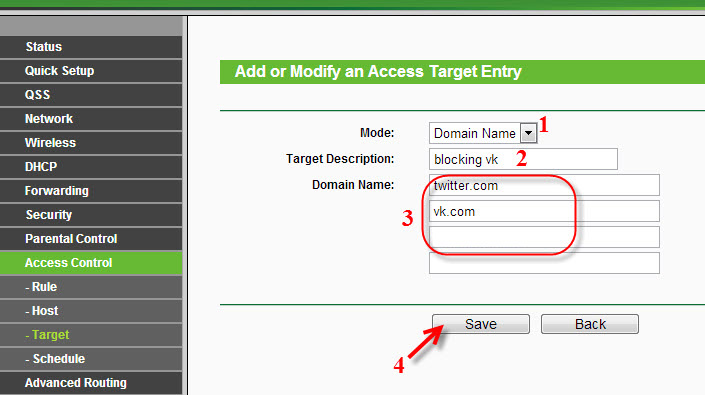 Great, the list of sites is ready. You can create several such rules. You can also edit or delete them.
 Add a device for which you want to block access
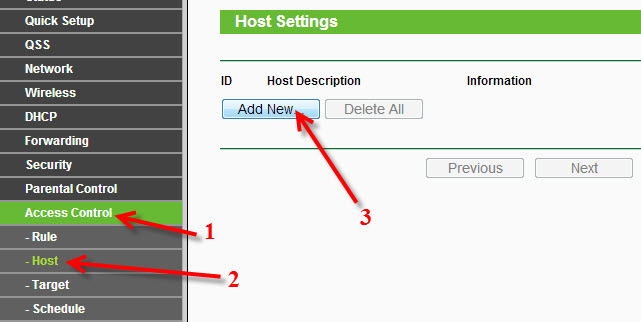
Go to the Access Control – Host tab and click the Add New… button. (button .)
 If the device connects to this router, it means that it has an IP address assigned to it. And if an IP address is assigned, you can block it by IP. But, it is better to block by MAC address, because IP is most likely dynamic and changes with each connection (although, you can fix a static one).
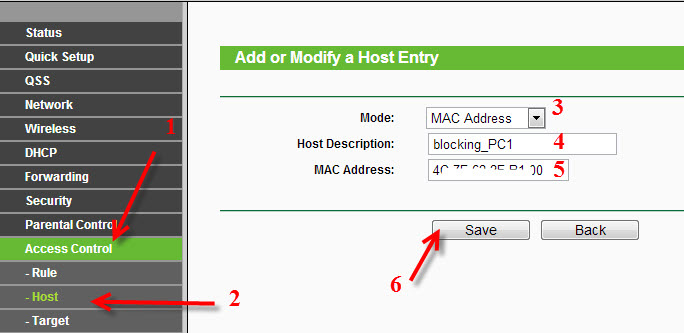
So, in the Mode field, select MAC Address.
In the Host Description field, you need to specify some understandable name. For example, “blocking_PC1”. The important thing is that you understand which device this rule applies to.
And most importantly, in the MAC Address field, specify the MAC address of the device to which you want to apply the rule created above, simply put, block social networks and other sites.
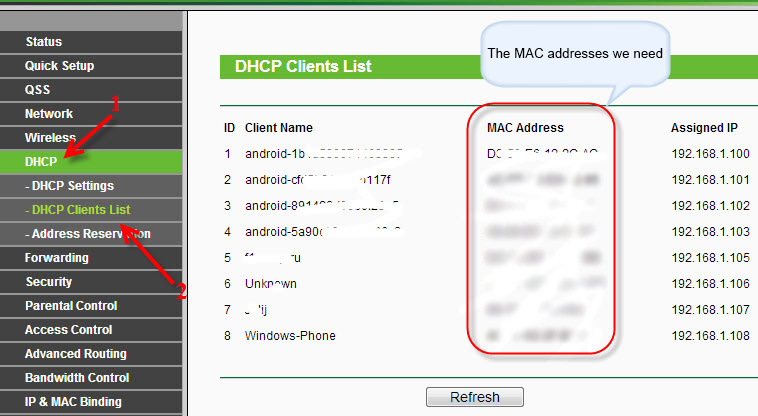
If the device is already connected to this router, you can view it on the DHCP tab – DHCP Clients List.
Simply copy the MAC address of the desired device and paste it into the field.
 You can also view the MAC address in the device settings (if it is a mobile device).
In Android: Settings – About phone – Status (it may vary from device to device, but it is roughly like this).
Windows Phone: Settings – About device – Details and there look for MAC address.
On a computer it is a bit more complicated, I will write about it in a separate article.
So, specify the address of the computer (or mobile device) we need in the MAC Address field and click Save.
 The blocking list has been created and the device has been added. You can of course add more devices, edit them, or delete them.
All we need to do is connect it all.
Enabling site blocking on the Tp-Link router
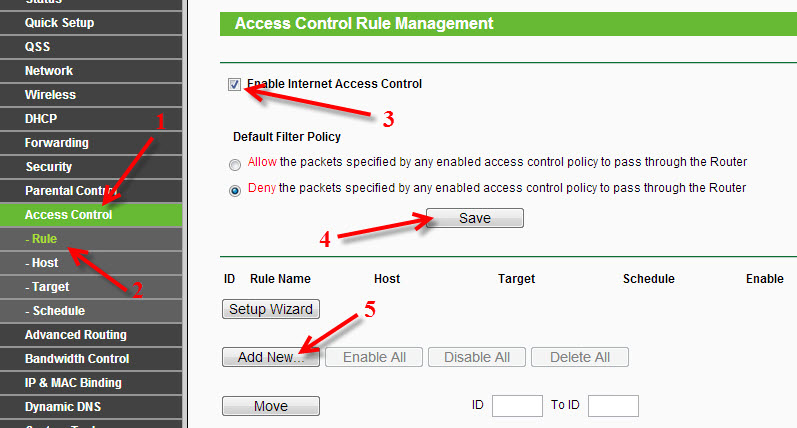
Go to Access Control – Rule.
Check the box next to Enable InternetAccess Control.
Below that, leave the item Deny the packets specified… (Deny packets not specified…).
Click on Save.
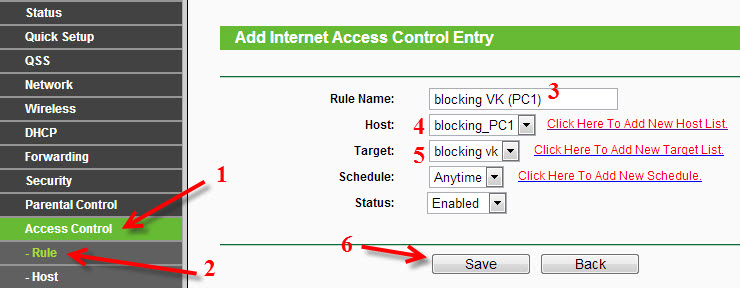
Next, click on Add New… (Next, click on Add New ...)
In the Host field , select the computer we need, which we have already added.
In the Target field select the list of sites to block, which we have also added.
Further, we leave everything as it is. There you can also customize the blocking by time, if necessary.
Click Save.
 That’s it, the rule is created. You can create many similar rules. You can edit them, disable and delete them.
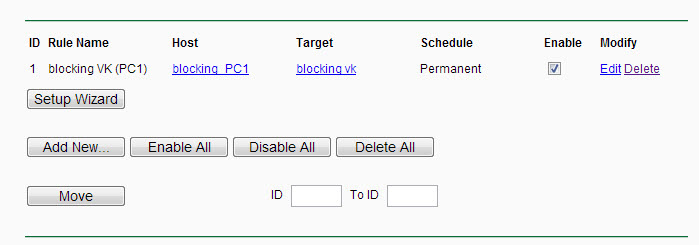 All settings will be used even without rebooting the router. Sites that you blocked on a particular device will no longer be blocked until you disable or delete the rule in the settings.
One more thing, if you block say facebook.com, the mobile version of m.facebook.com will not work either.
 How to Configure a Router Without a Disk with A Program?
  How to set up wi-fi router (go into settings) without the Internet
  Web Interface of the Router. What's this? How to Enter?
  192.168.1.1 or 192.168.0.1 - entrance to the wi-fi router settings