
Tenda N3 Router Setting – Connect the Internet, Set Up Wi -fi and Password
In this article, we will do a complete configuration of the router from the company Tenda. The model of which is Tenda N3 (at the link you can see reviews, overview and characteristics of the model). At first glance, it may seem that setting up the router Tenda N3 is very difficult. In fact, everything is very simple.
Tenda N3, this is an interesting router in all ratios. It is very small and unusual. It has only one LAN port. This means that by cable, you will be able to connect only one device (computer, TV, etc.). It lacks a lot of features that you can find in more expensive routers. The Tenda N3 is truly a budget router that will work for connecting multiple devices to the internet. If you load this router heavily, it will most likely just glitch and you’ll need to reboot it. But, such unstable work of Wi-Fi network (under loads) on Tenda N3 is not a minus of this router, but a manifestation of its small price. You can read more about it at the link above. There you can also leave your review about Tenda N3, because you are likely to use it already. Or you will use it after customization.
With this article you will be able to fully customize your Tenda N3 router. I’ll show you how to do a quick setup of the device, and if that’s not enough for you, we’ll go over all the nuances such as:
- Connecting via cable, or to a new Wi-Fi network
- Entering the router settings
- Setting up a connection to a WAN provider
- Setting up Wi-Fi network on Tenda N3
- Set (change password) for the wireless network
- Configuring LAN on Tenda N3
- Port forwarding
- Changing the password to enter the settings.
Connecting to the Tenda N3 router
You can configure the router both by cable (via computer, laptop) and by Wi-Fi from the same laptop, phone, tablet. If possible, I would advise you to do the configuration via cable. But, as far as I know, there are cases when Tenda N3 doesn’t come with a network cable.
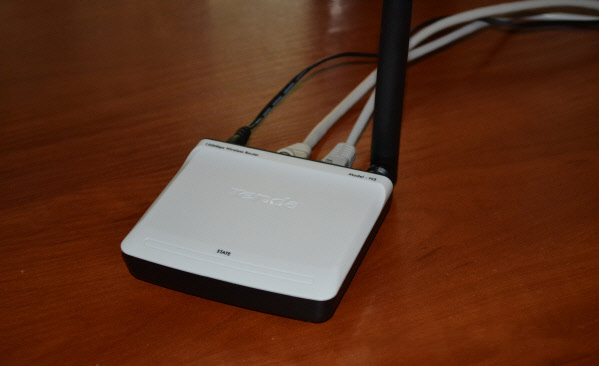
Connect the power to the router, then in the blue WAN connector connect the cable from your Internet provider or ADSL modem. And in the yellow LAN socket connect a network cable, which will connect the router to your computer (if you will not be configuring the router via wi-fi).
 Connection via wi-fi
If you are going to configure the router wirelessly, the device from which you will do the configuration should be connected to Wi-Fi with the standard name “Tenda_six digits”. The network will appear immediately, after connecting power to the router.
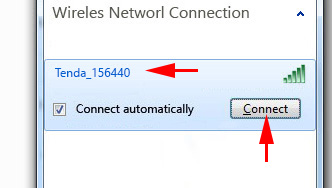 The network will be without a password. Just select connect, and if another window appears asking you to set up the network, click on the link “Connect to the network without…”.
The connection to the router should be established, you can enter the settings.
Entering the control panel, and quick configuration of the Tenda N3
Going into the settings of the Tenda router is very easy. In your browser, type the IP address of the router 192.168.0.1 and click on it. The settings should open immediately. If you are prompted for a login and password, enter admin for the login and leave the password field blank. If you have problems, you can check the general article on entering router settings, or a special article for Tenda devices.
You will immediately see the page with quick and basic settings of our router Tenda N3. By the way, this is very well thought out. You can configure the router literally in a few steps and all on one page.
We need to fill in such parameters (look at the description and screenshot below):
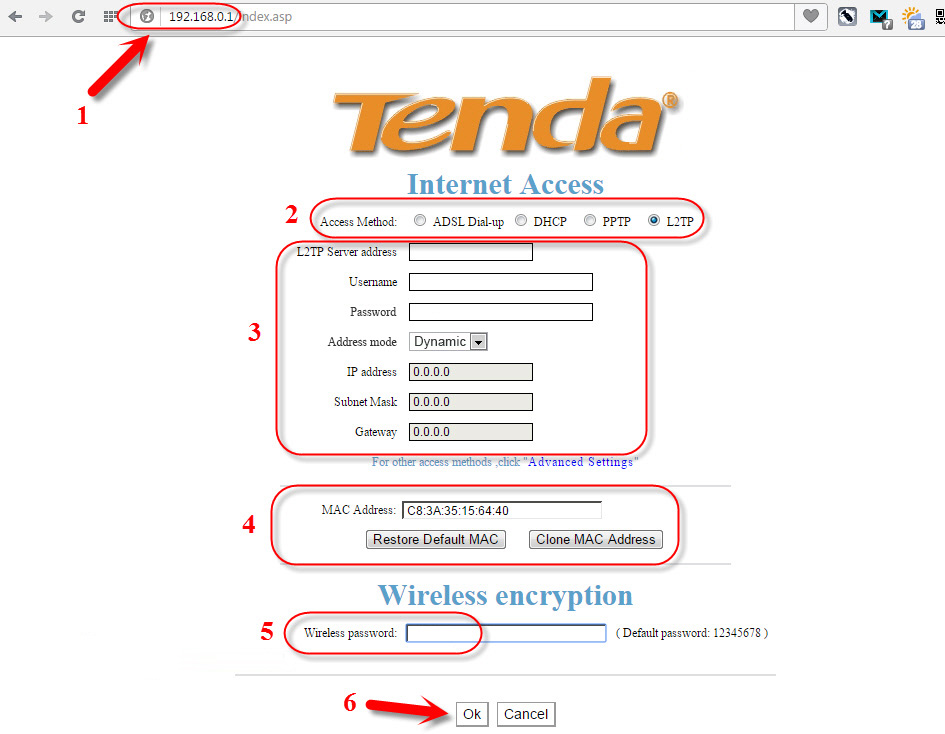
- Under number 1, the screenshot shows the IP address to enter the settings.
- Opposite Access Method, we need to select the type of connection your ISP uses. It is very important to choose a paired connection. If you don’t know what type to choose, you can call your ISP and ask. Or, look at their website. You might find this article about what type of connection you should specify when setting up your router useful. A few nuances: ADSL Dial-up, it is the same as PPPoE, this type of connection is used by such popular providers as Vodafone and others. DHCP is a type of Dynamic IP connection. It is used by many ISPs. L2TP connection. If you connect your router to an ADSL modem, then choose DHCP.
- Under the number 3 on the screenshot below, I have highlighted the fields that need to be filled in with the data that your ISP must provide you with (perhaps this information is specified in the documents that you received when you connected to the Internet). Depending on the type of connection you choose, these fields may vary. For example, if you choose DHCP (Dynamic IP), you do not need to set any additional parameters.
- Below, we need to set the MAC address of the router. If your ISP does not do MAC address binding, then just click on the Restore Default MAC button. If your ISP does, and you are configuring the router from a computer to which the Internet was previously bound, then click the Clone MAC Address button. The router will copy the MAC from the computer and the internet will work. Otherwise, you will need to call your ISP and ask them to assign a new MAC address to your router. You can find it on the sticker on the bottom of the router itself, or in the MAC Address field (after clicking on the Restore Default MAC button).
- And last of all, the Wireless password field. In this field, make up and write down the password that will be used when connecting to your Wi-Fi network on Tenda N3. The default password is 12345678. Make up a complex password, at least 8 characters. Make a note of the password so that you don’t forget it.
- Check all the settings again, and click on the Ok button to save the settings.
The router will most likely reboot. Connect to it again, if you are connecting via wi-fi, you will need to use the new password you just specified.
If you have correctly specified all the parameters, then the Internet through the router should already work. If not, you can again go to the settings, to the Quick Setup page, and check or change the required parameters.
Here we can finish configuring our router. Below, I will show you how to change the ISP connection settings, how to change the Wi-Fi network name on your Tenda router, how to forward ports, configure the local network, and most importantly, how to change the password to access your router settings (not to be confused with the Wi-Fi network password). If you don’t need these settings, you should change the password to access the control panel!
To open more settings of Tenda N3, you need to go to the control panel, and at the top click on the link Advanced Settings.
 This will open a page with the connection status and many different settings.
WAN (internet connection) settings on the Tenda N3
You can edit the ISP connection settings on a separate page. In the settings, click on the WAN settings tab.

These are very important settings. We have already mentioned them above, on the page of quick router setup. If you incorrectly specify the parameters for connecting to your ISP, the Internet through the router will not work, as it will not be able to establish a connection with the ISP. The Wi-Fi will work, but it will be “No Internet Access”, or it simply won’t open websites.
If you have such a problem, most likely the solution should be found on this page. Check the type of connection and the required parameters. Everything you need to set on this page should be provided to you by your internet provider.
Setting up Wi-Fi and changing the password
In the quick setup process, we have already set a password that will protect your Wi-Fi network. But, we haven’t changed the name of this very network. Now I will show you how to do it. In the settings, go to the Wireless settings – Wireless Basic Settings tab. In the primary SSID field, you can set a name for your wireless network.

Don’t forget to click Ok to save the settings. To change the wi-fi password, go to the Wireless settings – Wireless Security tab. In the Security Mode drop-down list select WPA2-PSK and in the Key field specify the Wi-Fi network key.

Click the Ok button to save the settings.
If you later want to change the password for wi-fi or access to router settings, you can do it according to special instructions.
Setting up a local network on Tenda N3
You can change the IP address of the router in the local network on the Advanced settings – LAN settings tab.
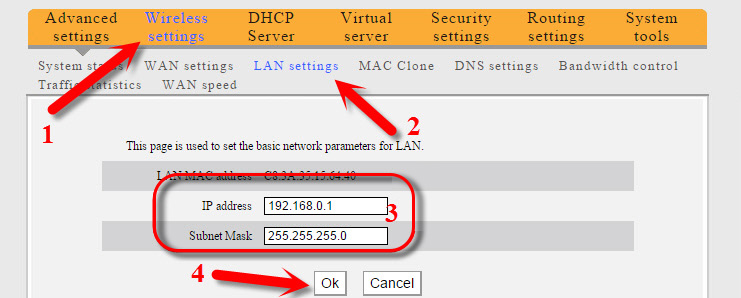
As usual, save the settings by clicking on Ok.
Port forwarding on Tenda N3 router
To configure port forwarding on Tenda routers, you need to go to Virtual server – Port Range Forwarding. Specify the start and end port (if one port, then specify the same in both fields), then set the IP address of the device connected via LAN network, select the desired protocol (TCP, UDP, Both) and check the box next to Enable.
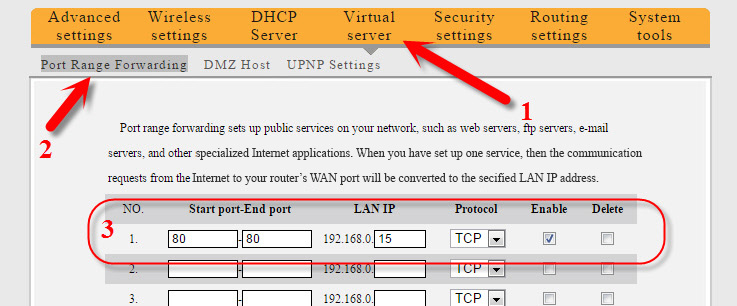
Don’t forget to save the settings by clicking Ok.
Changing the password to enter the settings
A very important point. To change the password used to access the control panel, open the System tools – Change Password tab. In the Old password field you should specify your old password. If you have not changed it yet, leave this field blank. In the New password and Confirm new password fields specify the same password, which will be used to log in to your router settings.
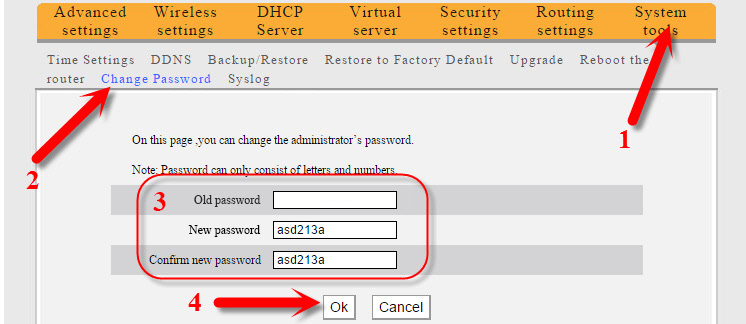
Now, to enter the settings, you will need to specify the password you set.
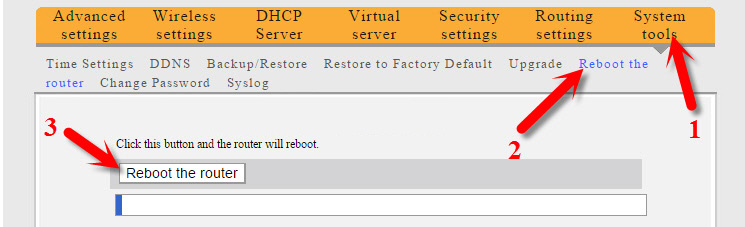
After all the settings, it is desirable to reboot the router. The best way to do this is through the control panel. In the System tools – Reboot the router section, click the “System tools – Reboot the router” button and wait a bit.
Afterword
As it turned out, it’s not difficult to configure Tenda N3 on your own. When I saw the settings panel for the first time, I thought it would be much more complicated. I liked the fact that they had a cool idea with the main page that appears right after accessing the settings and where you can set all the necessary settings. It turns out that you can configure your router on one page. I would only add the option to change the wireless network name and password to protect the settings.
 Setting Wi-Fi Router Tenda AC10U
 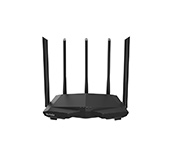 Tenda AC7 - OverView, Connection and Setting Up a Two -Band Router from Tenda
  Tenda F3 Wi-Fi Settings
  Tenda AC19 Review - Productive Router Router AC2100