
The Wi-Fi Indicator does not Burn on a laptop. What to do?

I decided to prepare a separate article with solutions to the problem when the wi-fi indicator light on the laptop is not lit, which signals the operation of the wireless module on the laptop. It doesn’t matter how you got this problem. Immediately after buying the laptop, reinstalling Windows, or the wi-fi indicator stopped lighting up suddenly. I think the tips in this article will help you fix this problem. We’ll look at solutions using Windows 10 as an example. But if you have Windows 7, or Windows 8, then all the solutions you can apply to yourself. It’s the same with a laptop. The tips will work for different manufacturers: ASUS, HP, Lenovo, Acer, Packard Bell, etc.
To begin with, you need to figure out what your specific case is:
- Most often, when the Wi-Fi indicator light on the laptop is not lit, then accordingly wi-fi does not work. And this is quite logical. Solutions to this particular case we will consider below in the article.
- It also happens when the laptop without problems to connect to wireless networks, everything works, but the light bulb responsible for the indication of the wireless network does not shine. In this case, I advise you to just ignore it. It works and that’s fine. But if you do want to fix it, start by reinstalling the drivers.
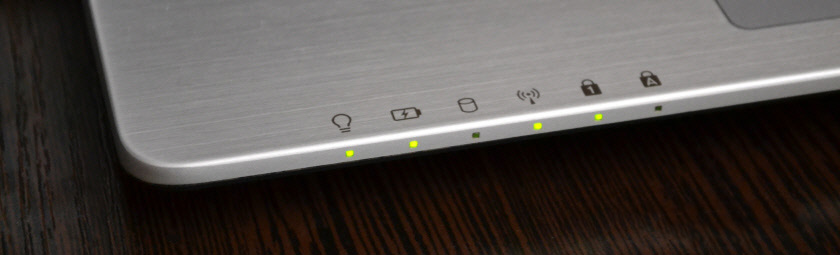
The wireless indicator itself can be located anywhere on the laptop case. It all depends on the specific model. Not seldom it is built into the button that is responsible for switching wireless modules on/off. On my ASUS laptop, this indicator is located on the front panel.
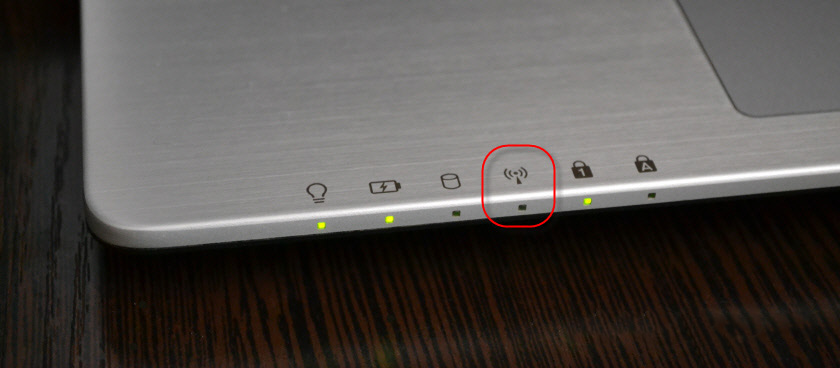
In the photo above, the indicator is not lit only because I enabled Airplane Mode in Windows 10. I enabled it with a keyboard shortcut on my laptop. And in Windows 7 it was the wi-fi module that was being controlled. After installing the appropriate drivers and utilities. Also this light bulb most likely will not be lit if the laptop does not have a wireless adapter driver installed at all. But first things first.
If you have such problems with wi-fi after reinstalling Windows, then you can go straight to the part of the article where I will talk about problems with drivers and their installation.
If wi-fi stopped working suddenly, then try to remember what you did before. What could have caused it.
A few articles that you may also find useful:
- Does not work wi-fi on a laptop. What to do. – A very detailed guide with many solutions.
- There is no wi-fi wireless network connection on the laptop
- How to turn on Wi-Fi in Windows 10 when there is no Wi-Fi button and the error “Could not find wireless devices on this computer”
Turn on the Wi-Fi indicator with the keys on your laptop
Let’s try a simple method. Almost every laptop has a combination of keys that is responsible for turning on and off wireless modules. Sometimes, it’s a separate switch on the case.
Combinations for different manufacturers:
- ASUS – FN+F2
- HP – Fn+F12
- Lenovo – Fn+F5
- Acer – Fn+F3
- Samsung – then these are keys Fn+F12, or Fn+F9
- DEL – Fn+F2, or Fn+F12.
For an example, on my ASUS laptop:
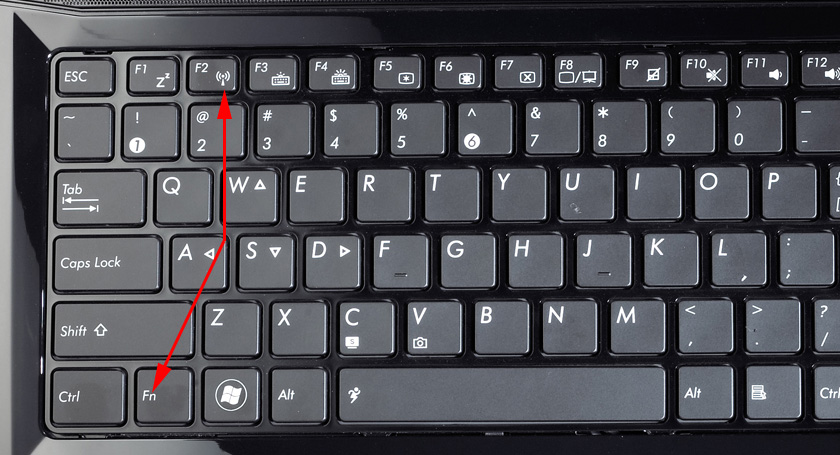
As you can see, the F2 key has the same icon as near the indicator. Press the combination of these keys and see if the light bulb lights up and if wi-fi works. As I wrote above, I have Windows 10 installed, and the combination of these keys simply turns the flight mode on and off. When airplane mode is on – the light doesn’t come on.
But most likely it’s because I don’t have the utility from ASUS installed, which is responsible for the function keys. And if I had Windows 7 installed, the combination of these keys would not work at all without installing a special utility from the manufacturer. Each manufacturer has a different name for this utility. Look for them on the manufacturer’s website, in the downloads section for your laptop.
Check the status of the wireless adapter. Turn it on programmatically
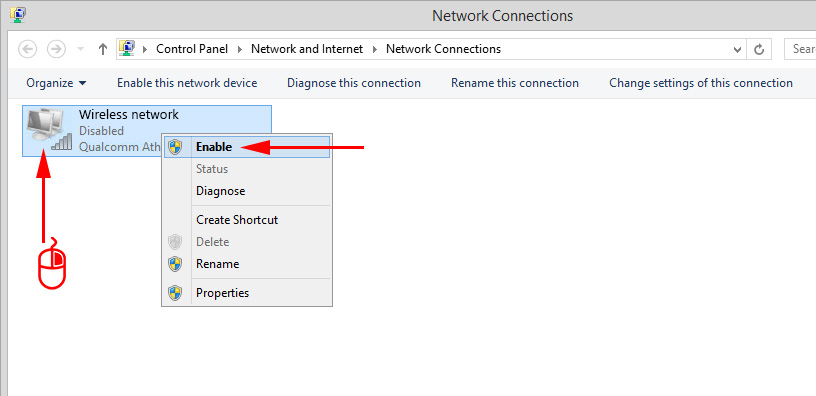
We need to go into “Network Connections” and check if the adapter is enabled “Wireless Network”, or “Wireless Network Connection”. To do this, we do the following:
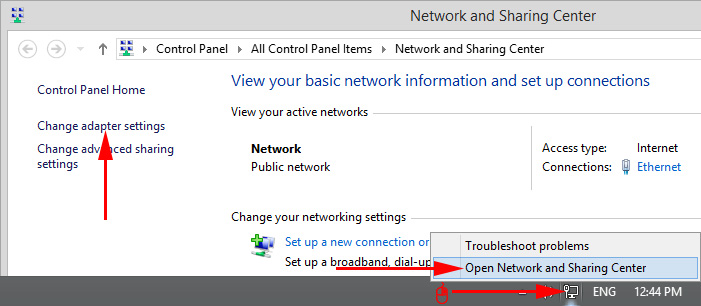
Next, right-click on “Wireless Network”, and select “Enable”. If there is such an option there.
After that, the wireless network on the laptop should work.
Let’s continue to figure it out.
Driver and wireless network indicator
You need to open the Device Manager and see if there is an adapter there, which is responsible for the operation of the wi-fi connection.
Press the keyboard shortcut Win + R, type (copy) the command mmc devmgmt.msc and press Ok. Or launch Device Manager in any other way convenient for you.
Immediately open the “Network Adapters” tab and see if there is an adapter with “Wireless”, “wi-fi”, “WLAN” in its name. Most likely, you will not see it there. I have this adapter, and it looks like this (the name and manufacturer may be different):
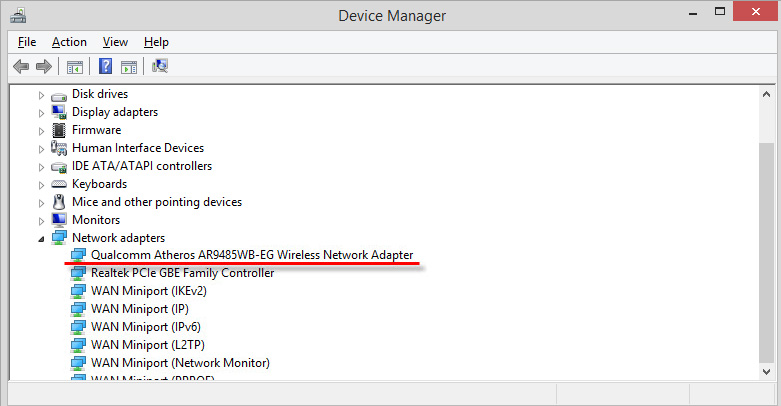
But there will be at least one unknown device with a yellow icon in Device Manager.
This means that you need to install the Wireless adapter driver. This driver can be downloaded from the manufacturer’s website, necessarily for your laptop model and Windows version. Or install it from the disk, if it was included with your laptop.
After installing the driver, Wi-Fi should work and the indicator light will be on.
I will not detail the driver installation process, as there are already detailed instructions:
- What driver do I need for Wi-Fi to work on my laptop?
- How to install drivers for Wi-Fi adapter in Windows 7?
I think this information will be enough to solve the problem with the wi-fi network indicator light on your laptop. If something didn’t work or you have any questions, please leave them in the comments.
 Windows Failed to Automatically Detect the Parameters of the Proxy of this Network
  Error In Resolving General Access to the Internet
  An Error Fails to Convert the DNS Address of the Server
  Wi-Fi Is Connected, But the Internet Dees Not Work. Pages do not open