
“Connection is Limited” In Windows 10 by Wi-Fi and Network Cable
Hi. Now we’re going to deal with the “Connection is limited” issue that occurs when connecting to the internet in Windows 10 over a wireless Wi-Fi network, or with a network cable. This is probably the most popular error that you can see not only on Windows 10, but also on Windows 8 and Windows 7, which simply wrote “No internet access”.
The solutions to the “Restricted” problem in Windows 10 are various. Now we will try to understand everything.
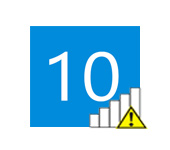
If you have already faced this problem, you probably noticed near the Wi-Fi network status “Restricted”.

And a yellow exclamation mark near the connection icon in the notification panel.
![]()
And when connecting via cable (Ethernet), the status will be “No Internet connection”. I also recently wrote about a problem when the computer doesn’t respond to the network cable connection at all.

Whatever it is, whether you’re connecting to the internet via Wi-Fi or cable, if you see this error, the internet on your computer won’t work.
No internet access in Windows 10: general tips to solve the problem
First, let’s take a look at some general, simple tips that will probably help you solve this internet problem in Windows 10. It doesn’t matter what kind of connection you have, either wi-fi, or Ethernet:
- Just reboot your laptop, and reboot your router (if you have a router connection).
- If you have a cable connection, you need to check it. See if everything is connected properly. If possible, try replacing the cable.
- Try disabling your antivirus.
- Check to see if you have paid for your internet.
- If you are just setting up your router and you see the “Restricted” error in Windows 10, then the problem is most likely in the router settings. Check them, and correctly set the connection parameters to your ISP. And also, on this topic we have a separate instruction: when configuring the router writes “No Internet access”, or “Restricted”.
- Determine what the problem is: in the computer, router, or ISP.
And most importantly:
If you have found out that the problem is in the computer, then read the article below, we will deal with it.
And by tradition, the first thing to do is to check IP and DNS address settings. Try to set static addresses, or set the automatic acquisition.
Configuring IP and DNS addresses in Windows 10 with Internet problems
Very often, the status “Restricted” can appear because of problems in the configuration of IP and DNS addresses. Windows 10 in this case is no exception. These settings should be checked first of all. And it does not matter how you are connected to the Internet, over the air, or by cable.
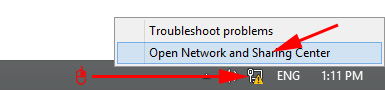
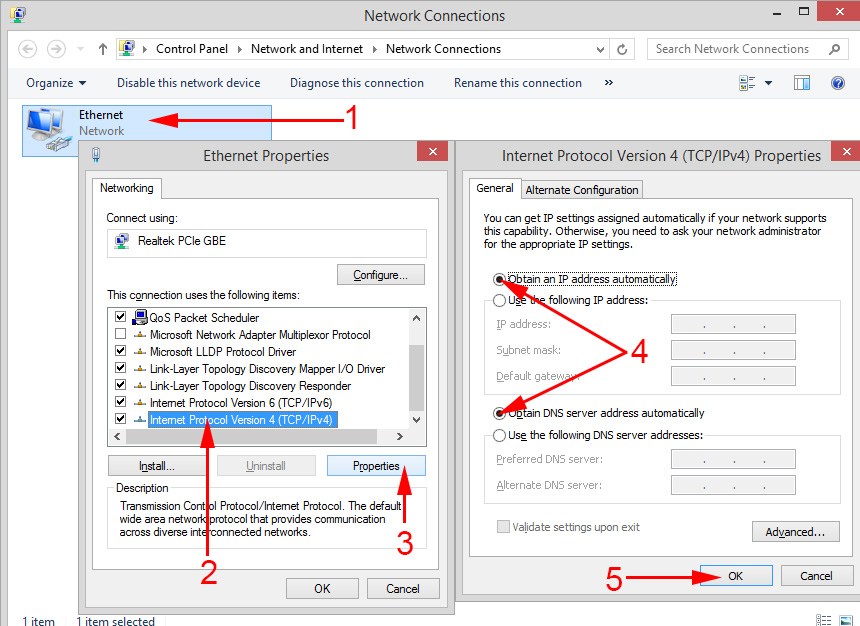
Right-click on the Internet connection icon and select Network and Sharing Center.
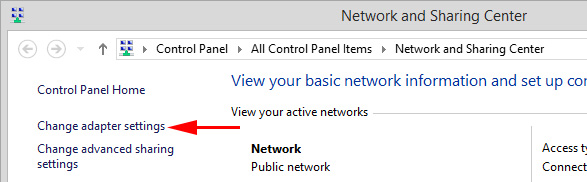
Next, on the left, select Change adapter settings.
Right-click on the adapter through which you have an Internet connection and select Properties.
- If you have an error “Restricted” when connecting via wi-fi, then click on the adapter Wireless network.
- If you are connected by cable, then the Ethernet adapter.

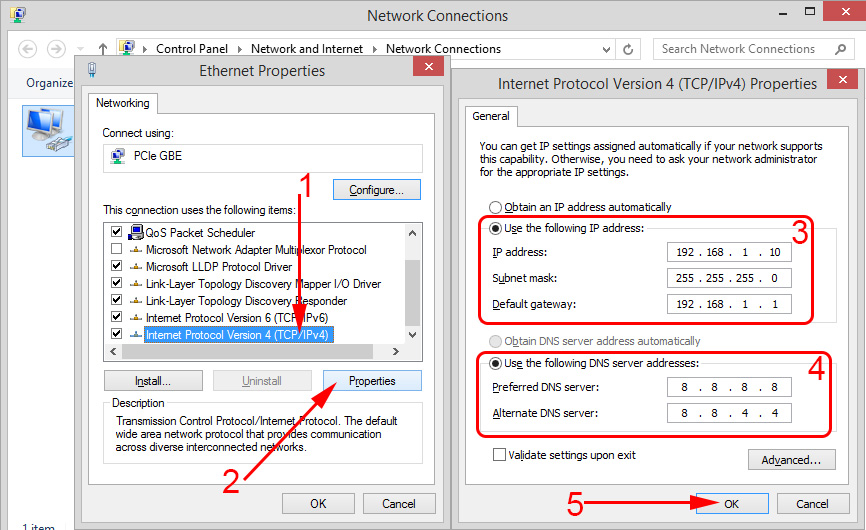
A window will open in which you should select IP version 4 (TCP/IPv4) and click Properties.
If you have automatic IP acquisition set there, try to set static data by checking the Use the following IP address box. For example, these are:
- IP address – 192.168.1.10 (the last digit can be different) provided that your router’s IP is 192.168.1.1. There may be another 192.168.0.1. You can see it at the bottom of the router, on the sticker.
- Thesubnet mask will be set automatically.
- Thedefault gateway is the same as the address of your router: 192.168.1.1, or 192.168.0.1.
- Specify thepreferred DNS-server – 8.8.8.8.8
- Alternative DNS-server – 8.8.8.4.4.
Screenshot for clarity:
If you have some data set there, then try automatic IP and DNS retrieval.
And one more way. You can try to set IP acquisition automatically, and set your DNS servers, which I specified above.
After the changes, it is advisable to reboot the computer and the router.
A few more tips to solve the problem
- If you have an error on your laptop appears when it is disconnected from the power grid, then try plugging it in. It happens that when working on battery power, the system limits the power to the wireless adapter. You can prevent the wireless adapter from disconnecting to save power. Try doing that.
- You can also try updating the driver on your wireless adapter, or network card. It depends on which connection you are having the error. The driver that Windows 10 automatically installs doesn’t always work stably. Download the driver from the official website for your laptop/adapter model and install it. If you have problems with the lack of internet, after checking the parameters I wrote above, you should definitely experiment with drivers.
- Check if the “IP version 4 (TCP/IPv4)” checkbox is checked in the properties of the network or wireless adapter.
You can also check if your region is set correctly in the router settings. You can check this in the control panel, usually on the tab where you configure Wi-Fi network.
Update: Two more ways in which you can solve the “Restricted” problem in Windows 10
These solutions were suggested to me in the comments. Thanks to everyone who shared useful information! In the first method, we will enable FIPS compatibility mode (I remember this method was also used in Windows 7 and Windows 8). And in the second method, we will check if there are any unnecessary components in your adapter properties that use the connection. Enabling compatibility mode with Federal Standard Information Processing Right-click on the Internet connection icon, and select “Network and Sharing Center”. In the window that opens, click on the link with the name of your Wi-Fi network. Like in the screenshot below. 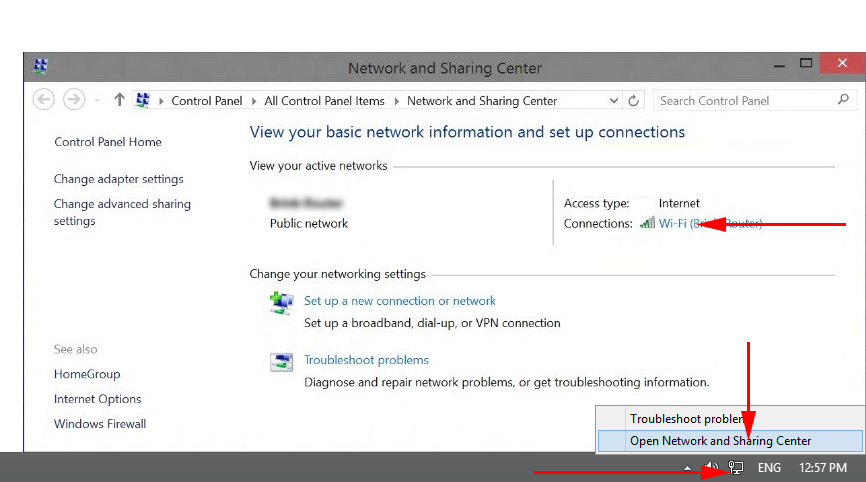 In the new window, click on “Wireless Network Properties”, then go to the “Access” tab, and click on “Advanced Settings”. Check the box next to “Enable Federal Information Processing Standard (FIPS) compatibility mode for this network”. And click the Ok button on all the windows.
 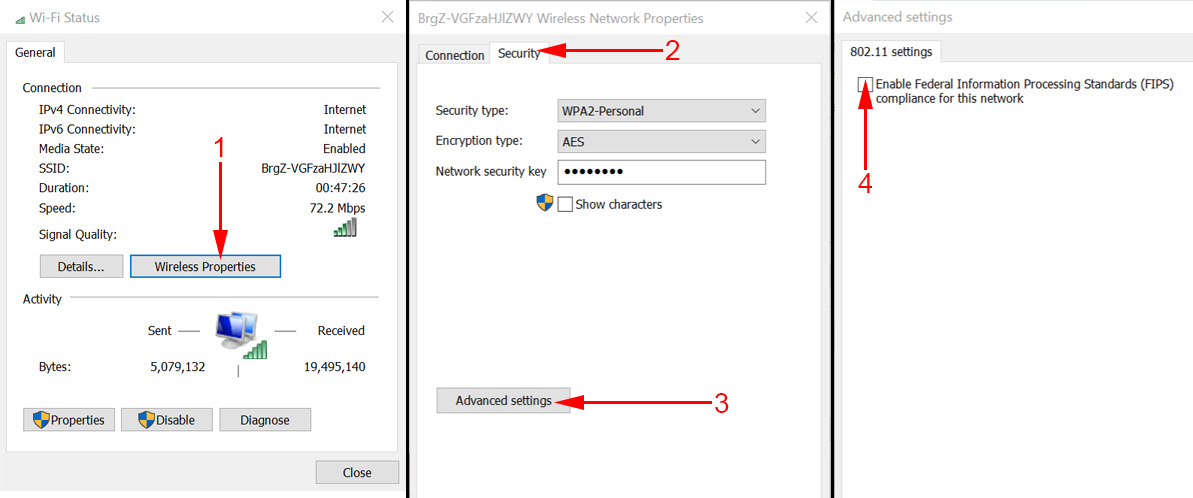 The second way: check the list of components in the properties of your connection. Open the “Change adapter settings” window, right-click on one of the adapters: “Ethernet”, or “Wireless”, depending on how you have an Internet connection (cable, or wi-fi). Select “Properties.” And in the “Checked components used by this connection” window, look for unnecessary checked components. In the comments wrote about the problem when in this list was marked component of antivirus, and therefore the connection in Windows 10 was “Restricted”. If you have something unnecessary there, just uncheck it, and click Ok. Reboot your computer. If it didn’t work, it’s advisable to revert everything back. I have it like this:
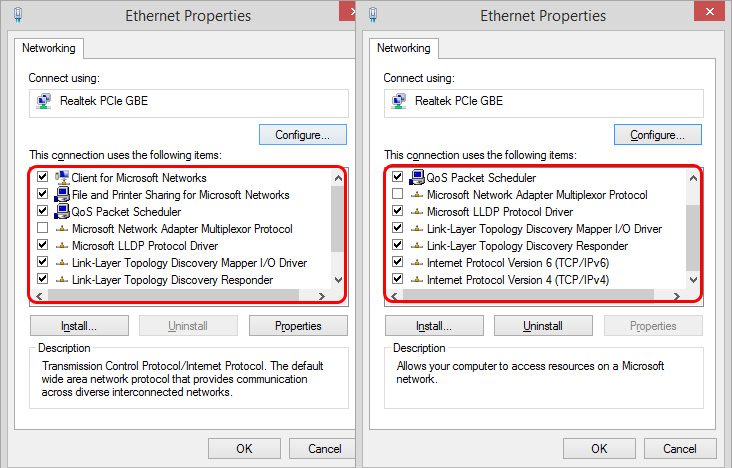
If you know other solutions to this problem, you can share useful information in the comments, it will be useful to many. There, you can also leave your questions on the topic of the article, we will deal with it together.
If possible, I will add new information on the problem.
 SOME SITES In the Browser Through The Router Do Not Open. What to do?
  The Internet not working via Wi-Fi Or Cable in Windows 10 After Updating
  Red Cross on the Internet Icon in Windows
  On the laptop thes no wireless Network Connection Wi-Fi