
Detailed Institutions for Updating the Firmware on the TP-Link Router

Before you start flashing your Tp-Link router, be sure to read the article about how to choose the right firmware and where to download it from (if you haven’t read it yet). We should already have an archive with the new firmware saved on our computer. And in this article, we’ll just look at the process of updating the software on Tp-Link routers.
It doesn’t matter what model you have: TL-WR741N, TL-WR842ND, TD-W8968, TD-W8960N, TL-WR841N, TL-WR741ND, TL-WR843ND, etc., this article will work for any model.
Instructions for Tp-Link TL-WR841N
Detailed instructions on how to flash TL-WR741ND, and TL-WR740N
If you have these models, please follow the links. If you don’t, follow these instructions.
The flashing process itself is very simple and safe for your device. But, provided you follow the following rules:
2. When the software update starts, never turn off the router and the computer. Do not touch the cable.
3. Make sure you have downloaded the correct firmware. For your router model and selected the correct hardware version. Read this article again.
If we’ve got the security rules sorted out, we can proceed.
Extract the firmware file from the archive
One more point. You downloaded the firmware from the website in a .rar archive. From it, you need to extract a .bin file. It is called something like this: wr841nv8_en_3_16_9_up_boot(170210).bin.
Just pull it from the archive onto your desktop, or into a folder.
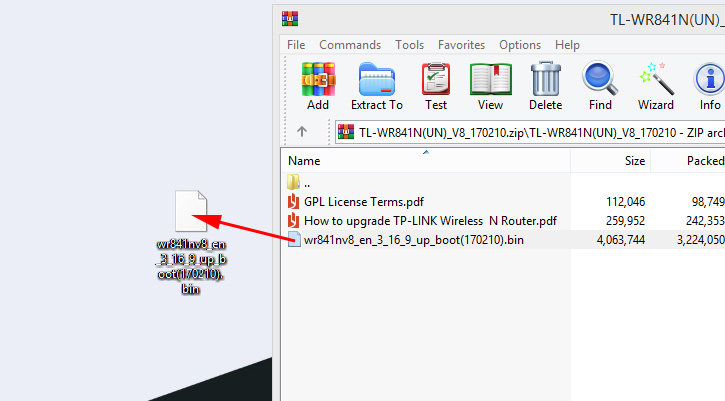 The file should just lie on the desktop, or in a folder. So that we can select it later.
How to flash the router Tp-Link?
As I wrote above, you need to connect the router to your laptop with a network cable. And disconnect from the wireless network, if the connection was established.
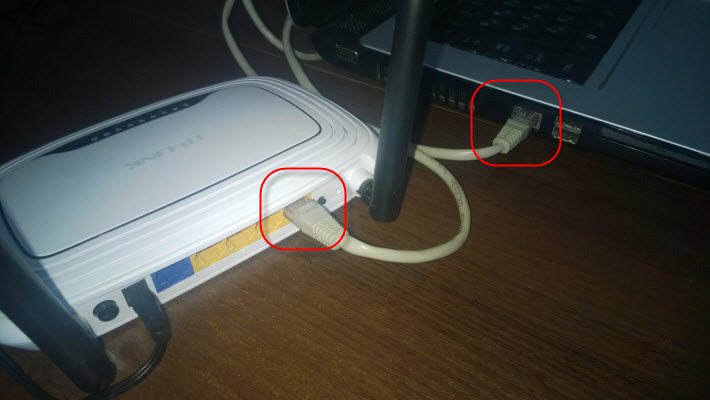 The cable from the blue WAN connector can be pulled out at the time of the update, but it is not necessary.
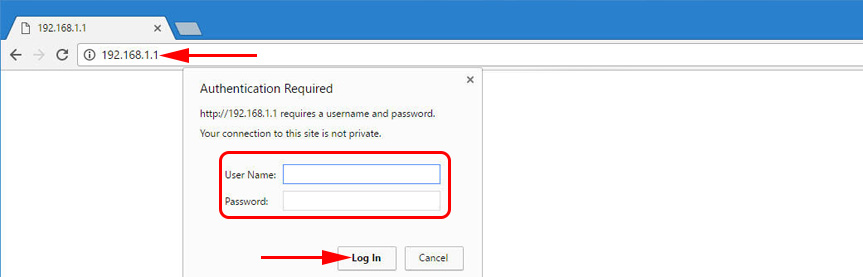
All connected, then open any browser on your computer and in the address bar go to 192.168.0.1, 192.168.1.1, or http://tplinkwi-fi.net. Enter login and password, by default (if you have not changed them) – admin and admin. IP address for entering the settings, login and password by default can be found on the sticker, which should be on the router itself.
 On the settings page, on the left, at the very bottom, open the System Tools – Firmware Upgrade tab.
Click on the“Select File” button.
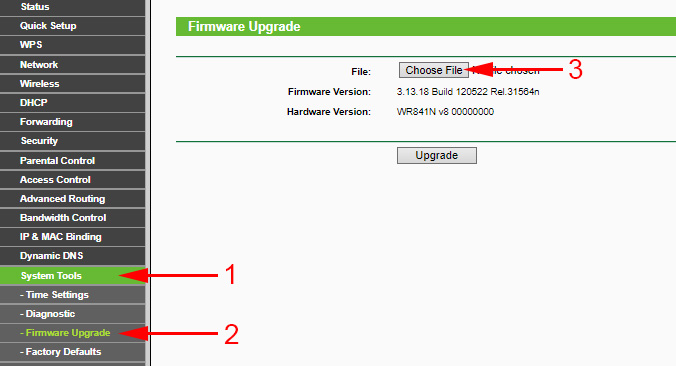 Select the firmware file in .bin format on your computer (which we extracted from the archive at the beginning of this article).
 Click on the Upgrade button.
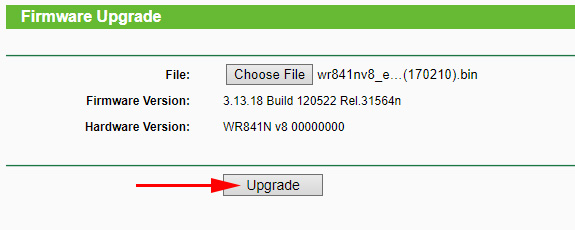 The upgrade process will start.
 When it finishes, the router will reboot.
Since all the settings will be reset, you will need to re-enter the settings (using your default login/password) and configure your router. You can do it using TL-WR941ND as an example.
 Were to download the firmware for the tp-link router? How to Choose The Right Firmware?
  How to Flash Asus Router? Firmware Update Instructions