Setting a Wireless Wi-Fi Network on the TP-Link Router

That’s why I love Tp-Link networking devices, because all their router models have the same control panel.
For example, using these instructions you will be able to set up wi-fi on the same TL-WR841ND, TL-WR740N, TL-WR940N, TL-WA701ND, TL-WR743ND, TL-WR842ND and other routers from this company. One manual for all of them. By the way, check if there is a new firmware for your router.
But this article is not about that. I want to tell you exactly how to set up a Wi-Fi network. This is like one of the steps in configuring your router. After you have configured your router to work with your ISP, you need to configure the wireless network. Specify the name of the wireless network, set the region, change the channel or mode if necessary.
We’ll look at the Wireless tab. Let’s look at the settings there, and set the necessary settings.
If the Internet doesn’t work, check your ISP settings on the WAN tab.
Configuring wi-fi on Tp-Link
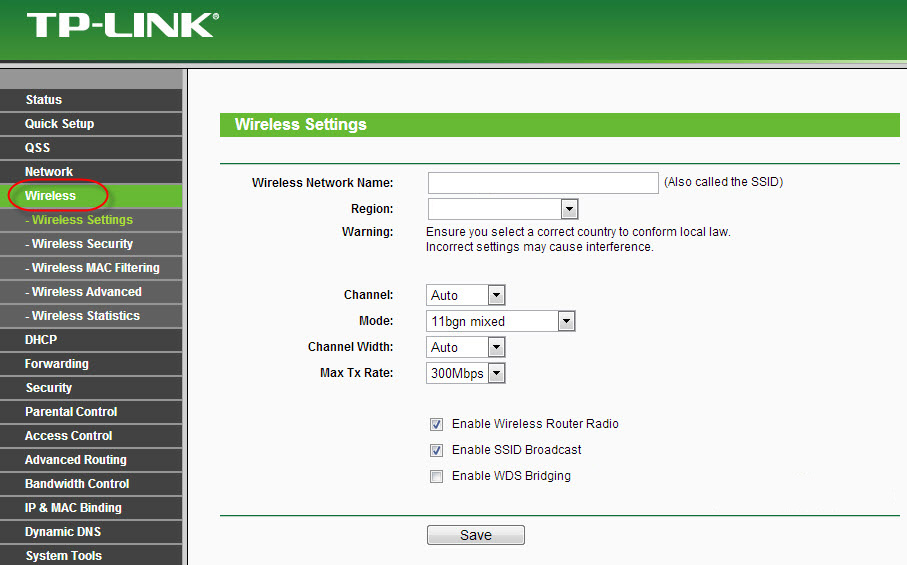
In the control panel of the router, on the left, open the Wireless tab and set the desired parameters.
In the Wireless Network Name field, specify the name of your network in English. This name will be displayed on all devices that will catch your Wi-Fi network. The name can be any name.
Region – select the country where you are located.
Channel – It is best to leave it on Auto. If you have problems with the wi-fi internet, try changing the channel to some static channel.
Mode – Leave 11bgn mixed.
Channel Width – leave Auto.
There may also be a Max Tx Rate option. Set the maximum value.
As a rule, there are three more items below that can be checked/unchecked.
Enable WirelessRouter Radio – this checkbox should be checked. If it is unchecked, the Wi-Fi network will disappear altogether.
Enable SSIDBroadcast – I suggest leaving this checkbox checked. If it is unchecked, the name of your network will be hidden. Devices will not see it. To connect to it you will have to manually create a network and specify the network name. This is a good way of additional network protection, but it is not always convenient.
Enable WDSBridging – If you don’t use your router in repeater mode, or if you don’t know what it is, then this checkbox should be unchecked (by default it is unchecked ).
Don’t forget to click on the Save button after the configuration.
This is how it all looks like:
If you have any questions, ask in the comments. Don’t be shy:)


 Wi-Fi Operating Mode B/G/N/AC. What is it and How to Change in the Settings of the Router?