
Netadapter Repair – A Program for Solving Problems with the Internet Connection

I very seldom tell you about any useful programs that are related to the subject of this site and can be of some use to visitors, but today is just the right case. I came across a free NetAdapter Repair utility on the Internet, and today I will tell you about its features. It’s a simple, small program that doesn’t even need to be installed. The main functions of this program – solving various problems with the network and Internet connection. It also troubleshoots the network and looks at the underlying information. In separate articles I told you how you can clear the hosts file, reset network settings, clear DNS cache, write DNS from Google, etc. Regular users who don’t know much about computers can’t always apply these solutions even with instructions. And in the NetAdapter Repair program, you can do it all with the click of a button.
I think that this instruction will not become popular, because few people are looking for a program that can solve a specific problem with internet connection. Mostly everyone is looking for instructions on how to solve specific problems and bugs. But by replying to visitors’ comments, I will be able to leave a link to this article. And I’m sure – this program will be useful to many people.
To make this article more understandable, I will divide it into two parts. In the first part, I will tell you how to use the network diagnostics features (maybe it will be useful to someone), and in the second part, I will tell you how and what features can be used to solve those or other problems with Internet connectivity in Windows. I will also leave links to more detailed instructions with solutions, if there are such on this site.
The link to download NetAdapter Repair from the official site is https://sourceforge.net/projects/netadapter/.
Network information and diagnostics in NetAdapter Repair
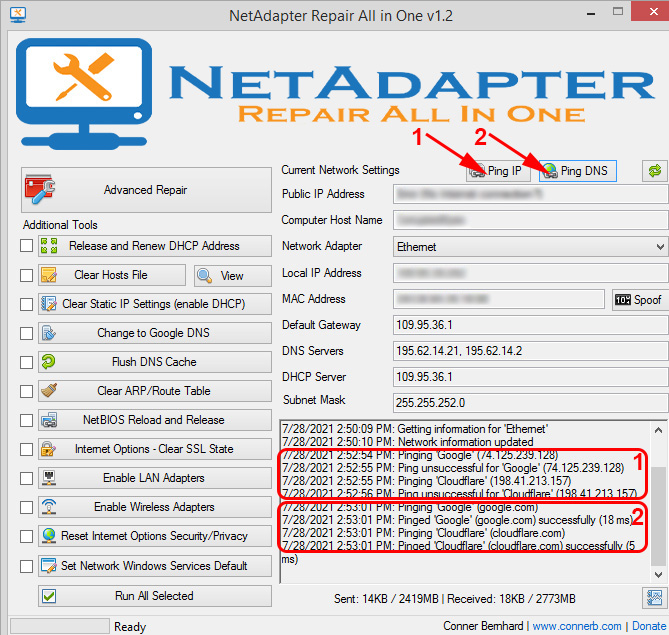
Download the program from the link above and run it. There will be different buttons on the left side – I don’t advise you to click them yet. The right side will display information about the current connection. Let’s look at the main points:
- Public IP Address – this is our external IP address, which was issued by the Internet Service Provider.
- Computer Host Name – the name of the computer in the local network.
- Network Adapter – this field contains the name of the network adapter through which we are currently connecting to the network and for which the information is displayed. We can select another adapter from the list and see information about it. But usually it is not necessary.
- Local IP Address – this is the IP address assigned to our computer by the Wi-Fi router or modem. That is, the internal IP address.
- MAC Address – this is the MAC address of the current adapter. By clicking on the “Spof” button you can change the MAC address.
- Default Gateway – the default gateway.
- DNS Servers – DNS server address.
- DHCP Server – address of the DHCP server.
- Subnet Mask – subnet mask.
For convenience I put numbers next to each item (which correspond to the list above).

Two diagnostic tools are available:
- Ping IP – check if you can connect to the Internet. It sends a ping to the Google site. More precisely to its IP address.
- Ping DNS – check connection to Google’s public DNS-servers.
The button to start the diagnostics is at the top, and the results are displayed in a separate field at the bottom.
Of course, all this can be done without NetAdapter Repair – through the Windows command line. But agree, working with the program is much easier than writing some commands in the command line.
How to fix Internet connection with NetAdapter Repair?
I’ll go a bit off the topic of this article and give you a little advice. Make sure that the problem with Internet connection or local network on your computer is not caused by a problem on your router/modem (if you have one) or Internet provider (you can call support and find out). Check if the Internet works on other devices through the same connection, connect the Internet directly (without the router), disconnect the router for a few minutes, restart the computer. Do not immediately apply any solutions directly on your computer (to avoid making things worse) if the cause of the problem is not on your computer.
Let’s go back to NetAdapter Repair and look at the functions presented in this program, applying which we can solve the problems with network connection.
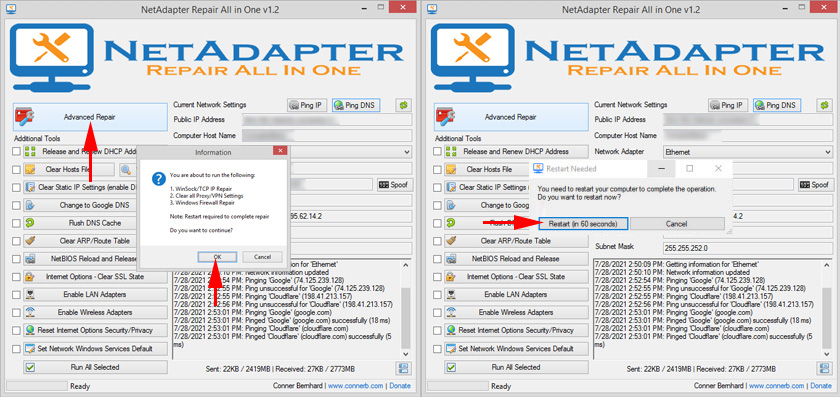
At the very top there is a large “Advanced Repair” button. By clicking on this button you can make basic, advanced fixes to Windows network settings (resetting the basic settings). After clicking on it, a window will appear where you need to confirm the following actions:
- WinSock/TCP IP Repair – reset TCP/IP settings. I wrote how to do it manually here (for Windows 7/8/10) and here (for Windows 10).
- Clear all Proxy/VPN Settings – clear proxy and VPN settings. By the way, it is often because of these settings that sites in browsers do not open. Even though there is an Internet connection. You can also manually check and clear proxy settings.
- Windows Firewall Repair – restore Windows Firewall settings to factory defaults.
You should click Ok to confirm. Next, black windows will appear. Then a window with a Restart button and a countdown will appear in the program. Click on this button and wait for the computer to restart.
You may not have to do an advanced reset, but rather just apply certain solutions using the individual buttons below.
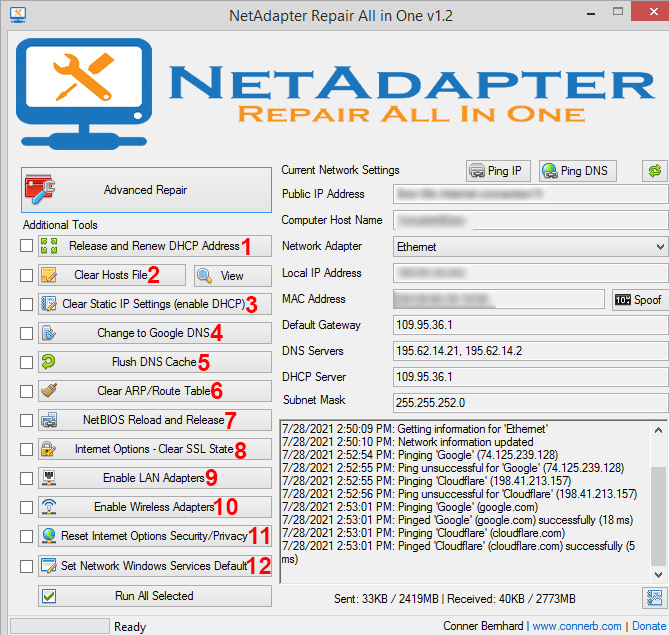
Additional tools:
- Release and Renew DHCP Address – Update IP Address. Reconnect to the DHCP server.
- Clear Hosts File – Clearthe hosts file. View – View the hosts file. This function can be useful when all or some specific sites are no longer open. Most of the time this happens after a virus or malware infection.
- Clear Static IP Settings – clears static IP address settings. This is a very useful tool. After clicking on this button it will be set to obtain IP addresses automatically. I wrote more about this in the article Automatic IP address acquisition in Windows.
- Change to Google DNS – Google DNS servers (which are 8.8.8.8.8 / 8.8.8.4.4) will be set for the current connection. This can be done manually by following the instructions on how to change DNS to Google Public DNS. But in the NetAdapter Repair program, it’s all done with the click of a button.
- Flush DNS Cache – startsflushing the DNS cache. It can solve the “DNS server is not responding” error when opening sites in the browser. After that, you can prescribe DNS from Google (see the previous item).
- Clear ARP/Route Table – performs a complete cleanup of the routing table.
- NetBIOS Reload and Release – reloads the NetBIOS protocol.
- Clear SSL State – function for clearing SSL.
- Enable LAN Adapters – enables network adapters (network cards).
- Reset Internet Options Security/Privacy – reset browser security and privacy settings to default values.
- Set Network Windows Services Default – sets the factorydefault settings for Windows network services.
You can click on them and individually perform certain actions, or select the necessary/all items with checkmarks and run the fix by clicking on the “Run All Selected” button.
There are a lot of useful tools that are very easy to apply. Yes, you can do all of this manually, but it’s complicated and time consuming. And with NetAdapter Repair, you can solve your internet connection problem literally in a few clicks. At least, you can try. Unless, of course, the cause of some Windows network settings.
If you do not understand how to use NetAdapter Repair – ask in the comments. If you have tried different options, but the problem persists – describe your case in the comments. I will reply and try to help you.
 How to Clear History, Cache, Browser Opera Browser
  Incognito Mode in the Opera Browser, Or How to Open A Private Window?
  Avast Writes that the Router Is Vulnerable, Infected, Configured Incorrectly
  What is tor Browser? How to set up and use it