
How to Open Ports on the Linksys Router (Cisco)

In this instruction we will open ports on Linksys router. To make port forwarding is not difficult, but to understand some of the nuances will still have to. If you came to this page, then you probably already know what port (or range of ports) and you need to open, and for what program, server, game, etc.
On any router, not only on Linksys, port forwarding is done in order that the packets that come from the Internet on a certain port, were redirected to the right port of a particular computer. Simply put, it is necessary in order that individual programs, games, servers can directly receive packets from the Internet through the router.
When we access the Internet through the router, we have one external IP address, which is actually received by the router itself. And computers that connect to the router, get already local IP. Therefore, when using programs such as DC++, various torrents, online games, etc., you need to open ports. However, many programs can do it themselves, using the UPnP function.
Now we will consider how to do it manually. In the control panel of our Linksys router. I have Linksys E1200, so I’ll show it by example.
Open the port in the settings of the router Linksys
First of all, we need to go to the web configurator of our router. It is enough to connect to the router by cable or wi-fi, and in the browser go to the address 192.168.1.1. More detailed information on accessing the settings page is in this instruction.
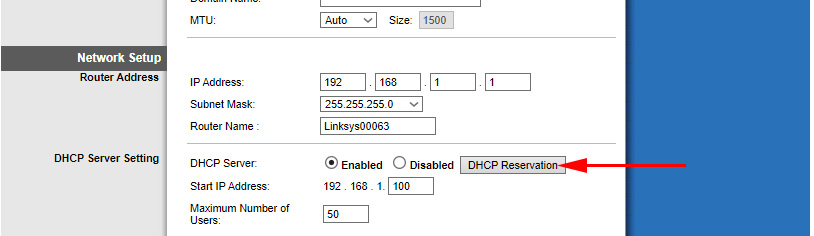
Before we start port forwarding, we need to reserve a static IP address for our computer. I am referring to the computer for which we will be configuring port forwarding. This computer must be connected to the router.
On the main settings page, in front of “DHCP server settings”, click on the “DHCP Reservation” button.
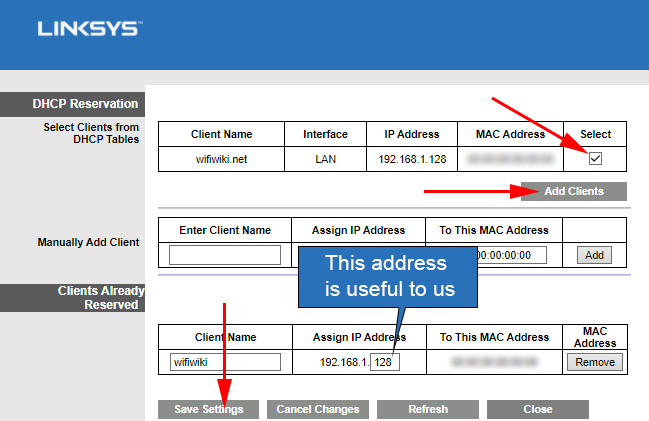
Another window will open, in which you need to check the box next to our computer and click on “Add Clients”. Our computer will appear at the bottom, in the “Clients already reserved” section. We will need the IP-address, which is specified in the table in the “Assign IP-address” field. Memorize it. This is a static address that the router will always give for this computer.
Click on the “Save Settings” button.
Let’s move on to port forwarding
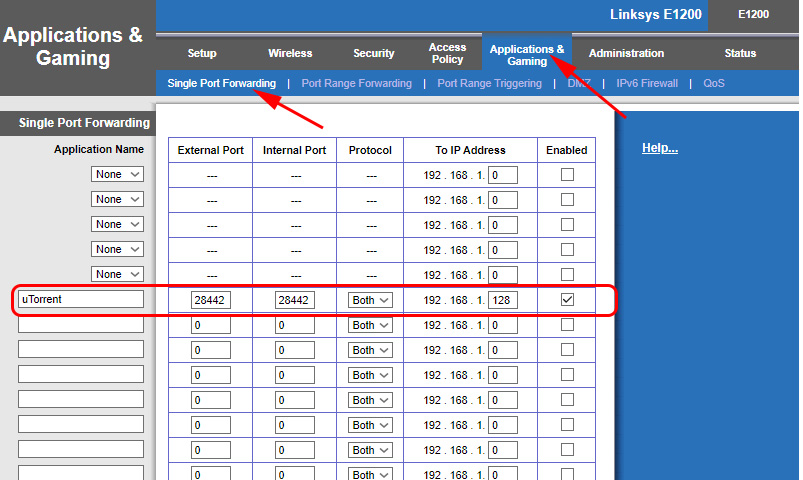
Go to the “Applications & Games” tab. If we only need to open one port, go to the “Single Port Forwarding” tab. There are two options there.
There are several fields where you can simply select the desired protocol (telnet, FTP, DNS, TFTP, etc.), and the router itself will substitute the necessary ports. Both external and internal. We only need to set the IP address of our computer (which we reserved above) in the “For IP address” field, and check the “Enable” box. And don’t forget to save the settings at the very bottom by clicking on the “Save Settings” button.

If you need to set the settings manually, then below in one of the fields it is enough to specify the name of the application (arbitrary, for which you make the settings), then set the external and internal port, select TCP or UDP (you can both), write the IP-address of the computer, and check the “Enable” box.
Save the settings and you’re done. See the screenshot for an example.
That’s all sorted out. But it often happens when you need to open not just one port, but a range of ports.
To do this, open the “Applications & Games” tab – “Port Range Forwarding”.
In the same way, set a name for the application, select the protocol, specify the IP address of the computer for which we are configuring, and check the “Enable” box. Only here we need to specify not the external and internal port, but the start and end port. Let’s look at the screenshot:
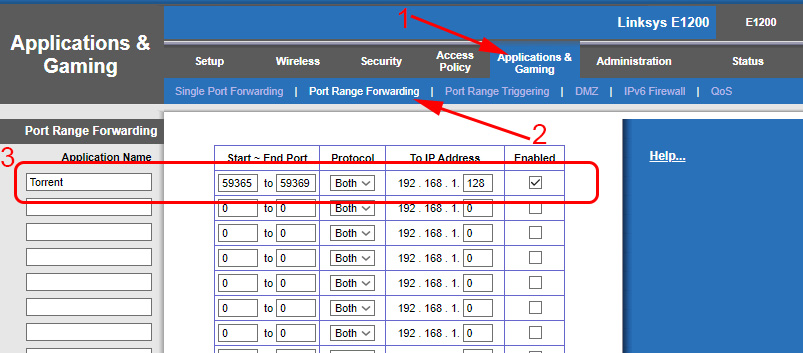
Don’t forget to click on the “Save Settings” button at the bottom of the page.
But that’s not all. We need to redirect this range of external ports to internal ports. To do this, open the “Switch port range” tab.
There we need to specify the name again, then specify the range of ports that we want to forward (which we set above), and specify the range of ports to which we want to forward them. Check the “Enable” box and save the settings.

That’s all. If you need anything, please write in the comments.
 Linksys: How to Put, Or Change Password On a Wi-Fi Router
  How to update the Firmware on the Linksys (Cisco) Router
  Linksys E1200 Router Setup-Connection, Internet Setting and Wi-Fi Network
  How to Make a Reset on Factory Settings on Linksys Routers?