
How to go to a router in a repeater, Bridge, Access Points? The Settings Do not Open After Changing the Operating Mode
In this article, I will tell you how to solve the problem when you can’t enter the router settings on which you have changed the mode of operation. When we configure a regular router in the mode of Wi-Fi signal amplifier, wireless bridge (WDS), receiver, access point, or just manually disable the DHCP server. And after that we can’t open the settings of this router, or the settings of another router are opened. I have written a lot of instructions on how to change the mode of operation on routers of different manufacturers. I have shown how to configure different routers as a repeater (signal booster), wireless bridge, access point, etc. And one of the most frequent questions in the comments to these articles is: “What to do if after changing the router’s operating mode you can’t enter the settings”.
Actually, everything is very simple. When we change the router’s operating mode, after changing the mode (for example, to “Wi-Fi signal booster”) the DHCP-server is automatically disabled on the router. And it is responsible for issuing IP addresses to the devices that we connect to the router. Since the DHCP-server, the device (the same laptop, or PC) can not get an IP-address from the router and connect to it. And if the device is not connected to the router, we can’t enter the settings from it. The same story with setting up the bridge mode (WDS). For example, on TP-Link routers. In the process of configuration I recommend to manually disable the DHCP-server. After that the connection with the router is lost and we can’t enter its settings (web-interface).
So the main reason is that in amplifier, bridge, access point or receiver mode the DHCP server is not working on the router. This is the case with all routers that have different modes of operation: ASUS, TP-Link, D-Link, Tenda, Zyxel Keenetic, Netis, Mercusys, Totolink, etc. There are several solutions:
- Simply do a factory reset of the router. By default, the device works in router mode and the DHCP server is enabled. Then you can open the settings and try again to configure the desired mode of operation, or make other settings. I often recommend this method. It is the simplest.
- On the device (computer, laptop, phone) from which we want to enter the router settings (on which the operating mode was changed and the connection was lost), you need to manually enter the IP-address, mask and gateway. When a DHCP-server works on the router, the device receives these addresses automatically. And since the DHCP-server is disabled after the mode change, they must be manually assigned directly on the client.
- If the router was not just switched to a different mode of operation, but was connected to the main router (for example, the second router in the repeater mode is connected to the first), then you can see the IP address (by which you can enter the settings) in the web-interface of the main router. In the list of connected devices. But this method does not work in all modes and not on all routers.
Next I will show you in detail how to apply these three solutions. Choose for yourself a more suitable way to solve this problem.
Restore the router to its default mode via a factory reset
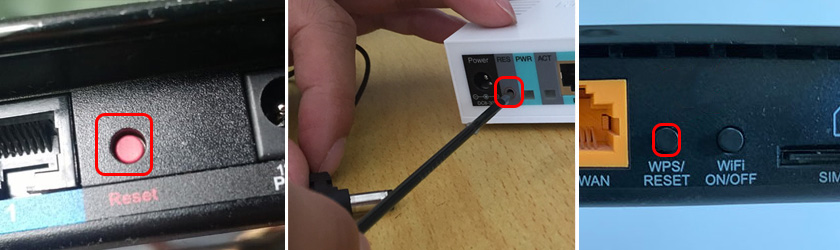
After setting up WDS (wireless bridging), or changing the mode of operation, you can always reset your router back to its original state simply by doing a factory reset. You don’t even need to go into the web interface to do this. The reset can be done with a button. It is on every router. Most often it is signed Reset (Reset, RST, Default).
On different models, the process of resetting the settings can happen differently. But in most cases the following scheme works:
- We turn on the router and wait for about a minute.
- Find the Reset button. If it is recessed in the case, we will need a paper clip, toothpick, or other thin object.
- Press the button and hold it for about 10 seconds.
- At this point (while holding the button) look at the indicators. By them you will be able to realize that a reset has occurred.
- The router will be as good as new after the reset.
After these steps, you will be able to connect to the router and open its settings through your browser. For example, I leave a link to the article in which I showed in detail how to reset the settings of the TP-Link router.
Manually enter the IP, mask and gateway
In most of the additional modes of operation (reipter, access point), the DHCP server is automatically disabled. After which the router does not give IP addresses, devices do not connect and settings do not open. After proper configuration in a certain mode of operation (after successful connection to the main router) IP-addresses are issued by DHCP-server, which works on the main router.
If we have a router, which has been switched to a certain mode of operation and the connection with it is lost, there is no connection when the router is directly connected to the computer, then on the computer, in the properties of the network connection (LAN), or even wireless connection (wi-fi) you can manually write the necessary addresses. After that the connection with the router will appear and we will be able to enter its control panel.
- Connect your computer to the router (in the settings of which you can not enter) via cable.
- Open the “Network Connections” window. This can be done through the options, or by pressing Win+R execute the command ncpa.cpl.
- Open the properties of the Ethernet connection (Local Area Connection). If you plan to connect to the router via wi-fi, then change the wireless connection settings.
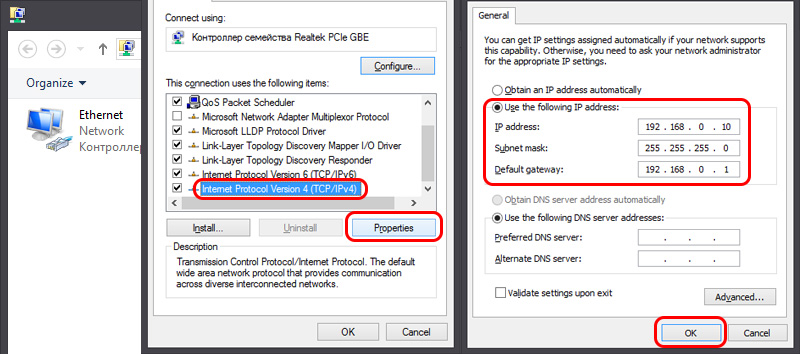
- Highlight “IP version 4 (TCP/IPv4)” and click on the “Properties” button.
- Check the box next to “Use the following IP address” and enter the addresses manually. We need to know the LAN IP address of the router. Most often by default (if you have not changed it) it is 192.168.1.1 or 192.168.0.1. Usually the address in this form is listed on the bottom of the router. In my case, the LAN IP address of the router is 192.168.0.1. So in the IP address field we write, for example, 192.168.0.10 (change the last digit), “Subnet Mask” will be written automatically when you set the cursor, and “Default Gateway” is the IP address of the router. In my case, 192.168.0.1. Like this:
- After that, the connection to the router will appear (if you spelled the addresses correctly). The connection status “Unrecognized network” will disappear. You will be able to access the web-interface using the router ‘s IP address (which you have entered in the “Default Gateway” field).
This is how you can open the settings of the router, on which for some reason was disabled DHCP-server. Already in the settings you can either change the mode of operation, or continue the configuration in the mode you need.
See the IP-address of the router (repeater, access point) in the settings of the main router
Now I will try to explain how it works. We have a main router that gives out internet. We want to use the second router for some specific tasks by connecting it to the first router. In the mode of access point (via cable), Wi-Fi signal booster, bridge, etc. If the second router has been connected to the main router (connection is established), it receives an IP address from the main router. This IP address is displayed in the web-interface of the main router. And it can be used to open the web-interface of the second router.
We need to go to the main router settings, find there the list of connected devices (or the list of DHCP-server clients), find our router and see what IP-address was assigned to it. Then go to the settings at this address.
 The Settings of the Router After Turning Off Are Reset. The Settings are not preserved
  There is no concess to 192.168.1 and 192.168.0.1. No Connection with the Router
  Who is the Internet wi-fi and cable through The Router?
  The Internet Lights (Wan Indicator) On the Router Does Not Burn