
How to Install (Change) Password On a Wi-Fi Asus Router?
No matter if it is a home Wi-Fi network or a network in the office, it should be password protected. If you have an Asus router, this article will show you how to properly password protect your wireless network or how to change the password on your Asus router. Changing the password can come in handy if your network has been hacked or you don’t want those who know the password to connect to it. Just set a new security key and no one will be able to connect.
On Asus routers, there’s nothing complicated about installing security on wi-fi. It is not more complicated than on routers of other companies.
I will show the example of the old and new firmware version (there control panels look a little different).
Asus: password protection of wi-fi network
Connect to your router. It is best to connect via a network cable, just to change or set the password. If this is not possible, you can connect via wi-fi.
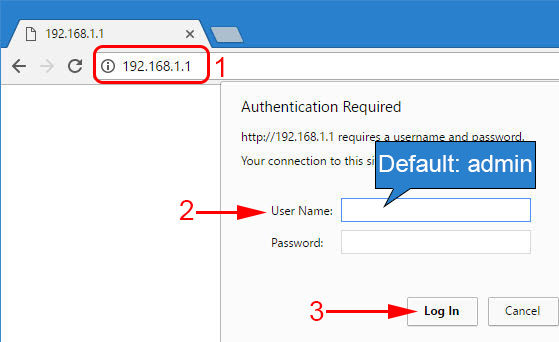
Open any browser and go to http://192.168.1.1. A window will appear asking for login and password. By default, if you have not changed them, they are admin and admin. Enter them and confirm your login.
 The router control panel should open. If you failed to enter the settings, then see this article.
If I’m not mistaken, Asus now has two main control panels (I mean the look). The first one is dark, new, and the second one is lighter. It all depends on the firmware that is installed on your device.
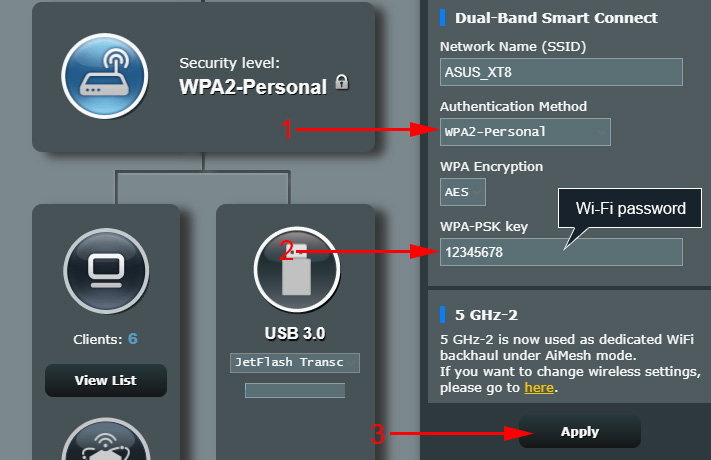
In the new control panel (as well as the old one), the network security settings are placed right on the main page. As soon as you enter the settings, you will see the“System Status” tab on the right. There you can set a password or change it.
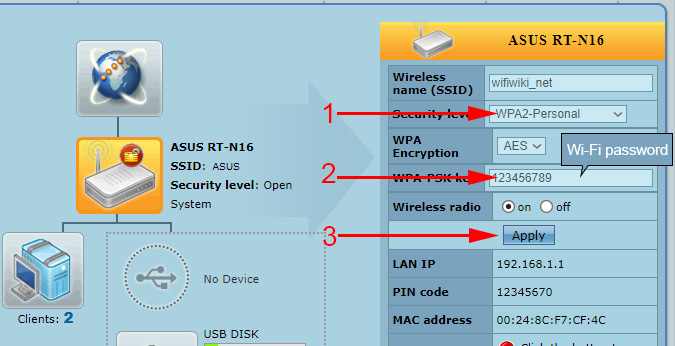
Near the“Authentication method” item, select WPA2-Personal.
In the WPA-PSK Key field, specify the password you want to use to protect your network. Minimum 8 characters, English letters and numbers.
To save the settings, click the“Apply” button.
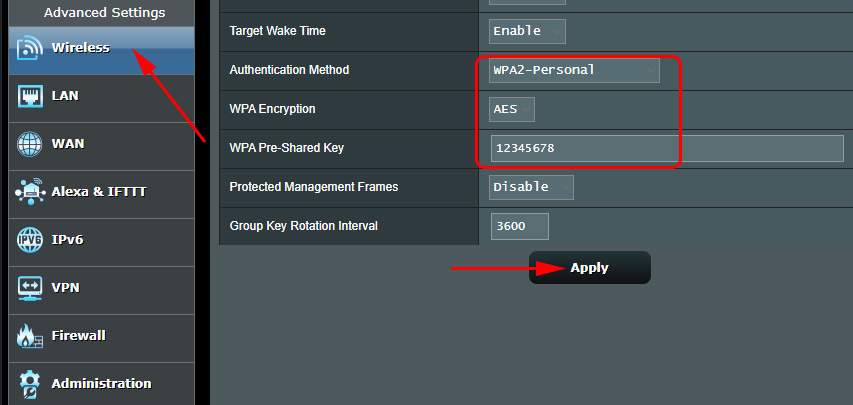
The same settings can be specified on the Wireless Network – General tab.
In the old control panel, which looks brighter, the settings are practically the same. On the main page you can also specify security settings.
Choose the type of security, and specify the password. It is done like this:
Or on the Advanced Setting tab – Wireless. Don’t forget to save the settings.
After you save, you will likely see a window that says you have changed the wireless settings and you need to adjust the settings on the clients (the devices you connect to the network).
After changing the password on your Wi-Fi, devices won’t connect
If you changed the password (rather than setting it the first time), all devices that were already connected to that network may have trouble connecting because the password is different. On a computer, for example, you might see the message “The network settings saved on this computer do not match the requirements of this network”.
On devices that you have already connected, you need to delete the connection, and set it up again with a new password. On mobile devices, all you have to do is delete, or forget the network. You can usually do this in the menu of a particular network. Just click on it, and select something like “delete”.
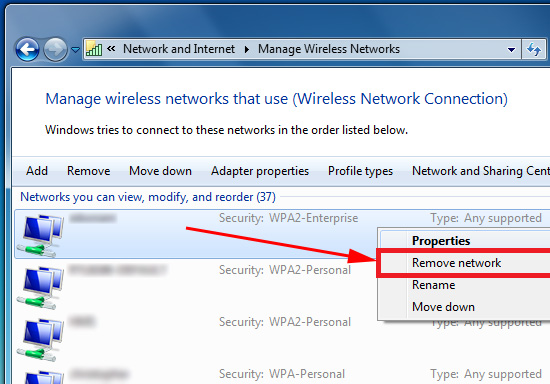
On computers, you need to delete the network the same way. You can do this in Control PanelNetwork and InternetWireless Network Management.
Right click on the desired network and select“Remove Network” from the menu. This is in Windows 7. In Windows 8,“Forget Network” is enough.
Then, just connect to your network, but already with the new password we set.
 Type of Safety and Encryption of a Wireless Network. Which to Choose?
  Wi-Fi Setting Up and Installing a Password (Password Changing) Wireless Network on D-Link Dir-615
  Maximum Protection of the Wi-Fi Network and Router from Other Users and Hacking
  How to Protect the Wi-Fi Network with A Password?