
Linksys E1200 Router Setup-Connection, Internet Setting and Wi-Fi Network
After I created a page with reviews, specifications and a small review of the router Linksys E1200 (by the way, leave your own reviews), I could not find time to write a detailed instruction on how to configure Linksys E1200. But I decided that it should be done already, because the model E1200 seems to be popular now, which means that the configuration instructions will be useful to many people. I will try to present everything in simple language, and of course with pictures. Everything as you like:)
Linksys E1200 is a router, which is made exclusively for home use and medium loads. This can be understood by looking at its price and characteristics. Wi-Fi network coverage is not big, for two rooms should be enough. The Wi-Fi network seems to keep stable, looks just fine and is made of quality plastic. Linksys E1200 is suitable for connecting to the Internet via Wi-Fi your mobile devices, laptops, and if necessary, desktop computers, TVs and other devices via network cable. It is not difficult to configure Linksys E1200, that’s what we are going to do now.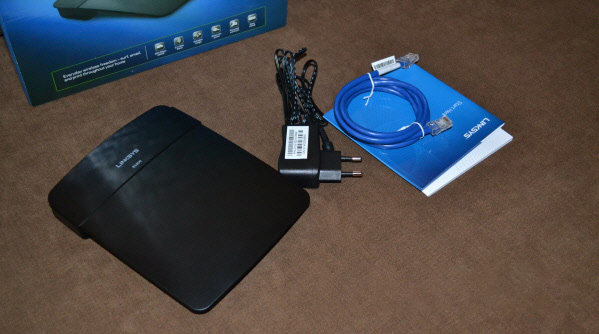
By the way, I will configure it through the control panel (which we will enter through the browser). This router comes with a disk with a program that we run on the computer, and step by step configure our Linksys. Yes, the thing is basically useful and simple, I will definitely write a separate article about configuring Linksys routers using the disk that comes with the kit. But, in this article I will show the configuration through the browser. Why? I consider this method more universal. If you want to configure Linksys from a tablet, phone, or laptop, which does not have an optical drive, then the disk just run will not work. And according to this article, you will be able to set all the settings even from a mobile device. By connecting via wi-fi. In fact, nothing is difficult. The main thing you need to know all the parameters for connecting to the Internet, which uses your Internet provider (I will write about it in more detail below).
We will configure the following scheme:
- Let’s do a reset of the router (if it is new, from the store, you can not do)
- Let’s connect to our Linksys E1200 by network cable, or by wi-fi. It depends on what device we will configure the router from.
- Let’s go to the control panel
- Let’s configure the router to work with the Internet provider. Choose the type of connection and set the necessary WAN parameters.
- Change (set) the password for Wi-Fi network and change the name of the wireless network to Linksys E1200.
- Change the password for access to the control panel
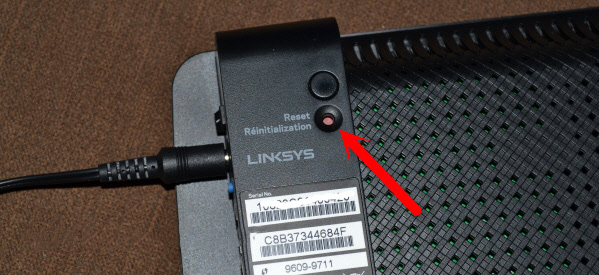
If someone has already tried to configure your router before (or you yourself have already tried to do something), then it may have left unnecessary settings that can interfere with us. Therefore, do a factory reset on Linksys E1200.
At the bottom of the device there is a Reset button, which we press something sharp and hold for about 10 seconds. Then release the button and wait for the router to start. The settings will be reset to factory defaults.
If there are any problems, see the detailed instructions on how to reset the settings.
How to connect Linksys E1200?
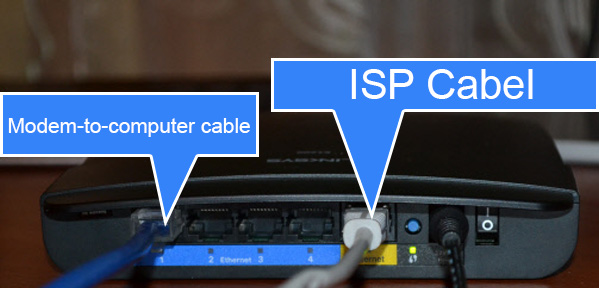
We take out our router, connect the power adapter to it, and plug this thing into a socket. On the router, on the back panel should light up the indicator light. Next, if you will be configuring from a computer or laptop via a network cable, then take the cable that comes in the kit, and connect our computer to the router. Connect one connector of the cable to the router in the LAN socket (there are 4 LAN sockets, there is a blue line under them, plug it into any of them), and the second one into the network socket of the computer.
Connect the cable from your Internet provider to the yellow WAN connector (yellow line under the connector).
If you want to configure via wi-fi, from a laptop, tablet, or other device, then connect it to the network that will appear immediately after you connect the power to the router. The network will be called “Linksys(some numbers)”.
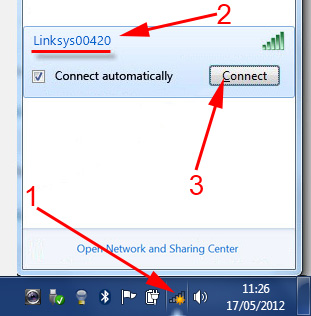
The default wi-fi network is without a password. Therefore, a “Set Network?” window should appear. You can just click on the link “Connect to the network without first installing and configuring it”, or click Ok, and specify the PIN code, which is listed at the bottom of the router on the sticker.

After connecting to the router, the internet may not work. The connection status may be “No internet access” – this is normal. We haven’t set up our router yet. And if you have the Internet through the router immediately works, you can go into the settings, which would only set the password on Wi-Fi and change the network name. You can skip the section with Internet settings on Linksys E1200. You most likely have a connection type Dynamic IP, everything worked there by itself.
Enter Linksys E1200 settings and configure the Internet (WAN).
To get into Linksys E1200 settings, start any browser, and type in the address bar address 192.168.1.1. Go to this address, you should see this window: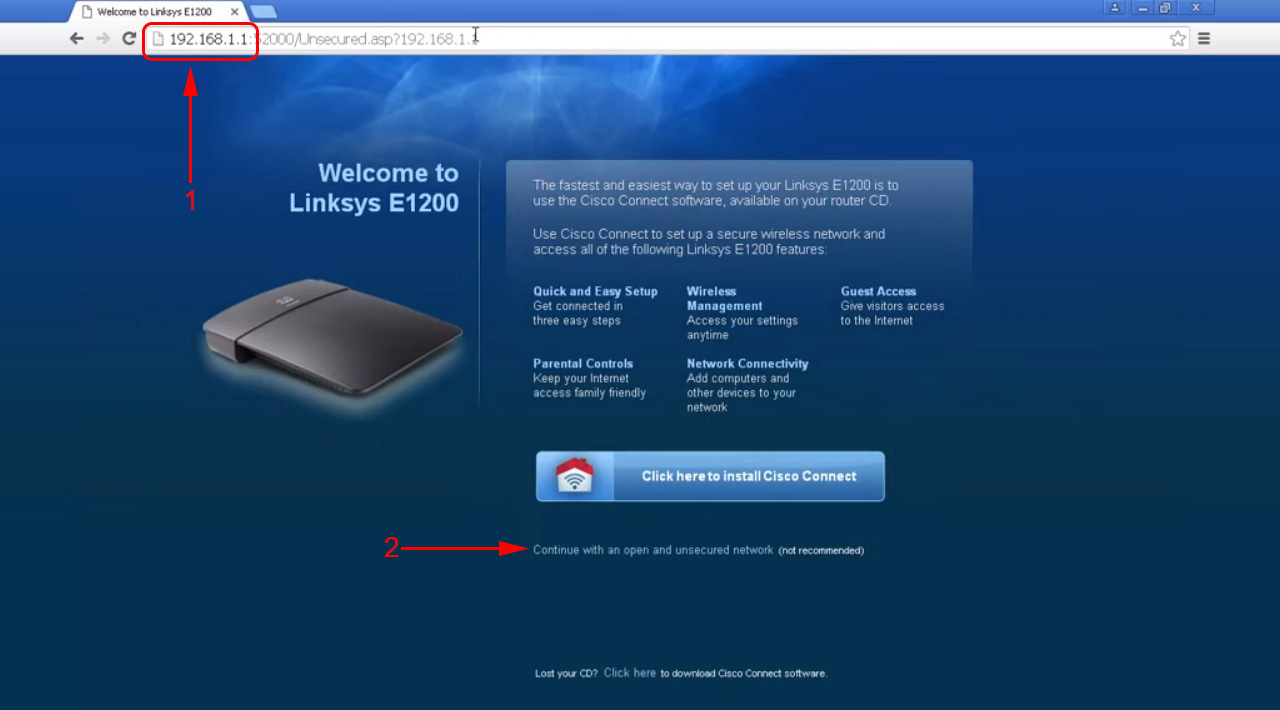
Next, a window will appear in which you check the box next to “I realize that my network is…” and click Continue.

Then, you will be asked for a username and password. Enter admin and admin – these are the default ones.
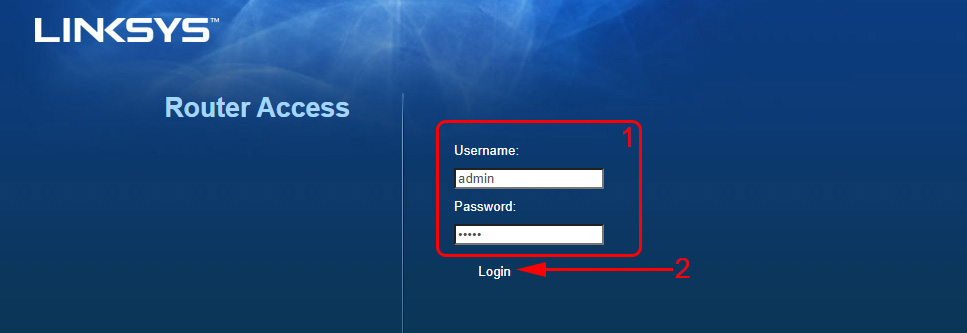
The Linksys E1200 router control panel should open.
You can see a detailed article on how to enter Linksys settings.
Setting up connection with Internet provider
Important! You need to find out what connection technology your Internet provider uses. Usually it is: Dynamic IP, Static IP, PPPoE, L2TP and PPTP. And the necessary parameters, based on the type of connection that you will need to set during the configuration process. This is necessary for your router to be able to connect to your ISP and access the Internet. If these parameters are set incorrectly, the Internet through the router will not work. Connection to wi-fi, or by cable will work, but without access to the Internet.
During the configuration process, we will need to select one of the above connection technologies, and set the necessary parameters (username, server, password, IP). Or any of these. Only for Dynamic IP technology you do not need to set anything. It’s enough to connect the Internet to Linksys E1200 and it will immediately distribute it via Wi-Fi and cable. I wrote more about how to find out the connection technology in the article: what type of connection to specify when configuring the router?
Immediately after entering the control panel, a page will open where you can configure the router to work with your Internet provider. On the Setup – Basic Settings tab, you need to specify the type of connection your ISP uses. Typically, this is Dynamic IP, PPPoE, L2TP or PPTP.
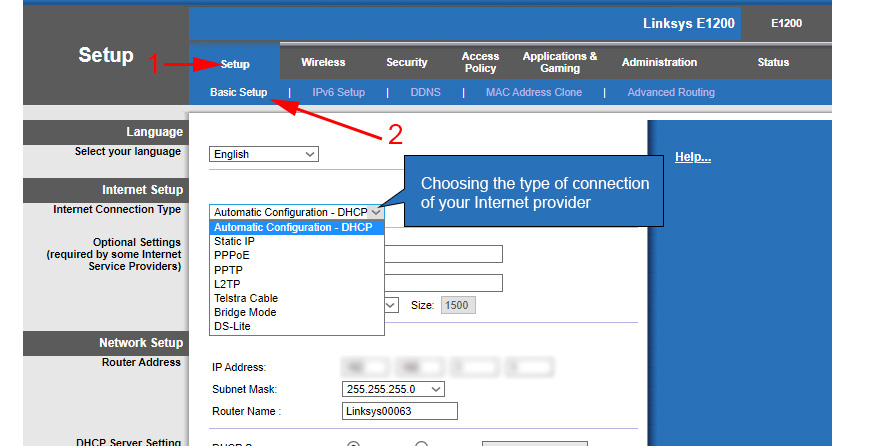
Depending on which connection type you choose, you will need to set additional parameters. Only if you have Dynamic IP, in the settings it is Automatic Configuration – DHCP, you will not need to set any additional parameters. Internet should already work, and if not, then select Automatic Configuration – DHCP and click on the Save Settings button at the bottom, the Internet should work, you can move on to other settings.
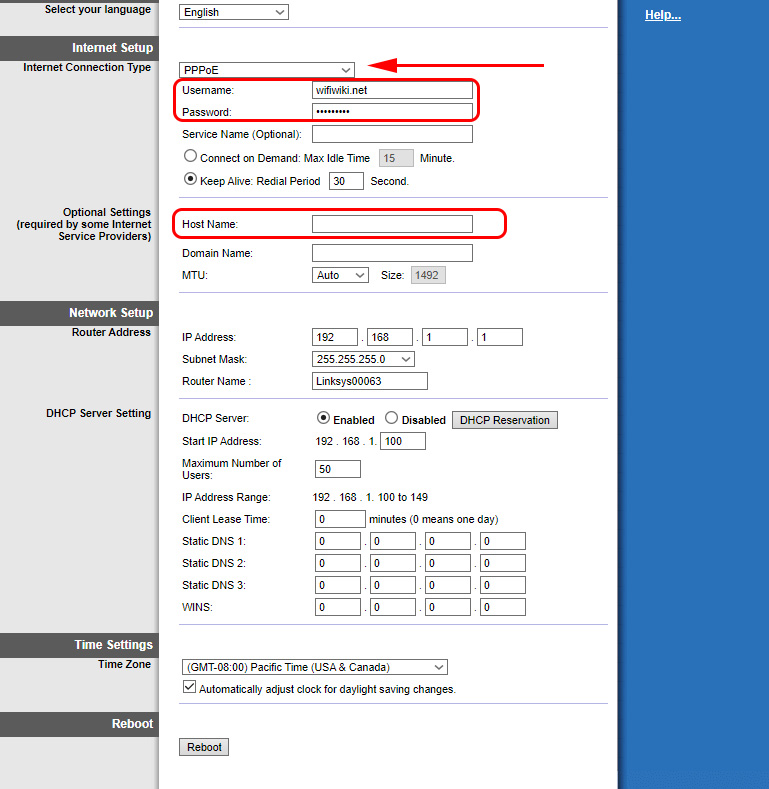
Configuring PPPoE, L2TP, PPTP, ISPs on Linksys E1200
If you are using one of these technologies, then select it (as I showed above), and set the necessary parameters, which you must be provided by the Internet provider. This can be: username, password, IP address, host name. Here is an example of PPPoE setup:
After you set all the settings, don’t forget to save them and reboot the router.
 If you have set everything correctly, the Internet through the router should already be working. If it works, it’s ok, go back to the control panel and continue the configuration. If it doesn’t work, then check the settings and parameters as I showed above.
Setting (changing) the password on wi-fi
After the Internet through our Linksys already works, the main thing we need to do is to protect the wireless network. That no one could not connect to it, as the default network without a password.
To do this, in the settings you need to go to the Wireless tab – Wireless Security. In the Security Mode field select “WPA2/WPA mixed mode”. Make up and set a password of at least 8 characters. It will be used to connect to your wi-fi. Make a note of the password so that you don’t forget it.
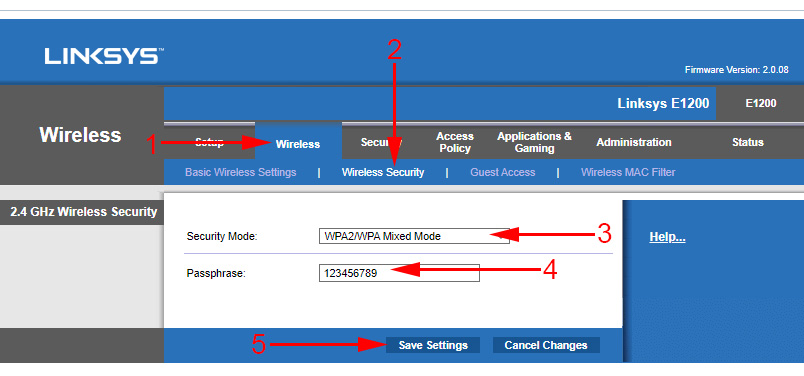
Then, save the settings by clicking on the Save Settings button. The router will be rebooted. To reconnect to wi-fi, you need to re-establish the connection, but in the process of connection already specify the password that you have just set.
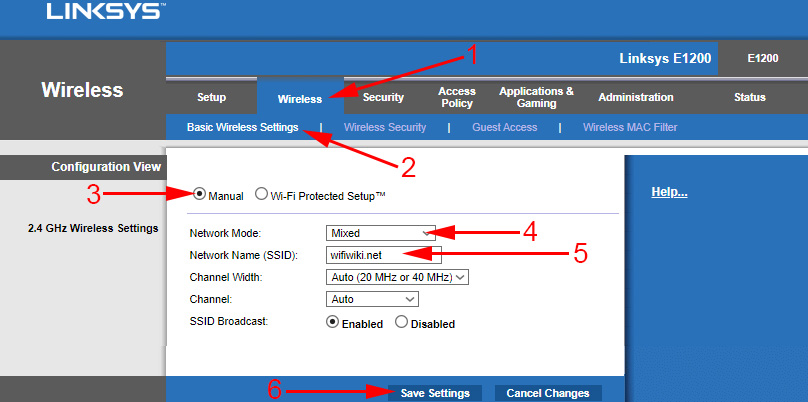
Setting up Wi-Fi on Linksys E1200: change the name of the network
I think that you will want to change the default name of your wireless network. Now I’ll show you how to do it. After we have changed the password, connect to the router again, go into the settings and go to the Wireless tab – Basic wireless settings. Choose the “Manual” setting mode, and the network mode should be specified as Mixed. In the Network name (SSID) field specify the name of your network that you want to use.
Next, leave all the default settings and click Save Settings.
The router will reboot and a Wi-Fi network with your name will appear. For me it looks like this:
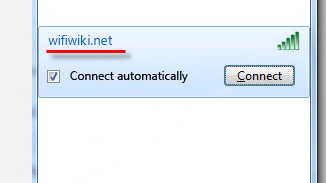
Connect to it, and we can already use the Internet.
Protect the router settings, change the password
Remember, you when you entered the settings of your Linksys E1200, you specified there the standard password admin. So, it should be changed that all who will connect to your wi-fi, could not go into the settings of your router and change them.
Password for access to the control panel is changed quite simply. In the settings, go to the Administration tab. In the ” Router Password” and “Re-enter to Confirm” fields, specify the password that will protect your router. Click Save Settings.
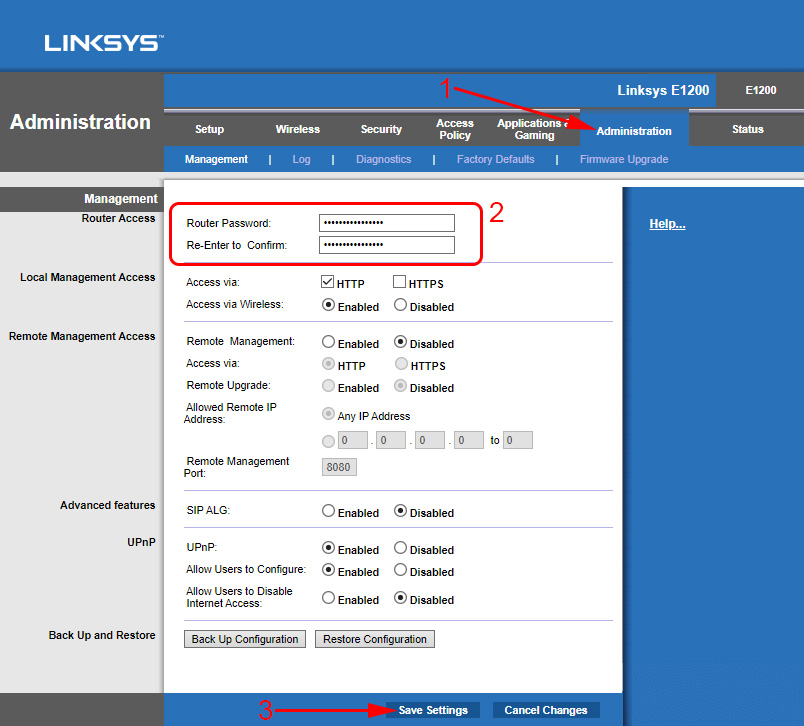
Make a note of this password so you don’t forget it. If you forget it, you will have to reset the settings and configure everything again. Now, when logging into the control panel, you will have to specify the admin user name and the password you have just set.
Afterword
That’s it, the configuration of Linksys E1200 is complete. You can already use the router. If you have such a popular problem as “No Internet access”, when sites just do not open, but on the cable without a router everything works, then first check whether such a problem is observed when connecting other devices. If yes, then check the provider settings in the router settings. Most likely, the connection type or other parameters are set incorrectly.
We have just configured the basic functions, which are enough for normal router usage. How to forward a port, start a guest network, block computers, close access to sites, etc., I’ll write in separate articles, and links will appear here.
I tried to keep it as simple and clear as possible, it’s a long article, but there’s no other way to do it. If you have something failed, ask questions in the comments, attach screenshots, I will try to advise you something.
 How to Make a Reset on Factory Settings on Linksys Routers?
  How to update the Firmware on the Linksys (Cisco) Router
  How to go to the Linksys Router Settings? On the Example of Linksys E1200
  How to Open Ports on the Linksys Router (Cisco)