
How to Open A Port on A Netis Router?

I’m not going to tell you what port forwarding is, or why you need to open ports in your router’s settings. If you came to this page, you probably already know why you need it, and you just want to see instructions on how to open a port on your Netis router. I’m going to demonstrate this now, using the Netis WF2411 router as an example.
Port forwarding is needed for programs like BitTorrent, FTP clients, various games, etc. Before proceeding to the configuration, you must know what port you need to forward. It can be found in the settings of the program, game, or in the manual. All this is necessary so that the packets that you will receive from the Internet on a certain port are redirected to the port of the desired computer, which is connected to the Netis router.
Therefore, the first thing we will do is to reserve an IP address for our computer (to which we will redirect the port), and configure a virtual server. By default, the UPnP function is activated on the router. It allows programs and games to automatically redirect ports. But, sometimes you need to set the settings manually.
Assigning a static IP address to the computer
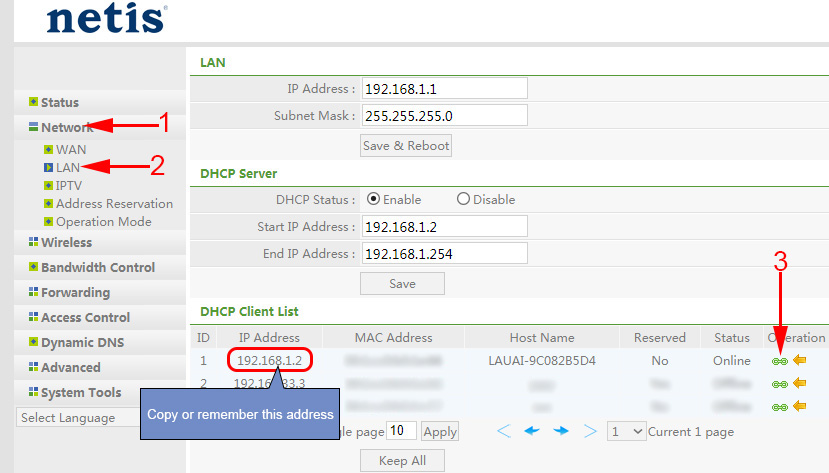
We need to reserve an IP for the computer on which the application we are going to open the port for is installed. To do this, in the Netis router settings, which can be accessed at 192.168.1.1, or http://netis.cc (there are also detailed instructions on how to enter the control panel), you need to go to the Network – LAN tab.
There you will see a list of devices that are currently connected to the router. Orient yourself by the name of the device. In front of the desired computer, click on the green Reserver button. The Netis router will assign a static IP address for this computer. We need to memorize or copy the assigned IP address.
Port forwarding on Netis
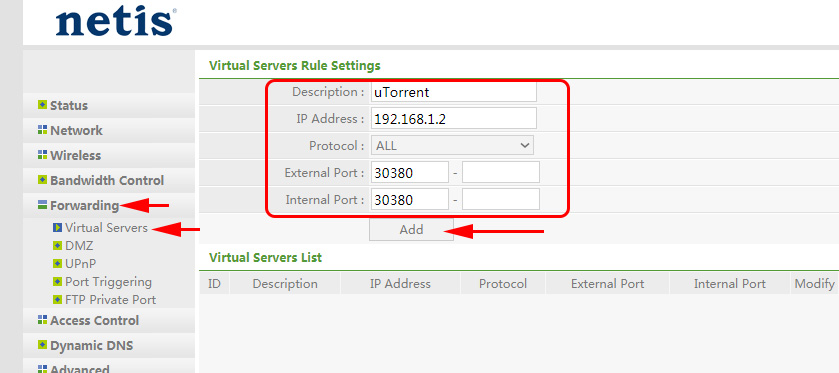
Next, go to the Forwarding – Virtual Server tab. There we need to create a rule and fill in a few fields:
- Description: an arbitrary name for our rule. I put there the name of the program for which I did the port forwarding.
- IP address: the address of the computer where the program or game is installed. This is the address we reserved. If you have already forgotten it, go back to the Network – LAN tab and look.
- Protocol: it is possible to select the protocol that your program uses.
- External port: here we specify the port, or range of ports, from which we will redirect packets. This port can be specified in the program settings or in its documentation.
- Internal port: this is the port (or range) to which the packets will be redirected. It is also specified in the program settings, or in the manual.
Click the Add button.
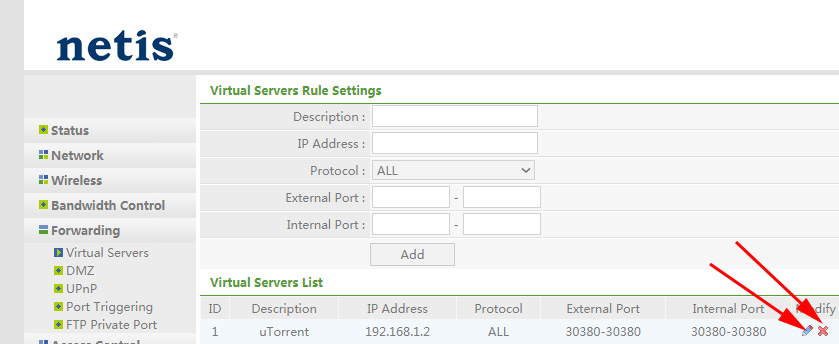
You will see the rule we created in the list. It can be deleted or edited by clicking on the corresponding buttons opposite it. You can create another rule.
Very often antiviruses and firewalls block such connections. If nothing works after the configuration, try to disable these programs, and if it’s because of them, you will need to add the connection to the exceptions.
 Netis WF2411E Router Setup
  How to Flash a Netis Router?
  How to go to the netis router settings?
  Wi-Fi Adapter Netis WF2190-REVIEW, DRIVERS, SETTING