
Setting Wi-Fi Router TP-Link TL-WR842ND
Today we will configure the TP-LINK TL-WR842ND router. As usual, I will show and tell you everything in detail. I have the router itself, I have already made a photo of connecting TL-WR842ND, now we will configure it.
It’s an interesting router. If you have already bought it, I think you will be satisfied. It costs a bit more than the popular TP-LINK TL-WR841N (ND), but TL-WR842ND has several advantages. The main advantage is that it has a USB connector. To TP-LINK TL-WR842ND you can connect a flash drive or hard disk and organize file sharing. Also, you can connect a printer and send documents from all devices in the network. And if you have the second hardware version of the router (V2), you can connect a 3G/4G modem to TL-WR842ND and set up Internet distribution. And also, you can run up to 4 Wi-Fi networks, with different settings. And I liked the white antennas better than the black ones.

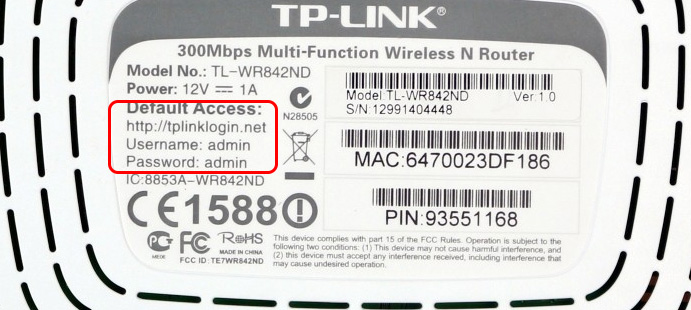
I have a regular TP-LINK TL-WR842ND, hardware version V1. You can see this information at the bottom of the router, on the sticker.
By the way, you can flash your router before setting it up. I have already prepared a separate instruction for this model: TP-LINK TL-WR842ND. Firmware update.
If you bought TL-WR842ND (V2) to work with 3G/4G modem, you can configure it according to this instruction. We’ll consider the configuration when connecting to the usual Internet via a network cable.
How to connect TL-WR842ND and enter the settings
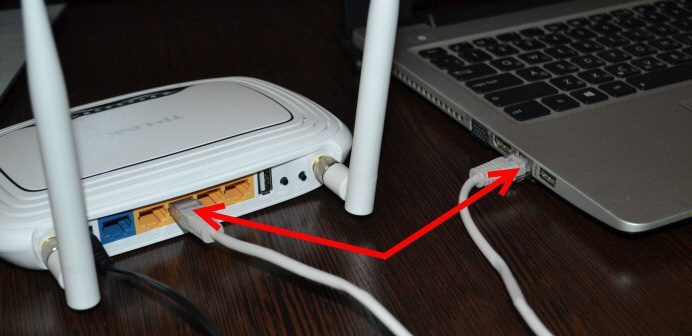
First of all, take our router out of the box. Connect the power adapter to it and plug it into the socket. If you are going to configure the router from a computer or laptop, take the network cable that comes with the router and use it to connect your computer to the router. On the router, connect the cable to one of the 4 LAN sockets. And on the computer into the network card. If you have a computer at home, I recommend that you configure the router by cable.
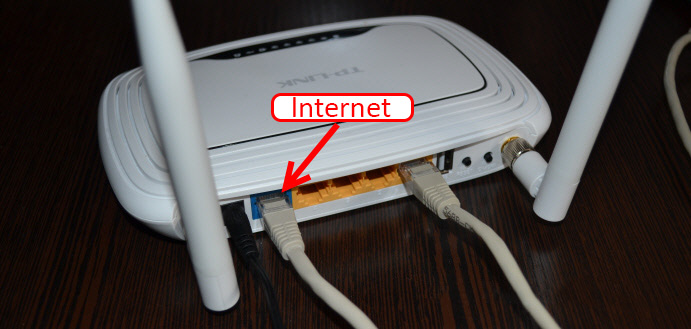
Next, in the WAN socket (it is blue) you need to connect the Internet. Cable from your provider, or from ADSL modem.
The connection is sorted out. If you want to configure TL-WR842ND router via wi-fi, then connect to its Wi-Fi network. If the router is new and has not been configured yet, the network will have a standard name like this: “TP-LINK_3CE9DA”. The network will be passwordless, open. And if it is closed with a password, the factory password (PIN) is indicated at the bottom of the device on the sticker.
Logging in to the control panel
If you are already connected to the router, open any browser and go to the address tplinklogin.net, or 192.168.0.1. The address is also on the bottom of the router. The factory username and password: admin and admin are also indicated there on the sticker.
Go to the address in the browser and specify the username and password.
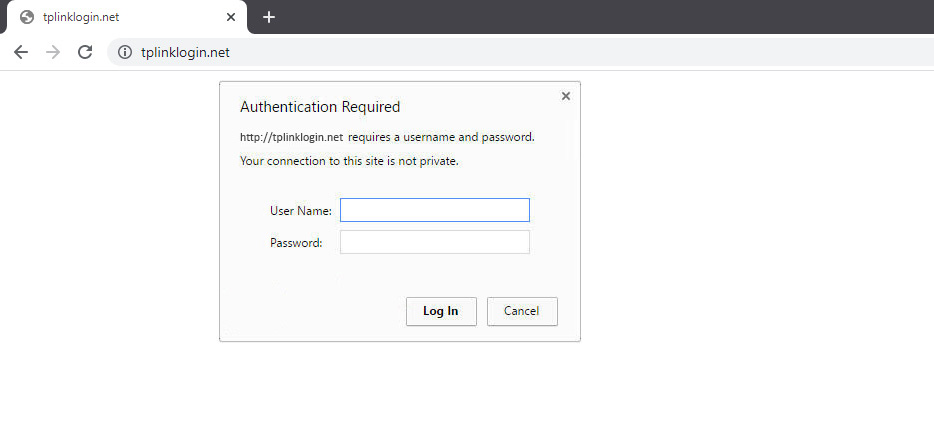
After these actions the control panel should open. If you can not enter the settings of the router TP-LINK TL-WR842ND, then read this article: what to do if you can not enter the router settings on 192.168.0.1 or 192.168.1.1?
To reset the settings and password on TL-WR842ND, just press and hold the WPS/RESET button for 10 seconds. Look at the indicators on the front panel, they should all light up and go out. The router will reboot and the settings will be restored. Here is another detailed instruction for TP-LINK routers.
TP-LINK TL-WR842ND: Internet (WAN) setup
The first thing we need to do is to configure the Internet. So that the router will be able to connect to your ISP, and distribute internet to your devices. This is very important. If the router can not connect to the ISP, then on your devices that you connect via cable or wireless network, the Internet will not work. The connection will have a status of “No Internet Access”. It turns out that the router will give out Wi-Fi, but there will be no Internet access.
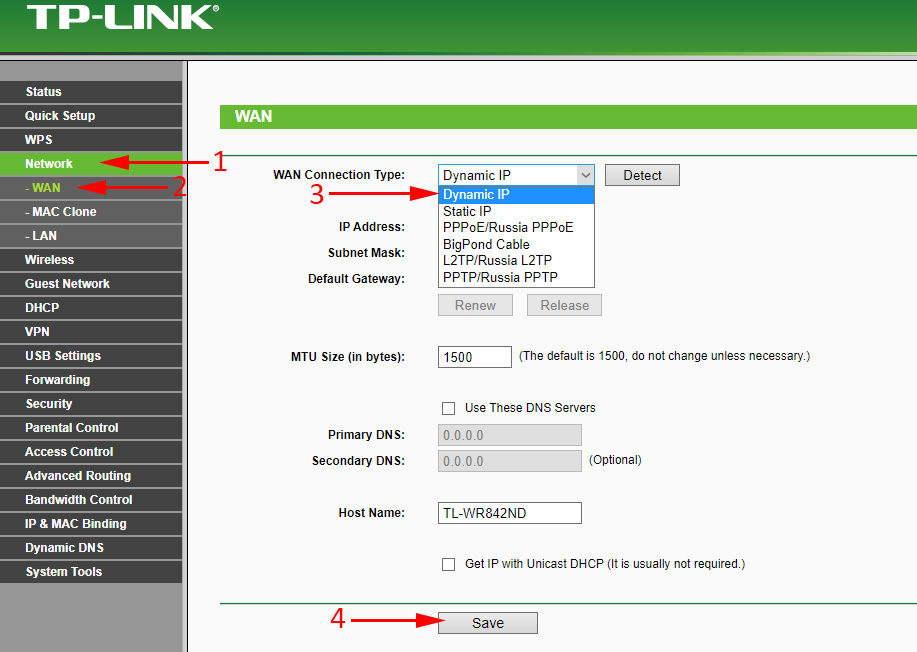
Setting up Dynamic IP connection
If your ISP provides you with the Internet using Dynamic IP technology, you don’t need to configure almost anything. The Internet is likely to work immediately after connection. But, let’s check.
On TP-LINK routers, you can change the connection settings to your ISP on the Network – WAN tab. The connection type is selected in the WAN Connection Type drop-down menu. Accordingly, if we have a Dynamic IP connection, we select this technology, and save the settings.
Configuring other connections:
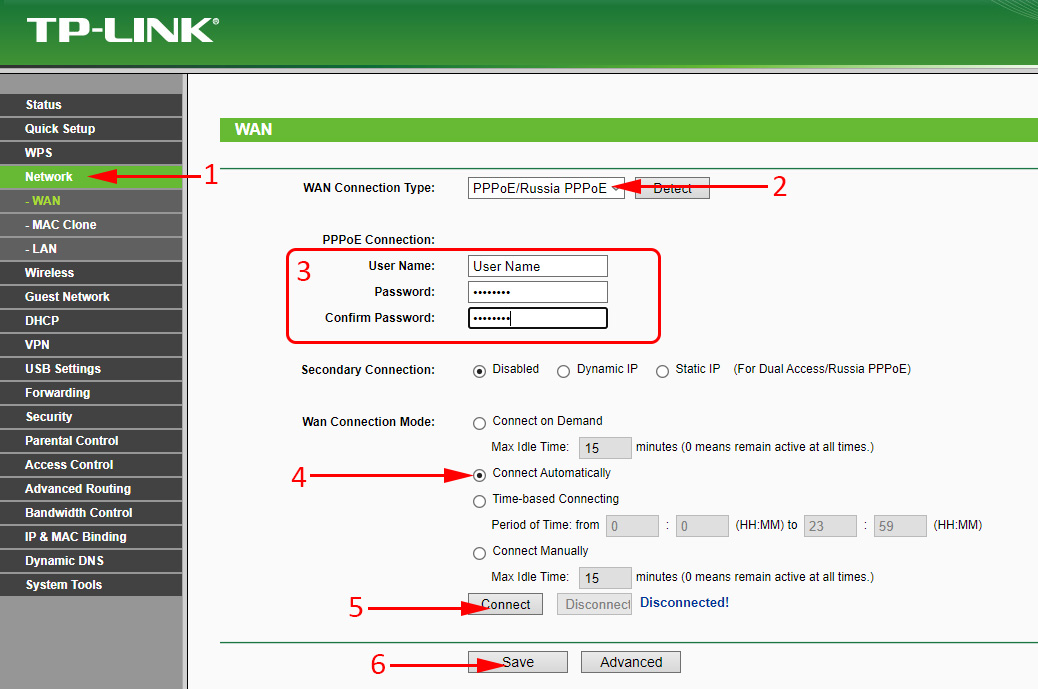
If your provider uses the PPPoE connection type, then select the appropriate connection, then specify the username and password that the provider gives you. Next, select ” Connect Automatically”.
Click on the Connect button, the router should connect to the Internet. And the internet should already work on the device you are configuring from. To save the settings, click Save.
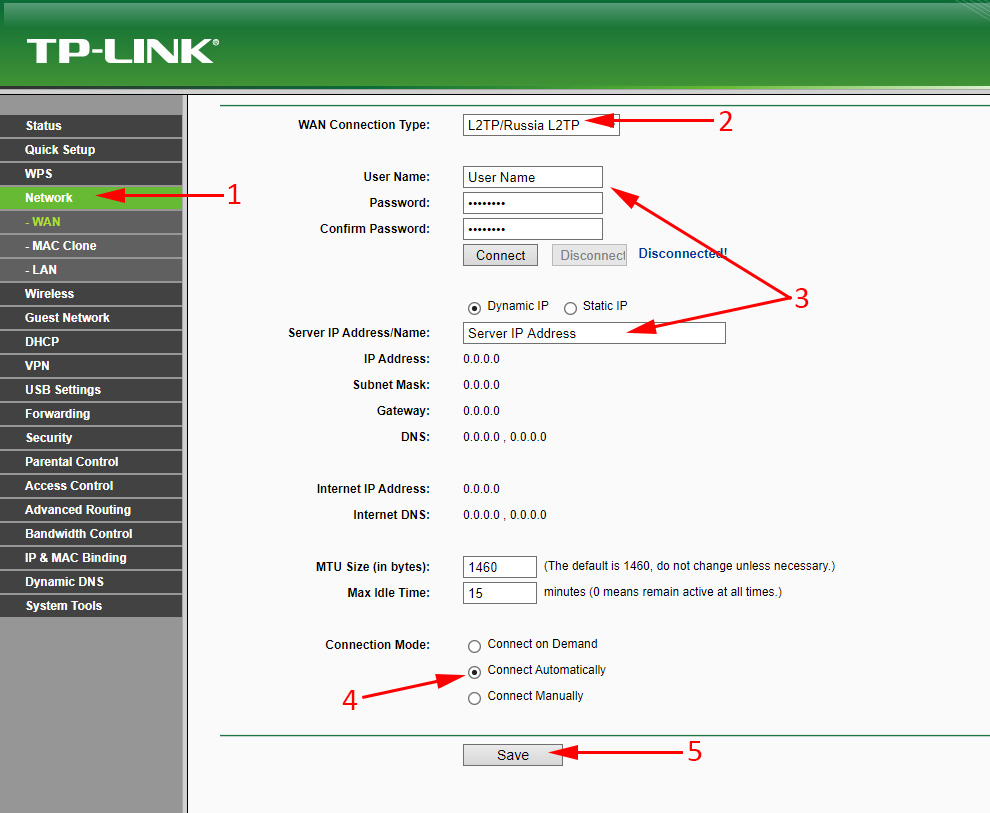
Everything is exactly the same here. Select the appropriate connection type, set the user name, password, and IP address/server name (this information is provided by the ISP). Then, put a checkmark next to ” Connect Automatically”.
Click the Save button and reboot the router. Or, click the Connect button to see if the router will connect to the Internet.
After the router is installed, no connection is needed on the computer. The router will connect to the ISP itself, it only needs to be configured. If there are any problems with the configuration at this stage, the article will help you: when setting up the router writes “No Internet access”, or “Restricted”.
Only after the Internet through the router works, you can continue to configure our TP-LINK TL-WR842ND.
Setting up Wi-Fi and setting the password on TP-LINK TL-WR842ND
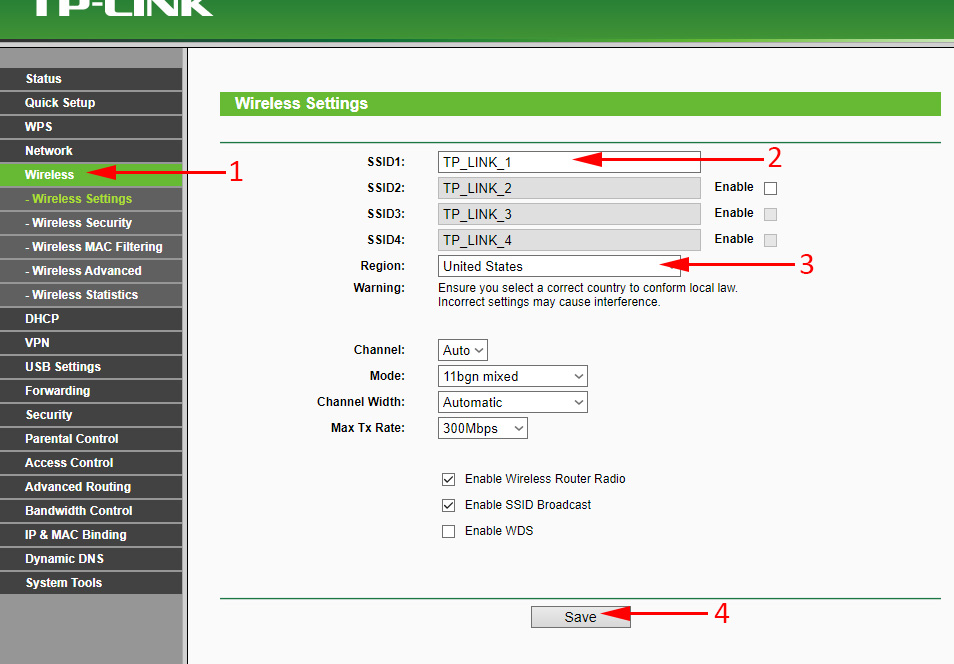
So, we have set up the Internet. We need to change the name of the Wi-Fi network, if you are not satisfied with the standard one, and set a good password for wi-fi. You can do it in the settings, on the Wireless tab.
Here, in the SSID1 (Wireless Network Name) field we make up a name for our wireless network.
Next, select your region where you live and click on the Save button.
To set a Wi-Fi password, go to the Wireless– Wireless Security tab.
On this page, the first thing to do is to enable the “WPA-PSK/WPA2-PSK” security type. Next to Version, select WPA2-PSK. And in the PSK Password field, make up and write down the password that will be used to connect to our wi-fi. The password must be at least 8 characters long.
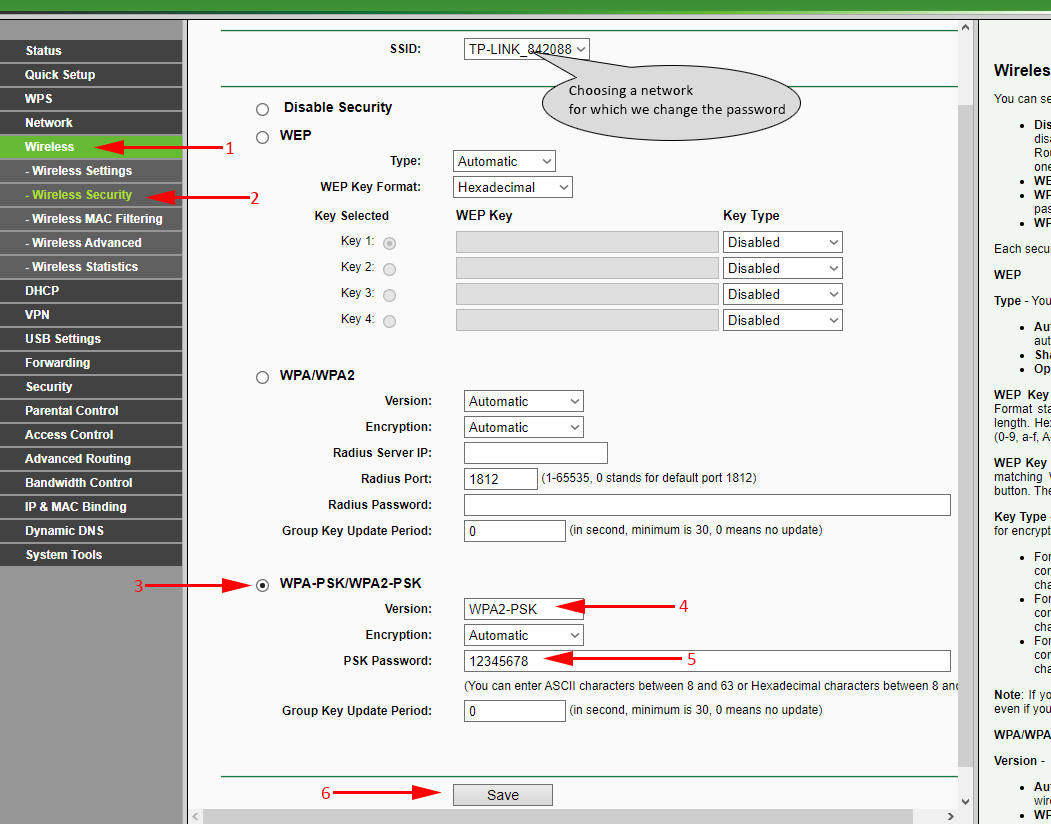
Don’t forget to save the settings by clicking on the Save button.
Changing the password to enter the settings (admin)
We have already configured the Internet and wireless network. I recommend that you change the default admin password that you must enter when logging into your router’s settings. This is to protect the router settings. After all, everyone who connects to the router via wi-fi will have access to them.
Go to the System Tools – Password tab. Specify there the old username and password (by default: admin and admin). And specify a new username and a new password twice.
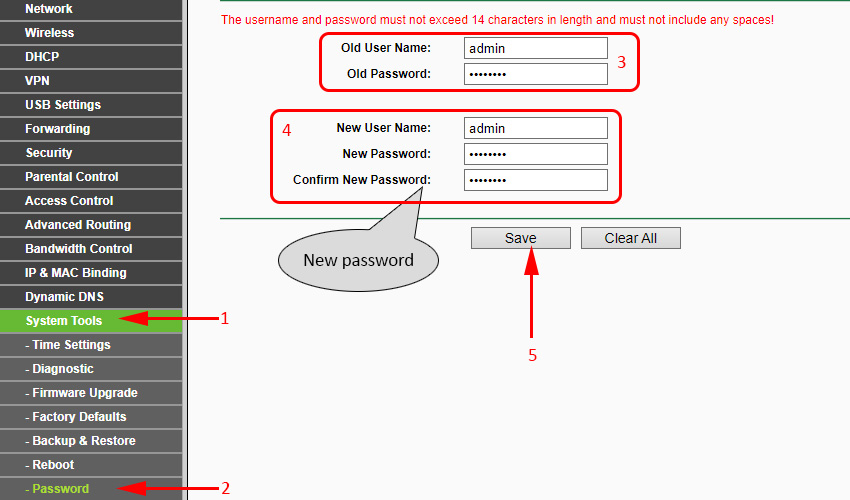
Save the changes by clicking the Save button. If you haven’t rebooted the router after the configuration, reboot it. You can do this on the ” System Tools” – “Reboot” tab. By clicking on the “Reboot” button. You can simply turn the power off and on.
This is the end of TL-WR842ND router configuration. We have set only the basic settings, which are enough for the router to work. Try not to forget the password from the Wi-Fi network and from the router settings. It is desirable to write them down somewhere.
You can ask your questions on the topic of the article in the comments. Only one request, describe your problem in detail, write what model and hardware version of the router. And also, what ISP you have.
 How to Change the Wi-Fi Password on the TP-Link M5250 and M5350 Router
 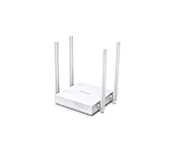 The TP-Link Archer C24 Review is an inexpensive Two-Band Router with Support for the Repiter Mode and Access Points
  Powerline Setting TP-Link TL-WPA4220KIT Adapters
  Reviews ABOUT TP-LINK TL-WR845N. OverView of the Ideal Router for Home from TP-Link