
Powerline Setting TP-Link TL-WPA4220KIT Adapters
In this tutorial, I will explain and show you how to configure the TP-LINK TL-WPA4220KIT PowerLine adapter kit. The kit includes two adapters: TL-PA4010, and TL-WPA4220. Now we’ll take a detailed look at how to connect them, connect them, configure them, and how to enjoy all the benefits of PowerLine networking.
If you came to this page purely out of curiosity, to find out what these adapters are, what they are for, and how it’s Internet from a socket on the power grid, then now I’ll try to explain everything in a nutshell. There is such a standard as HomePlug AV. It allows you to transmit data over the electrical wiring. It works as follows: we plug one of the PowerLine adapters into a socket and connect it to a router or modem (from which it will receive the Internet). The second adapter is plugged into an outlet in the room where we need to access the Internet. The adapters are connected to each other through the power grid, and we get internet from the outlet. By cable, or by Wi-Fi network, if the adapter is able to distribute wi-fi, as in our case with TL-WPA4220 adapter. I wrote more about PowerLine networks in a separate article: HomePlug AV standard and PowerLine adapters: what it is and how it works.
Let’s get back to our TP-LINK TL-WPA4220KIT (“KIT” stands for kit) adapters. By the way, you don’t have to buy a kit, you can buy adapters one at a time, and as many as you need. You can, for example, not buy adapters without a wireless access point if you don’t need wireless networking. And get adapters only with an RJ-45 connector.
In the set with the adapters, I found two network cables, instructions, and a disk with a utility for configuration.
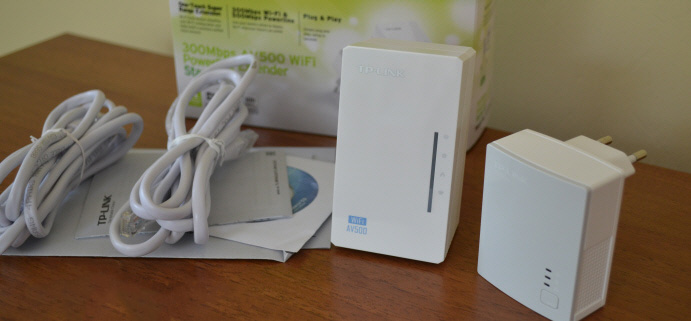
The TL-PA4010 adapter (which is small) is used to connect to a router or modem, and its task is to get the Internet into our wiring.
And TL-WPA4220 adapter has two LAN ports and can give out wi-fi. This means that you can connect two devices via network cable, and also via Wi-Fi network. If you don’t need Wi-Fi network, you can disable it. Also, the TL-WPA4220 adapter can not create another Wi-Fi network, but can extend the existing wireless network (if there is one). Everything is configured by pressing one button on the router and on the adapter itself. Let’s consider this point in detail in the article.
TP-LINK TL-WPA4220KIT: configuration instructions
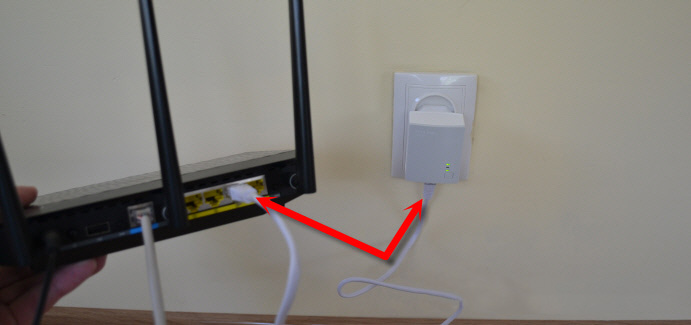
First of all, we need to install the TL-PA4010 adapter, plug it into a socket, and connect the Internet from the router or modem to it. Please note that you can’t connect the Internet directly to the PowerLine adapter. Only through a modem/router.
Plug the adapter into an outlet. Do not connect it through power filters. Then, take the network cable, plug it into the adapter and into the LAN jack of the router (modem). Like this:
Don’t press any buttons yet. Let’s move on to installing the second adapter. I have TL-WPA4220. Plug the second adapter into the outlet in the room where you need to get internet.
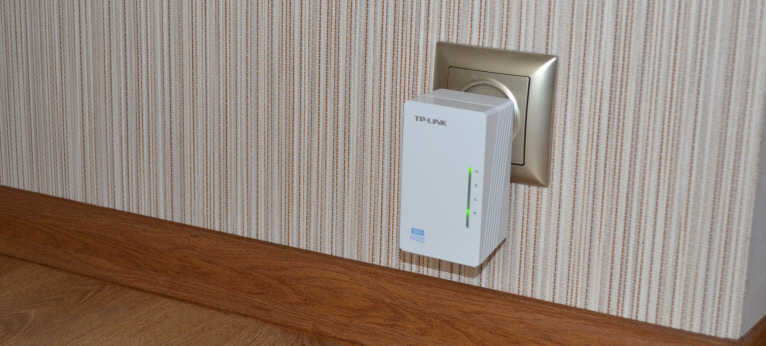
Wait a minute for the adapter to start up.
Now, we need to connect the adapters to establish a secure connection. To do this, first press the “Pair” button on the first TL-PA4010 adapter. The power indicator will start blinking. And within two minutes press the “Pair” button on the second adapter (on TL-WPA4220 it is at the bottom). The devices will establish connection. PowerLine network indicator will light up on both adapters.
After subsequent disconnections and connections, the adapters will automatically establish a connection. If you want to connect another adapter to the network, first plug it into an outlet, press and hold the “Pair” button on it for no more than 1 second, and within two minutes press the “Pair” button on one of the adapters already on the network.
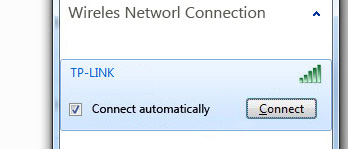
That’s all there is to it. We can connect the device to the TL-WPA4220 adapter via cable, or via Wi-Fi network. And get connection to the Internet through an ordinary socket.

Everything is ready and everything works. We can connect two devices via cable without any problems, and the Internet will work on them. But, I have an adapter that also gives out Wi-Fi network. This adapter has settings that can be accessed through a browser. Now we will look at it in more detail.
Configuring Wi-Fi network on PowerLine adapter TL-WPA4220
We have sorted out the PowerLine network configuration. Let’s deal with wireless network configuration if you have a wi-fi adapter.
TP-LINK TL-WPA4220 adapter is a small Wi-Fi router. Its main difference is that it gets internet through the wiring. There are two modes of Wi-Fi network operation in this adapter:
- New Wireless Network. When the TL-WPA4220 adapter gives out a wireless network with its own name, password, and settings. If you already have a router that gives out wi-fi, this PowerLine adapter can create another network. And you will have two networks in your home or office with different parameters.
- Wireless network extension. In this mode, the adapter completely copies the settings (SSID and password) of the already existing network, and simply expands it. It turns out that there is one network in the house, and TL-WPA4220 just enhances it. But, unlike usual repeaters (you can read about them here), the adapter receives Internet not via wi-fi, but via PowerLine network, which is much better. There is no loss in speed.
Enter TL-WPA4220 adapter settings. Setting up a new W-Fi network.
Immediately after turning on the adapter, it will start distributing wi-fi, with a standard name. The network will be locked with a password. The factory password is indicated on the sticker on the adapter itself. The address for entering the settings and the factory username and password are also indicated there.
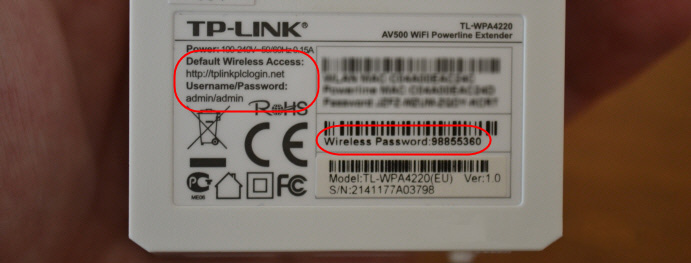
Next, connect to the adapter via cable or wi-fi. Ideally, you can enter the adapter settings at tplinkplclogin.net (192.168.1.1 works the same way) using your factory username and password. But you will most likely get into the router or modem settings. That’s why I advise you to use the utility from the disk that comes with your TL-WPA4220 and configure wi-fi without any problems.
If you can’t run the disk, download the utility from TP-LINK website. Here is the link https://www.tp-link.com/en/support/download/tl-wpa4220kit/#Utility. The utility is called “Powerline Scan Utility.” Download it and run it. Or run it from the disk.
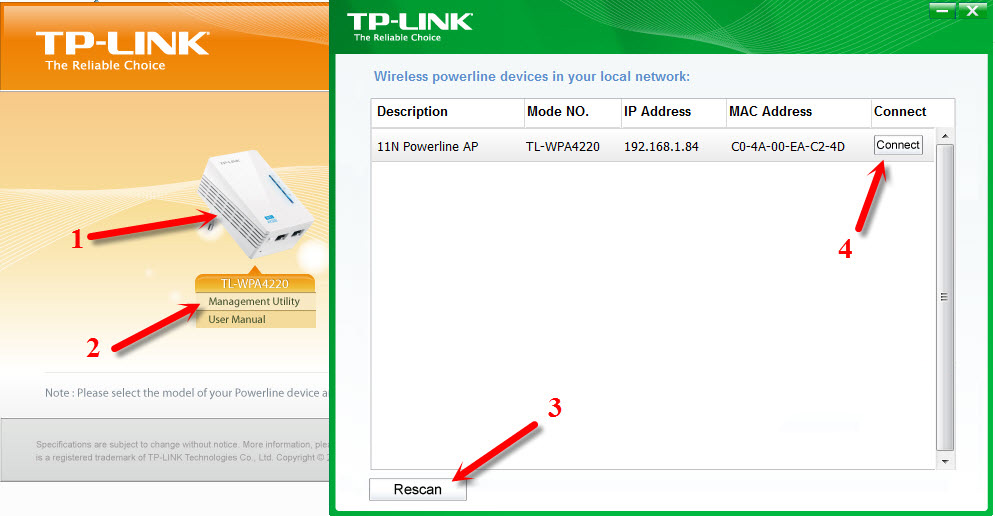
In the utility, click on the “Rescan” button and our adapter should appear. Then, in front of it, click on the “Connect” button. If the PowerLine adapter is not found, make sure your computer is connected to it. And if antivirus or firewall will ask for permission – allow it.
After clicking the “Connect” button, the browser will start immediately and you will be prompted for a username and password. The factory ones are admin and admin. Enter them and we get to the settings page of TP-LINK TL-WPA4220 adapter.
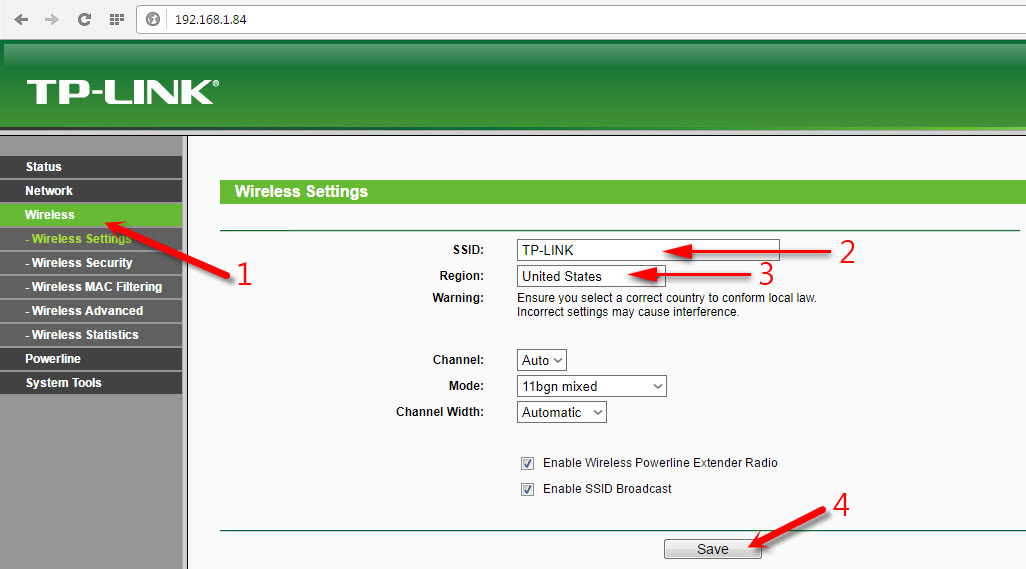
There are not many settings there. We are interested in Wi-Fi network settings. We need to change the network name (not necessary) and the password. Let’s go to the “Wireless” tab. Here we can change the standard Wi-Fi network name and set our region. After making changes, click on the “Save” button.
And to change the wi-fi password, go to the “Wireless Security” tab. In the “PSK Password” field, specify a new password of at least 8 characters, and click “Save”.
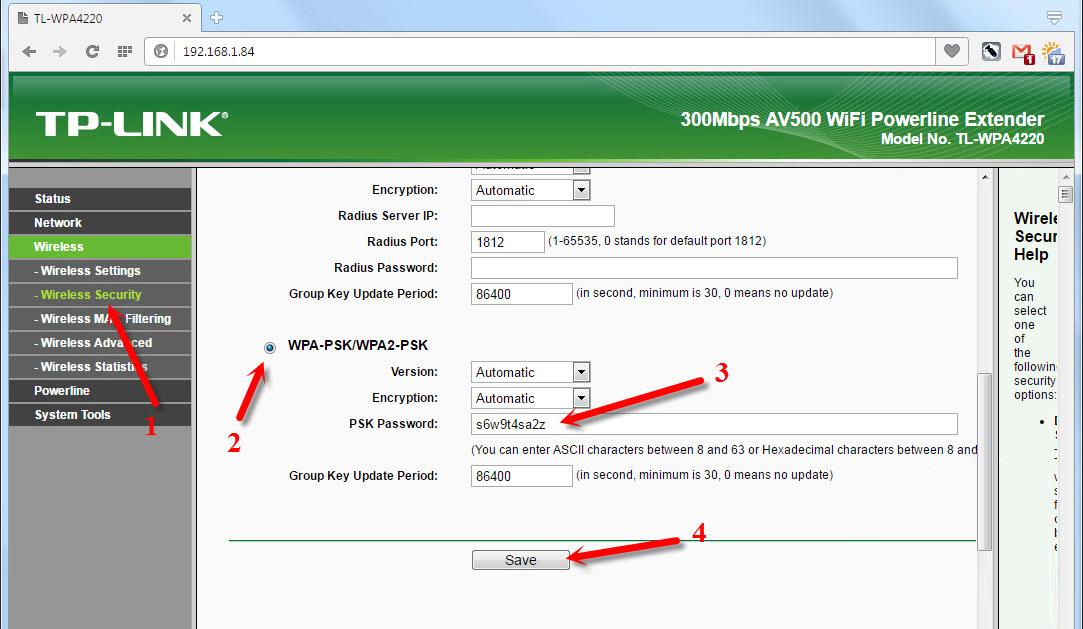
After that, you need to reboot the adapter. This can be done from the settings. Tab “System Tools” – “Reboot” by clicking on the “Reboot” button.
After these actions, you will need to connect to the wireless network with a new name. Using the password you set.
There are also local network settings, and PowerLine network settings (but they are hardly useful for you). As in a regular router, through the control panel you can flash the adapter, reset settings, save/restore settings, or change the factory admin password, which protects the settings, which I would advise you to do. You can change it on the “System Tools” – “Password” tab. Be sure to write down the passwords you set so that you don’t forget them.
Anyway, you will be able to reset the TL-WPA4220 adapter. Press the “Reset” button recessed in the case for 10 seconds. It is located at the bottom of the adapter case. If your sockets are located very low to the floor, it is not very convenient to press it. Therefore, I advise you to connect the adapter upside down and do a reset. After resetting the settings, you will need to press the “Pair” button on both devices again.
Setting up Wi-Fi network extension, via PowerLine network. Wi-Fi Clone function
It’s very simple here. If you have a router that already distributes Wi-Fi network and you don’t want to create another one, but you want the PowerLine adapter to extend the existing network, you can easily configure it for this mode of operation. Once configured, you will have one wireless network that will be amplified by the TL-WPA4220 adapter. Your laptops, smartphones, tablets will automatically connect to the network whose signal will be stronger in a certain place of your office or home.
All we need is to press the WPS button on our router. There should be one. After pressing it, some of the indicator light should start blinking slowly. After that, go ahead and quickly press the “wi-fi Clone” button on our adapter. The indicator light will also start blinking slowly.
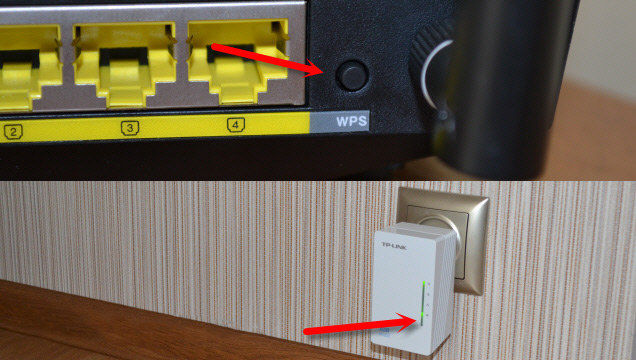
Wait until the SSID and password from the main router are copied. The main thing is that the adapter should be in the Wi-Fi network coverage area. As a result, we will have one wireless network from the main router reinforced by the TL-WPA4220 adapter. At the same time, it will get the Internet from the socket. That’s all.
Disabling the Wi-Fi network
To turn off the wireless network completely, you should press and hold the “wi-fi Clone” button for some time. The indicator will go out and the wireless network will be turned off. It is turned on in the same way.
Afterword
Everything is set up very simply. Yes, and there is a small instruction manual on how to configure it in the kit.
Interesting devices that work without problems and perform their task. I read a lot of reviews that PowerLine adapters get very hot. Nothing like that, after a few hours of work through these devices, they were just warm, which is quite normal.
I think the principle of setting up and operation of PowerLine network is clear. It is not necessary to buy exactly the same set of adapters. Everything is individual. If, for example, you just need to connect your TV to the Internet via a network cable, and you don’t want to lay a network cable, and you don’t need an adapter with a wireless access point, it will be reasonable to buy a set of adapters TP-LINK TL-PA4010KIT. They will be cheaper. You can also buy one adapter at a time. But, a set is cheaper.
There is a choice, and it is large. You can easily find adapters for your network and your tasks. There are adapters with built-in sockets, for example, TP-LINK TL-PA4010PKIT. Which is also good, because even after connecting such an adapter, you will be able to plug some other device into the socket.
And look at the speed. TP-LINK TL-WPA4220KIT, which we configured, works at speeds up to 500 Mbps. You can take adapters, for example, with the maximum speed up to 200 Mbps and save a bit. It is clear that this is the maximum possible speed, which you will never get under normal conditions.
 Review TP-Link Archer Mr400-Two-Band Wi-Fi Router with A Built-in LTE Modem
  TP-Link EAP245 AC1750 Access Point. Wi-Fi Solution for Restaurants, Hotels, Shops
  Reviews ABOUT TP-LINK TL-WR845N. OverView of the Ideal Router for Home from TP-Link
  Comparison of Wi-Fi Routers: TP-Link Archer C20 and Xiaomi Mi Wi-Fi Router 3