
VLAN AUTO -Building Service. What is it and How to Include in Windows

In comments people often ask questions about the fact that the notebook does not see Wi-Fi network (although Wi-Fi is enabled), or it is not possible to start Wi-Fi distribution on the notebook. Very often, such problems occur because the WLAN auto-configuration service is disabled. There is such a service in Windows, it manages wireless connections. So, if the WlanSvc service is stopped, you will not be able to connect your computer to wi-fi, or start a hotspot on your laptop.
If you just want to connect your laptop to a wi-fi network, then because of the stopped WLAN auto-configuration service, the laptop simply won’t see any available wireless networks. There will be a status of “No available connections”. And when you try to give out Wi-Fi from your laptop, you will most likely get the error “Failed to start the WLAN auto-configuration service (1068)”. In any case, this problem needs to be fixed somehow. You just need to check if this service is running on your computer. If it is not, start it and set it to start automatically in the settings.
I’ll be showing you how to enable the WLAN autotuning service in Windows 10. But, if you have Windows 7, 8, or even Windows Vista, it will be exactly the same. The process itself is no different.
What is the WLAN Auto Setup service?
Without complicated and boring terms, this service in Windows operating system manages all wireless connections (Wi-Fi and Bluetooth). That is, the WlanSvc service is responsible for searching, connecting, disconnecting and other operations that are necessary for the operation of wireless connections on the laptop. It is clear that if this service is stopped, Windows will not be able to see the available wireless networks and will not be able to connect to them.
There may also be a problem when trying to start Wi-Fi network distribution in the Windows command line. If this service is stopped, you will get the following error: “The wireless autotuning service (wlansvc) is not running”.
Basically, this is all we need to know about the WLAN Autotuning service. In the system, this feature is always enabled by default. You may ask, why should it be enabled? It’s very simple, there are many instructions on the Internet, where they advise you to disable this service “to make your computer work faster”. Also, the service can disable some programs, especially it likes to do different system optimizers. And if you have not installed the original Windows image, but a build, the service can be disabled immediately after installing the system.
Yes, if you do not connect your computer to wireless networks, you do not need this service, your computer will work fine without it. But, this is not a reason to disable it.
How to enable the WLAN Autosetup service in Windows 10, 8, 7
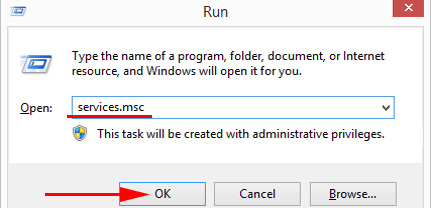
Press the Win + R key combination on your keyboard. The “Run” window will appear. Enter the command“services.msc“, and click “Ok”.
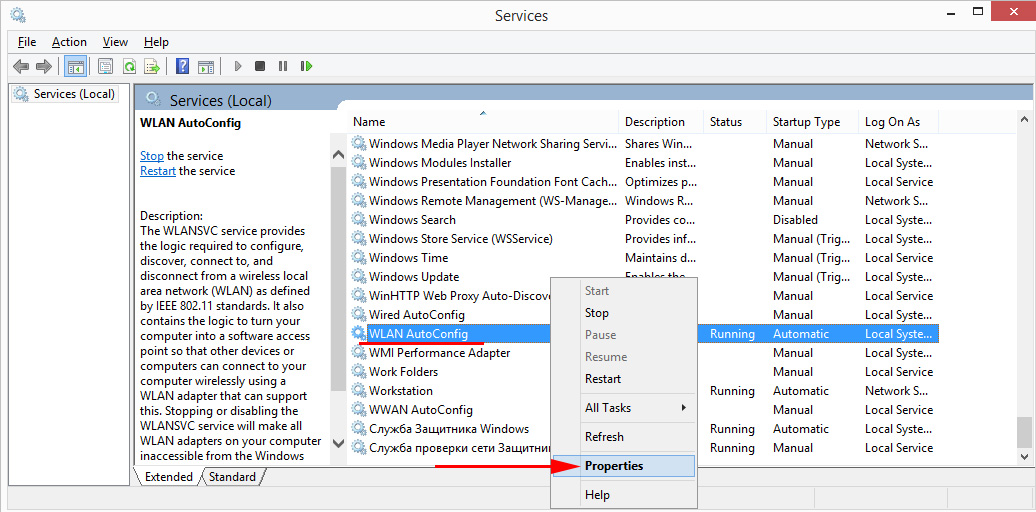
Next, in the list, find the “WLAN Autotuning Service” we need, right-click on it, and select “Properties”.
Set the “Startup Type” to “Automatic”. Press “Ok” and “Apply” button.
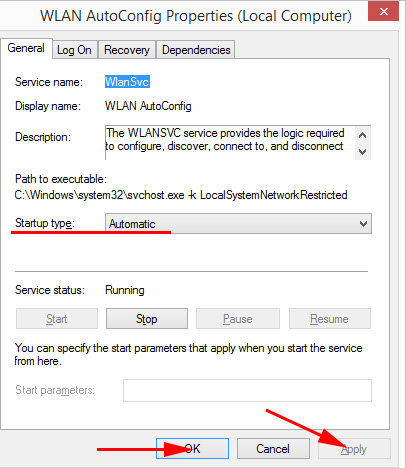
Restart the computer. After these steps, everything should work.
What should I do if the WlanSvc service does not start?
If you encountered the fact that the WLAN auto-configuration service does not start, then the problem may be that the service itself is disabled completely. Let’s check it out, and enable it.
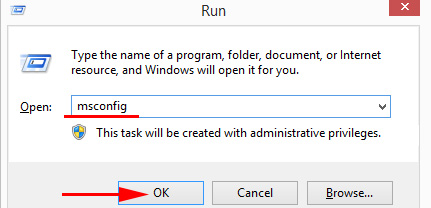
Press the Win + R keyboard shortcut again, but this time type“msconfig“, and click “Ok”.
Find the service we need in the list and see if it has a checkmark. If not, check it, click “Ok”, and then click “Apply”.
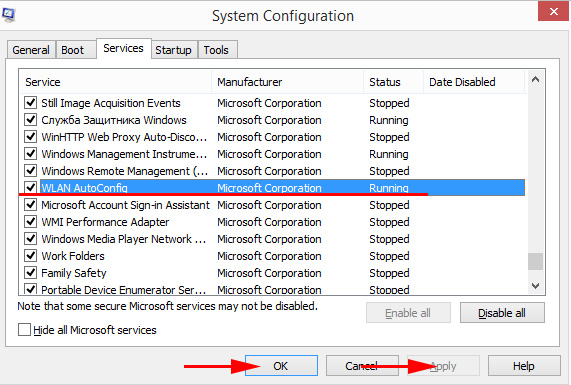
Restart the computer.
Update: Enable “Normal Startup” if error 1068 appears
This solution was shared with us in the comments. It is very simple and helped to get rid of error 1068 when starting WLAN service. Press Win + R on your keyboard, copy the msconfig command to the appropriate line and click Ok.
Set the startup option to “Normal Startup”, click on the “Apply” button (must be active) and Ok.
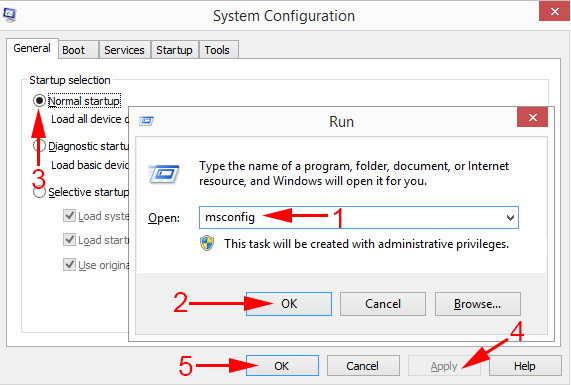
Perform a restart of the computer.
If these tips didn’t help you solve the problem, please describe it in detail in the comments.
 Windows 10: An Unaceptable Network Security Key. Try AGain
  How to Disable The Proxy Server in Windows?
  Who is there no Network Adapter in the Device Dispatcher?
  We look at the password from wi-fi Through The Command Line In Windows 10, 8, 7