TP-Link Archer C60 Setting. Connection, Internet Settings and Wi-Fi
Another router configuration tutorial, and today we will be configuring TP-Link Archer C60 (AC1350). I have already made a review of this model, you can see it at this link. There you will find the specifications, and you can leave your review about TP-Link Archer C60.
Usually, all router setup instructions are long and boring. There are so many different points and nuances to talk about. There are a lot of configuration options, etc. After all, everyone has different devices, providers, installations. I will try to make this instruction as simple and short as possible. In fact, for normal operation of the router you only need to set the parameters for connecting to the Internet provider, change the name of the Wi-Fi network and set the password on the wi-fi.
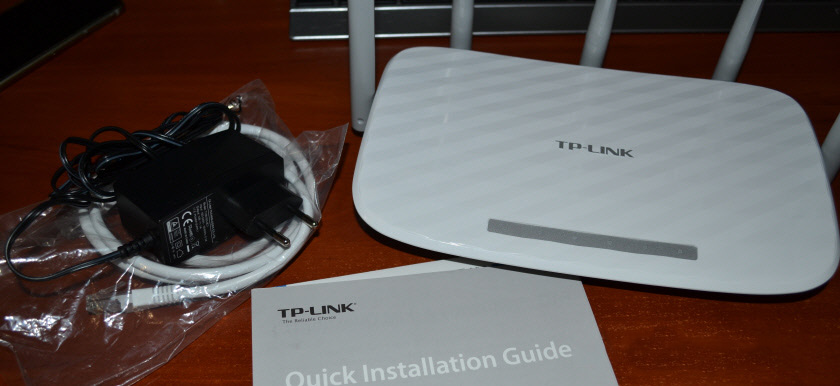
Setting up the TP-Link Archer C60 router is practically no different from setting up other TP-Link routers. Newer models, where an updated control panel is already installed. And in general, the algorithm of actions when configuring the router will always be almost the same, regardless of the manufacturer or model.
Connect TP-Link Archer C60 and enter the control panel
There are two ways to configure the router:
- Connect to it via the network cable that comes with it. In this case, you must have a laptop or desktop computer that has a network card. This is the best way. If possible, at the time of setup, I advise you to connect the router by cable.
- On a Wi-Fi network. At the factory settings router immediately distributes Wi-Fi network. We can connect to it, go to the control panel and set the necessary settings. This method is suitable for those who do not have a LAN port on the laptop, or no computer at all. You can also configure it from your phone or tablet. To configure TP-Link Archer C60, you can use the proprietary application for mobile devices TP-LINK Tether.
By cable:
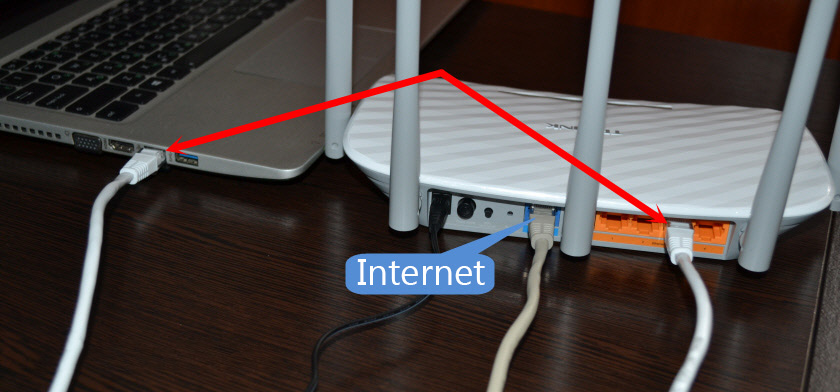
It is enough to connect the router to your computer. In the same way, immediately to the router connect the Internet to the WAN port. Here is the connection diagram.
By wi-fi:
In this case, it is enough to power up the router, connect the Internet to it, and connect your device to the Wi-Fi network, which will have a factory name.
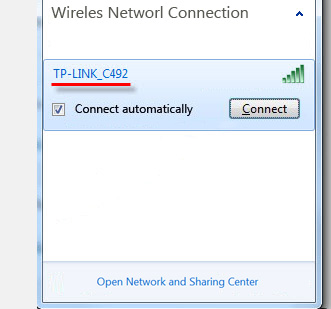
To connect to this network, you will need a password. The factory password (PIN), the name of Wi-Fi networks (5GHz and 2.4GHz), MAC address, IP address of the router and the factory username and password are on the bottom of the router on the sticker.
I’m going to show you how to configure the router using the example of a router with factory settings. Before writing this article I reset them to factory settings. Therefore, if you have already tried to configure the router, or it was configured before, you may have different settings. If you have already tried to configure the router, it is better to do a factory reset. To do this, press the Reset button with something sharp for 10 seconds.

The router will reboot and the settings will be restored.
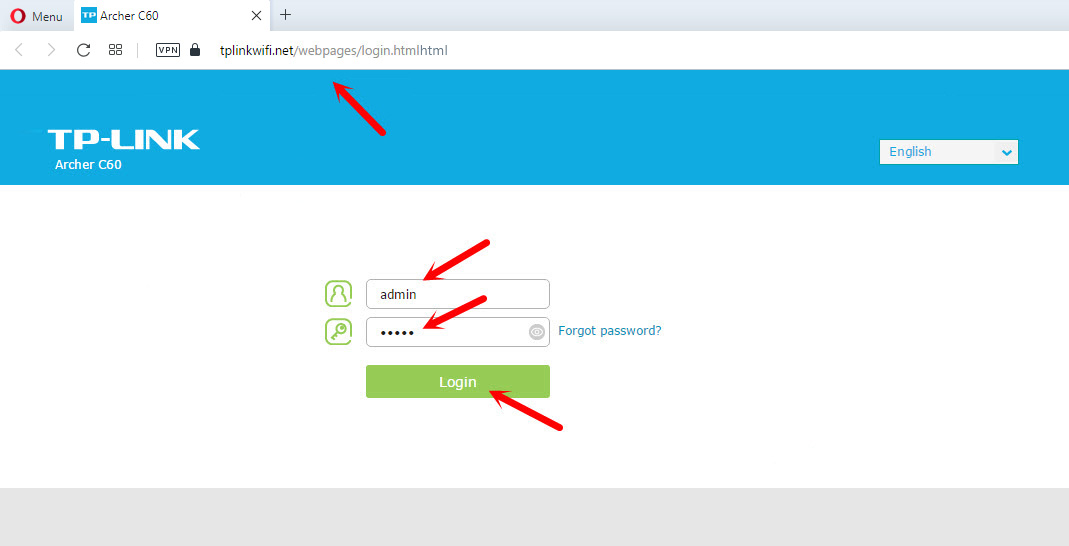
To enter the Archer C60 control panel, just open a browser and go to http://tplinkwi-fi.net (or 192.168.0.1), and specify your factory username and password (admin and admin). If you haven’t changed them yet.
If you encounter some problem and you can’t get into the router settings, see the solutions from this article: /errors-and-breakdowns/does-not-go-into-the-settings-of-the-router-for-192-168-0-1-or-192-168-1-1-what-to-do/. And separate instructions on how to log into the control panel of TP-Link routers.
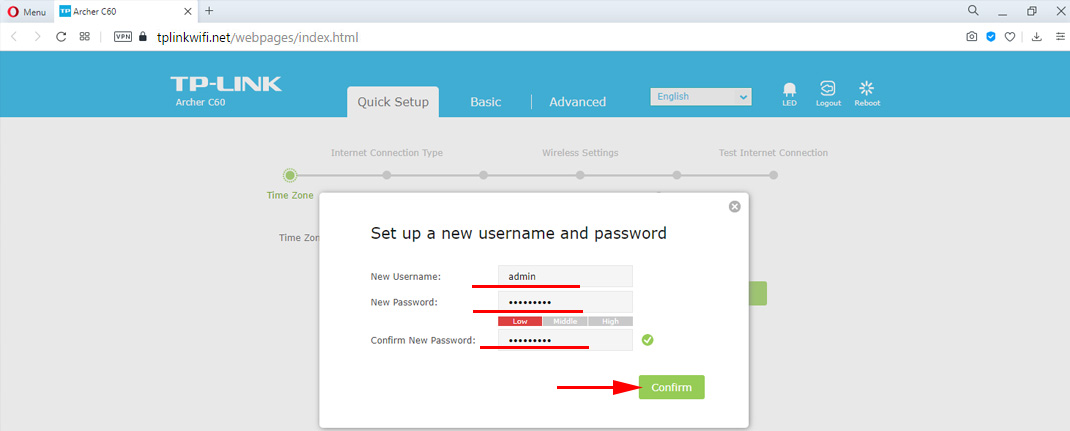
The control panel will open, and the router will immediately prompt us to change the factory username and password to enter the settings. I recommend doing this. Just specify a new username (I left admin), and twice a new password.
The next time you enter the settings, you will need to specify the set password and username. If you forget them, you will have to do a factory reset (I wrote about it above).
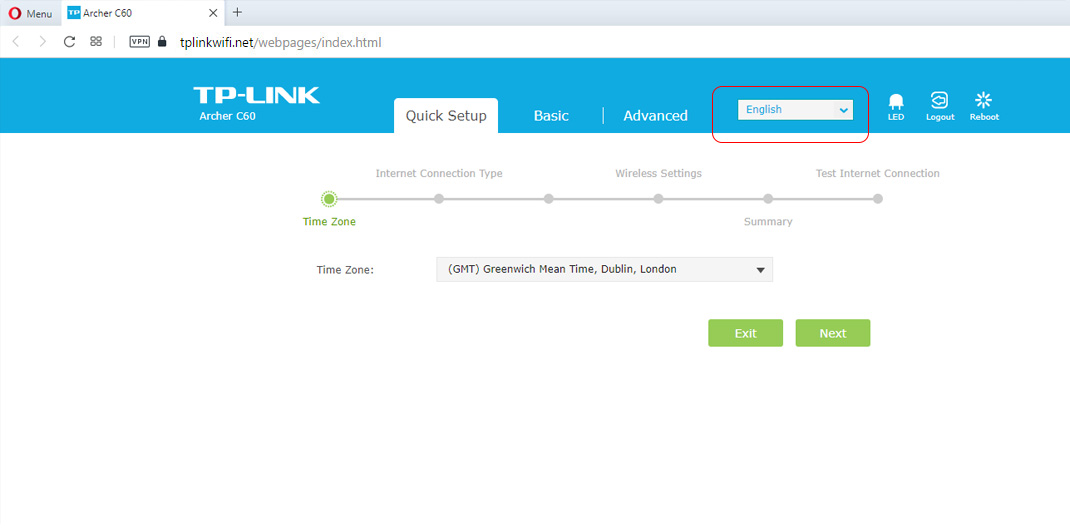
The quick setup wizard will open at once. It’s a cool thing. With its help you can configure the router step by step (specify the region, Internet connection settings, Wi-Fi network settings). You can try it.
I don’t know about you, but in my case the settings were only in English. It didn’t work to switch the language. Perhaps you just need to update the firmware. But I did not check it.
I will show you how to set the necessary parameters in different sections of the settings. I will not use the quick setup wizard.
Internet settings
Important point. Let me remind you that the cable from your ISP or modem must be connected to the WAN port of the router.
To connect to the internet, your ISP uses some type of connection. This could be: Dynamic IP, PPPoE, L2TP, PPTP, or Static IP. You should be sure to know what type of connection your ISP uses. Otherwise there is no way. Also, it is good to know at once whether the provider uses MAC-address binding (it is rare, but it happens). This information can be found out directly from the provider or in the connection contract.
If you have a popular type of connection Dynamic IP (without MAC-address binding), then the Internet should immediately work through the router. Since the router’s default settings are Dynamic IP. You can immediately go to the Wi-Fi network settings.
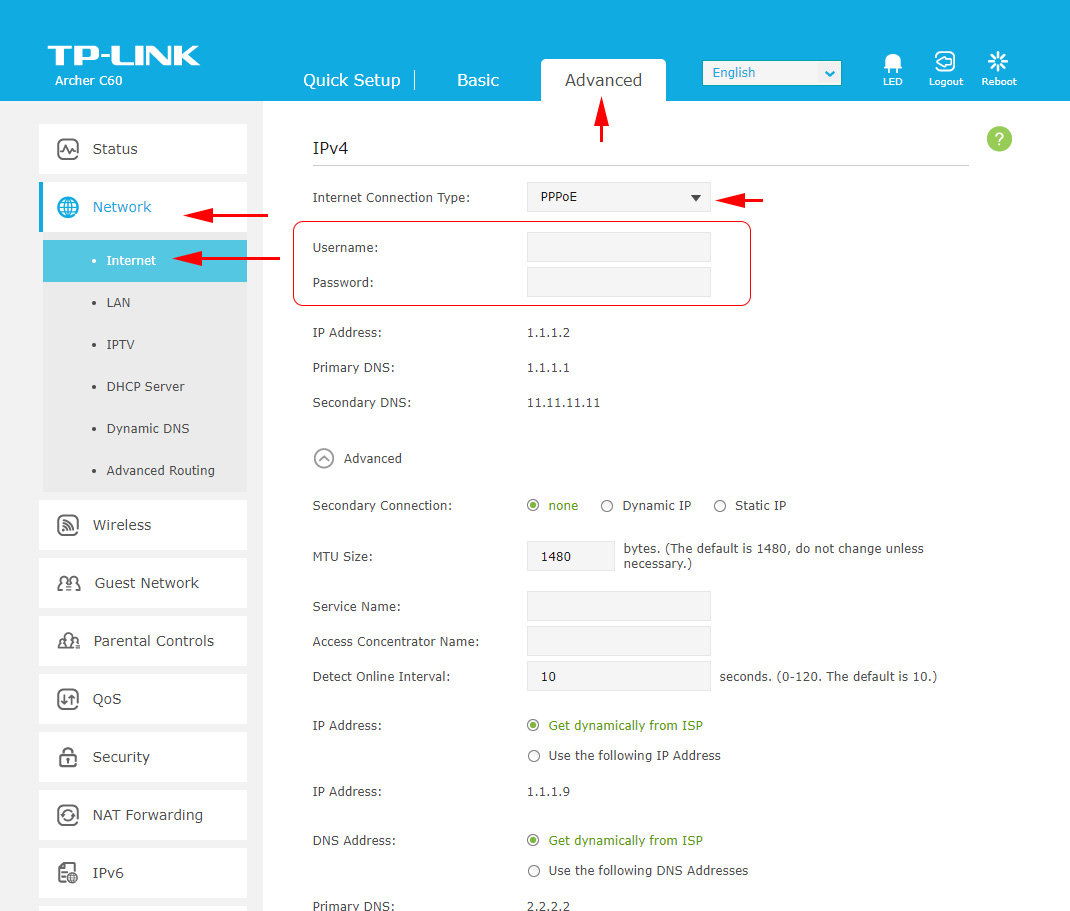
If the Internet through the router does not work (without access to the Internet, or limited), then you need to set the parameters for connecting to the provider. To do this, go to the tab “Advanced” – “Network” – “Internet”.
There select your connection type and set the necessary parameters. Usually, it is a user name, password, and server address. For example, I chose PPPoE.
After setting all the parameters, click on the “Connect” button. If the router connects to the Internet, then save the router settings. If it does not connect, then check the settings. Check the settings with the provider.
L2TP and PPTP are configured in the same way. Only there in addition to the username and password you will need to specify the address of the server (which is also given by the provider).
Our goal is for the router to establish a connection with the provider.
Setting up Wi-Fi network and password on TP-Link Archer C60
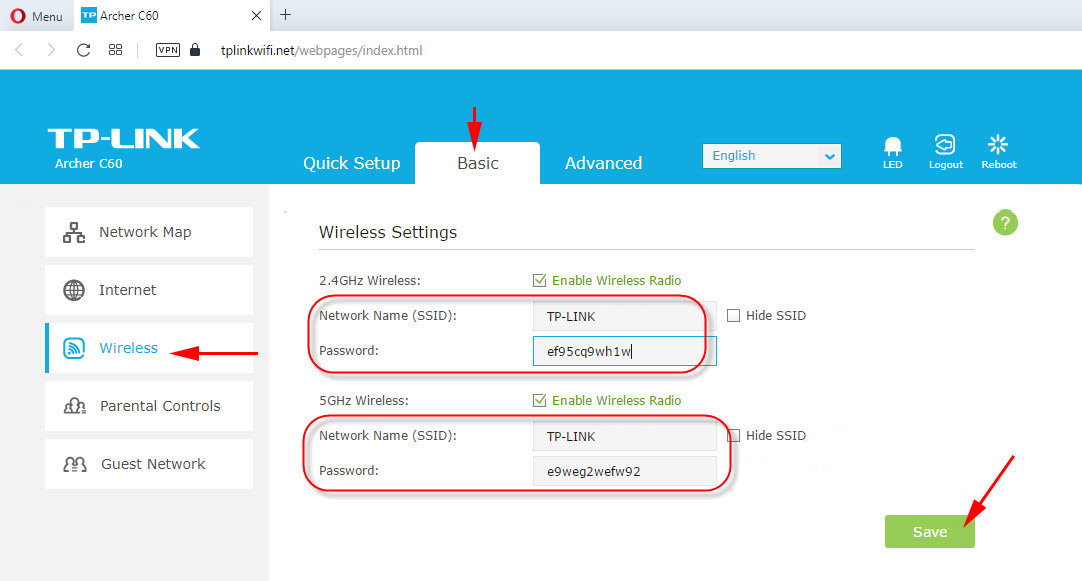
From the Wi-Fi network settings I advise you to change only the name of the network itself, and of course the password. Since we have a dual-band router, the settings should be set for both networks. Or, if necessary, you can disable one of the bands. Let me explain.
Since we don’t need to change any special parameters, we open the basic settings on the “Basic” – “Wireless” tab.
There you will see the settings of two networks: 2.4GHz Wireless and 5GHz Wireless. Change the name (SSID) and password for each band. The password should be at least 8 characters. English letters.
If, for example, you don’t need the 5GHz network at the moment (you don’t have devices that support it), you can disable it. Just uncheck “Enable Wireless Radio” and save the settings.
After saving the settings, you will need to reconnect to the Wi-Fi network. Specify a new password, which we have just set.
IPTV settings
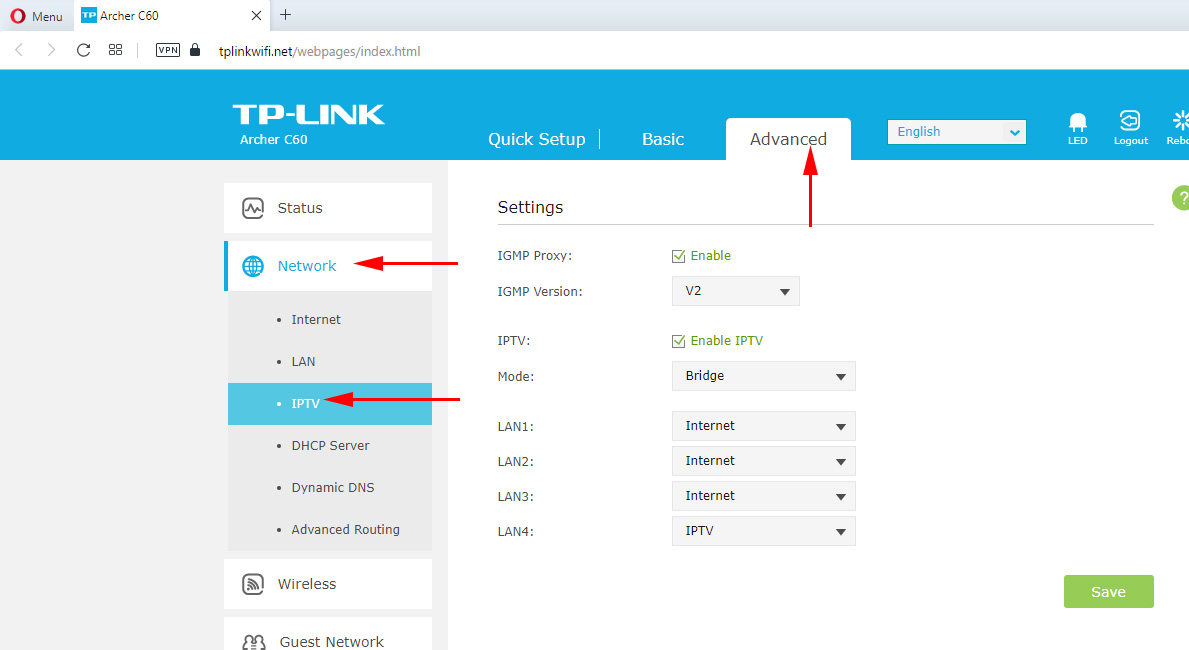
IPTV settings are set in the “Advanced” – “Network” – “IPTV” section.
It’s enough to connect the set-top box to one of the LAN ports of Archer C60 router and set this port for IPTV in the settings. In bridge mode.
I think there will be no problems with it.
That’s all, we have finished configuring the TP-Link Archer C60 router. I hope that everything worked out well for you. If you encountered any problems, then do a reset and try to configure it again. Check the settings with your ISP.
Ask questions in the comments, and share your experience. All the best!

 TP-Link TL-WR842N: Review and Reviews. Is the Any Support for 3G/4G Modems
  TP-Link: Wi-Fi does not work. The Router Does Not Give Out Wi-Fi Network
  Setting Wi-Fi Router TP-Link TL-WR940N and TL-WR941ND. Instructions for Connecting and Configuring Wi-Fi
  How to Connect TP-Link TL-WR740N (TL-WR741ND)