
IPV4 Without Access to the Internet or Network. How to Fix in Windows 10, 8, 7?
If in the “Status” window of the network connection you see the inscription “IPv4 connection: no internet access”, or “IPv4 connection: no network access” and the internet on your computer or laptop does not work, then following the advice in this article, you can fix this problem. Or at least try to fix it, and figure out what’s wrong.
In fact, the problem is very popular. And the status “no internet or network access” near TCP/IPv4 protocol can appear because of many different reasons. Including problems with your Wi-Fi router (if you have a router connection), some errors in Windows, or even problems with your Internet provider. Now we will try to find the cause and fix it. The main problem is that the Internet is not working on your computer. And we need to make it work.
With this problem you can face when connected to Wi-Fi network, and network cable through a router, or directly to the Internet Service Provider. Also, the lack of Internet for IPv4 can be observed in the new Windows 10, as well as in Windows 8 and Windows 7. The solutions will be universal for all OS, computers, laptops. Opening the “Status” of your Internet connection (wireless, or Ethernet), we will most likely see the status of no Internet access, or network.
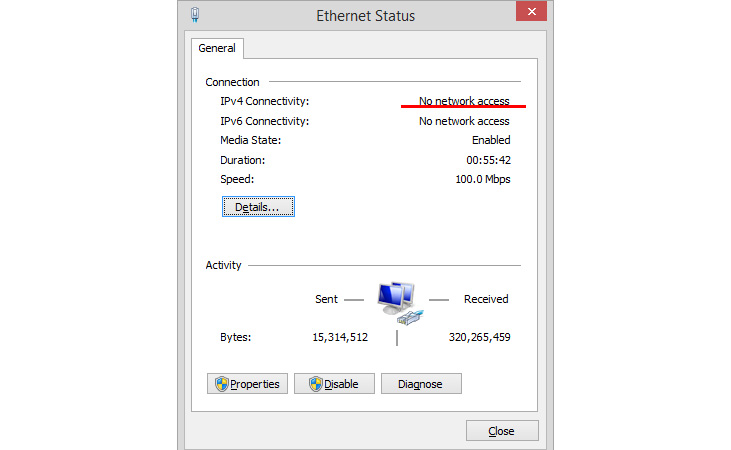
It should be: “IPv4 Connection: Internet”.
Well, the problem is clear, we can move on to solutions. I will show you on the example of Windows 10.
What do I do if I have IPv4 with no Internet access or no network access?
First, I suggest you follow a few simple guidelines, and try to determine the cause:
- Reboot your computer, or laptop. It is the rebooting that should be done, not the shutting down.
- If you have a connection through a router, reboot the router by turning off the power completely for a minute.
- Think back to what you were doing before the internet stopped working and the no internet access status appeared next to IPv4. This is very important. Maybe you changed some settings, or installed something.
- If you have the internet connected directly to your computer (without a router or modem), connect it to another computer if possible. It is possible that the problem is with your internet provider. Call your ISP support and ask.
- If you have a router installed, and the Internet does not work on any device that is connected through it, then the reason is in the router itself, or in the ISP. Call support and check the router settings (after rebooting it). If the Internet does not work only on one computer, then look for the cause on it. About it below in the article.
- Temporarily disable antivirus.
Let’s look at some more serious solutions.
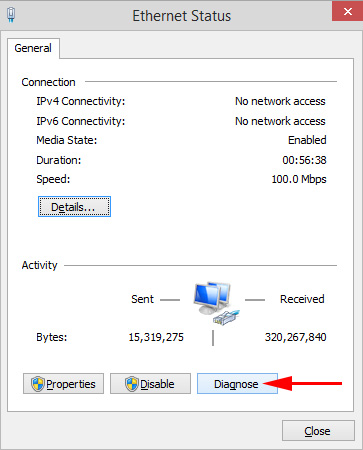
Run troubleshooting
Right in the “Status” window, click on the “Diagnostics” button.
The “Troubleshooting” will start, then the result will appear. Most often you will find errors like these:
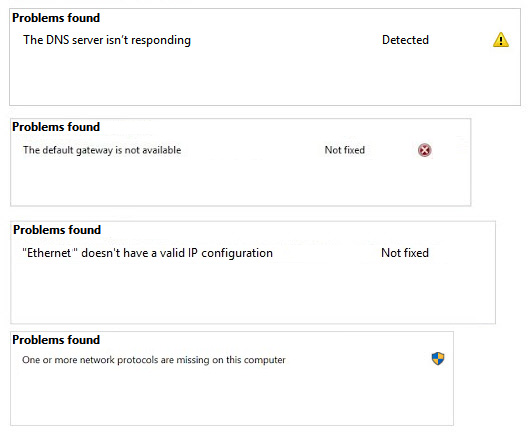
Depending on the problem found, you can apply the solutions from the following articles (if Windows doesn’t fix it automatically):
- DNS server is not responding, or “Computer settings are configured correctly, but the device or resource (DNS server) is not responding”.
- This computer is missing one or more network protocols
If the error was not detected, or the tips from the links above did not help you, you can also check the TCP/IPv4 protocol settings.
Changing TCP/IPv4 settings
Go to “Network Connections”. You can right-click on the connection icon (in the system tray) and select “Network and Sharing Center”. Then, in the new window on the left, select “Change adapter settings”.
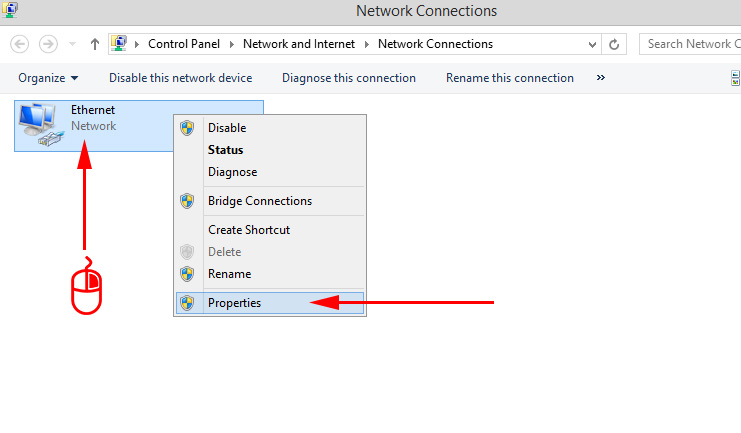
Next, right-click on the adapter through which you are connecting to the internet and select “Properties”. If by wi-fi, it’s “Wireless Network”. If by cable, it’s probably “Ethernet” (local area network connection).
In the “Properties” window, highlight IP version 4 (TCP/IPv4), and click on the “Properties” button. In most cases, the computer gets the settings automatically from the router, or ISP. Therefore, leave the IP address to be obtained automatically(unless your ISP or network administrator requires static settings), and specify DNS manually and click Ok. Specify the following addresses: 8.8.8.8.8 / 8.8.4.4. As on the screenshot below.
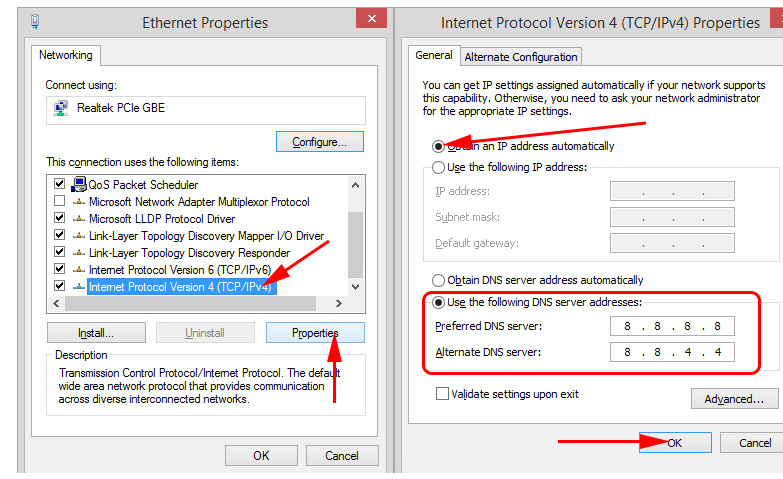
It is advisable to restart the computer.
If this does not help and you are connected via a router, you can try to manually set the IP settings.
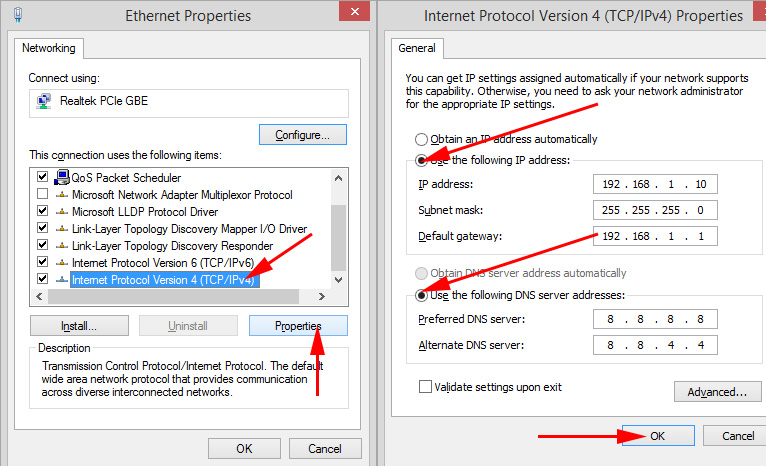
Setting static addresses for IPv4
You need to find out the IP address of your router. Most likely it is 192.168.1.1, or 192.168.0.1. It should be specified on the router itself.
In the IP address field, write the router’s address and change the last digit. For example: 192.168.1.10. Subnet mask – will be set automatically. Default gateway – IP-address of the router. DNS can be left “get automatically”, or you can write your own. Here we go:
How to do this in Windows 7, I described in detail in this article. If it doesn’t work, set everything back to automatically get settings.
Conclusion
If my recommendations did not help, and you find out that there are no problems on the side of the ISP, or the Internet works on other devices from the same router, then you can try to do a network reset.
In case the problem is with the router, then you can check its settings, or reset them to factory defaults and do a rotary configuration. You can find instructions for some models here.
Not being able to access the internet, or the network for IPv4, is pretty much the same problem as described in the article Restricted in Windows 10.
If you managed to fix this error, then be sure to write in the comments what solution you found useful. You can describe your case in detail and I’ll be sure to respond!
 The Internet sores not work on a Network Cable from Wi-Fi Router
  Red Cross on the Internet Icon in Windows
  On the laptop thes no wireless Network Connection Wi-Fi
  The Connection is Interrupted. It seems that you have connected to Another Network. Error err_network_changed