
Settings tp-Link TL-WA701ND and TP-LINK TL-WA801ND AS An Access Point, Repiter and Adapter
Recently I published an article about two access points from TP-Link. You can read: TP-Link TL-WA701ND and TP-Link TL-WA801ND – access point, repeater and Wi-Fi adapter in one device. There I talked about what these devices are, what tasks they can perform, and did a little review. Since these are multifunctional network devices that can work in different modes, I decided to write a separate instruction on how to configure TP-Link TL-WA801ND and TP-Link TL-WA701ND in the access point, Wi-Fi receiver (client) and repeater (wireless network amplifier ) modes.
The setup process is very simple. You just need to switch the operation mode and connect the access point or connect to the main Wi-Fi network through the control panel. Since these are access points, the first thing we will consider is the configuration process in this mode. We will also configure these devices as a repeater to strengthen the existing Wi-Fi network. And let’s consider the configuration in client mode. It will come in handy if you want to use one of these devices to connect to a Wi-Fi network of a desktop computer, TV, etc. A device that doesn’t have a Wi-Fi module and can only be connected to the Internet via cable.
One nuance: most likely, the control panel of TL-WA801ND will be a bit different from TL-WA701ND. The web-interface of the older model is more modern. But only externally. The sections and all the settings are almost the same. That’s why I didn’t make two separate instructions.
How to enter the settings and switch the operating mode?
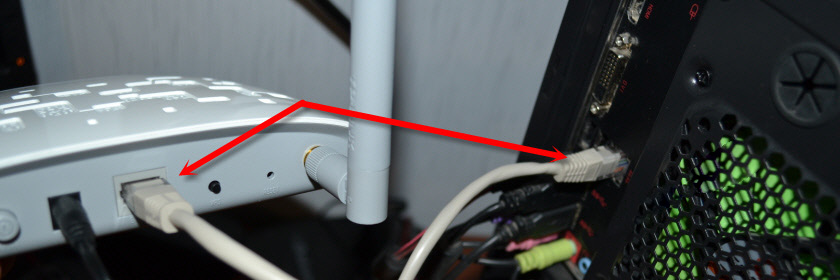
To enter the settings of the access point from TP-Link, you must first connect a computer, laptop or smartphone to it. Over a network cable, or over a Wi-Fi network, which by default is open (without a password). And if it is closed, the password is indicated on the sticker at the bottom of the device itself (signed as PIN).
All factory information: address for entering the control panel, factory login and password, MAC-address, PIN – are indicated on the access point itself.
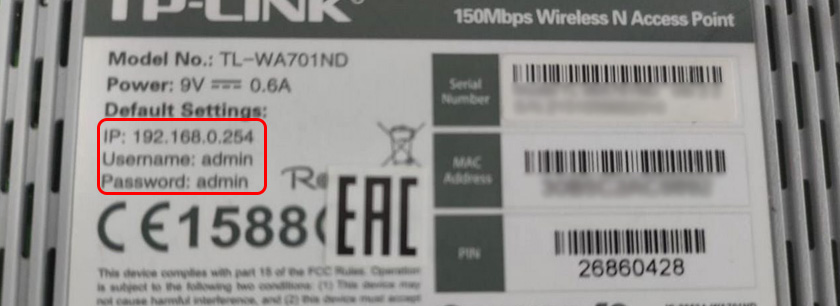
Open any browser and go to the IP address: 192.168.0.254. A form should appear in which you need to specify your username and password. As you can see in the photo above, the factory username and password are: dmin and admin.
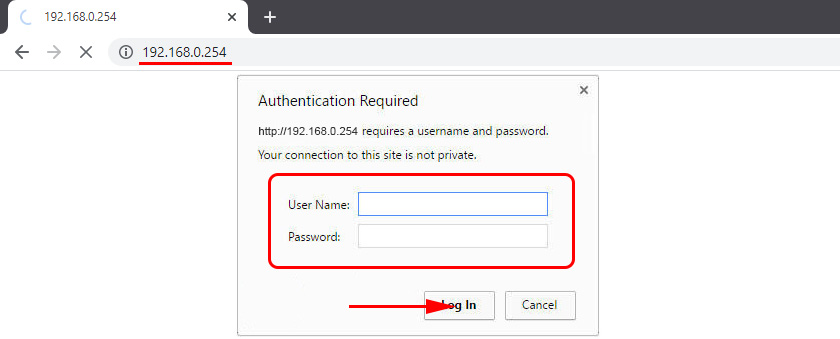
The control panel will open. If the access point has not been configured yet, a quick setup wizard will be launched. You can try to configure everything with its help, or you can click on the “Exit” button and configure according to the instructions below.
If something went wrong and you can’t get into the settings
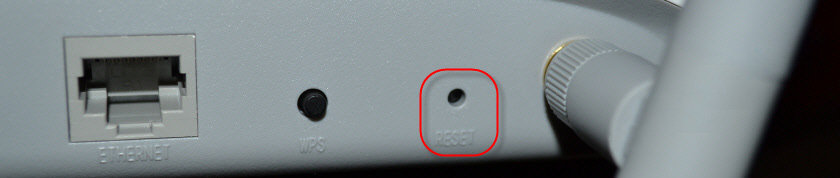
If you can’t go to the address 192.168.0.254, the login/password doesn’t fit, or something else, then the first thing you should do is reset the access point. Turn it on and press the Reset button with something sharp for about 15 seconds. The indicator in the form of a gear will flash actively and then go out. Then you can release the button.
If after that the settings will not open, then read the article does not enter the router settings. And according to it, check the settings on your computer. Our goal is to enter the web-interface.
Change the mode of operation
The default mode of operation is “Access Point”. You can change it in the settings, on the “Operation Mode” tab. Select the required mode and save the settings.
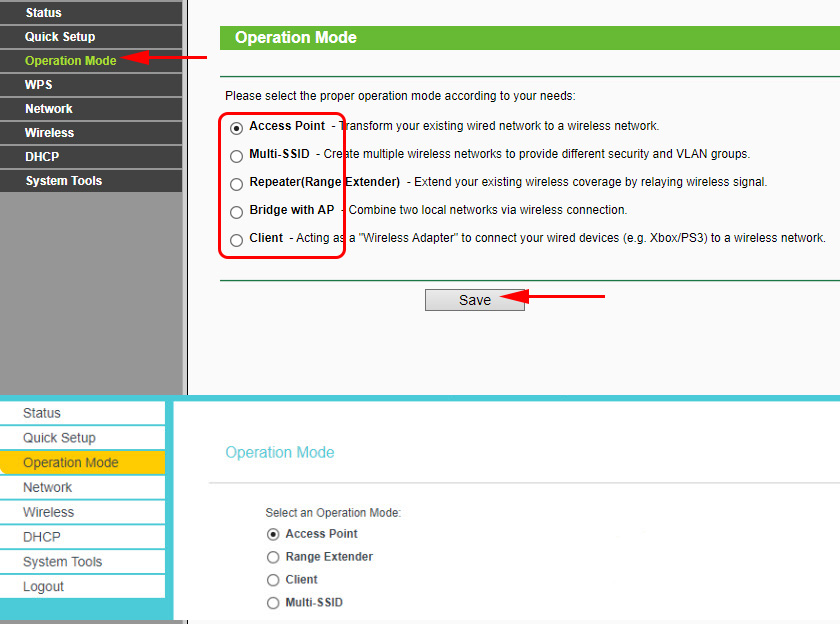
The device will be rebooted, after which you need to enter the control panel again at the address: 192.168.0.254.
TP-Link access point configuration
The default mode is Access Point. You can go to the “Operation Mode” tab and check. In this mode, the access point receives Internet via cable from another network device (usually a router) and distributes it via Wi-Fi network.
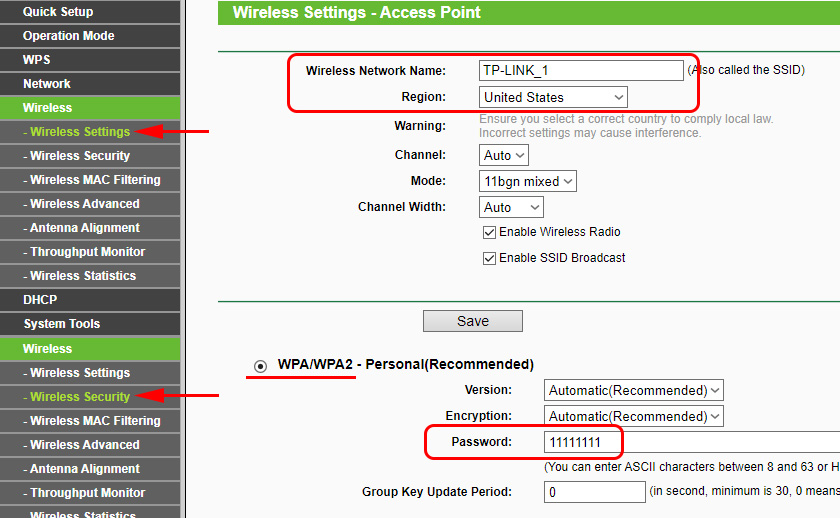
All you need to do is change the Wi-Fi network settings in the “Wireless Settings” section, set the network name and select your region. Then save the settings by clicking on the “Save” button. Next, in the “Wireless Security” section, choose the type of protection, set the password, and save the settings.
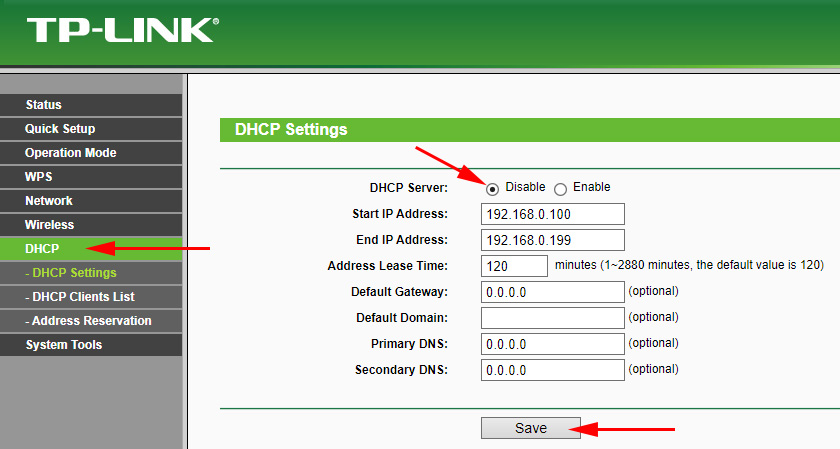
Then go to the “DHCP” section, disable “DHCP Server” by setting the value “Disable”. Save the settings.
Reboot our access point.

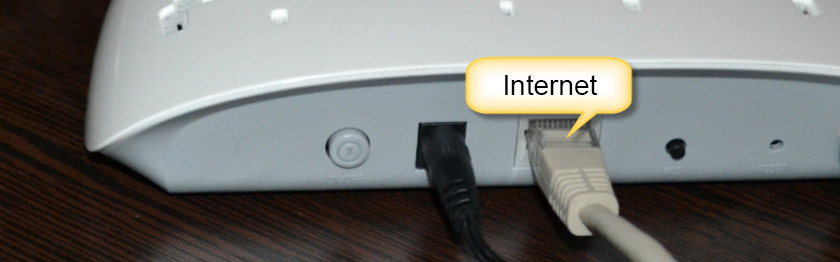
After that, simply plug the network cable (Internet) into the “Ethernet” port. If it is not already connected.
To get back into the settings, the easiest thing to do is to do a factory reset (shown above). Or in the client list on the main router, look up the IP address of the access point and go to it.
Configuring TP-Link TL-WA701ND (WA801ND) in repeater mode
In this mode our device will connect via Wi-Fi to the existing network and amplify it.
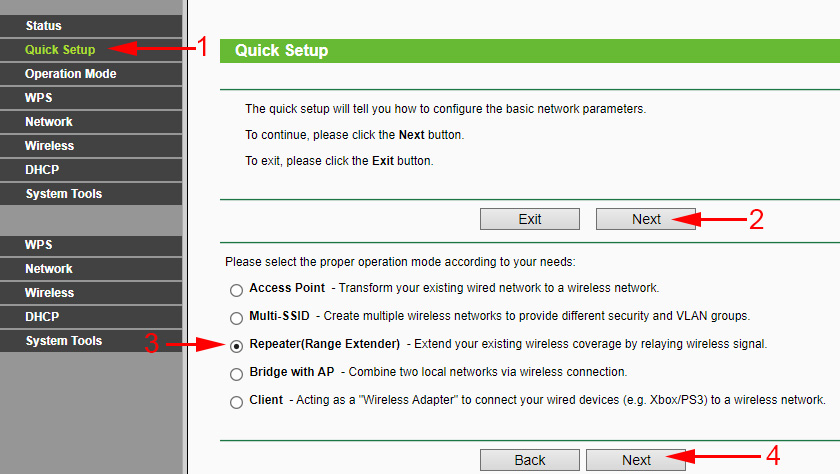
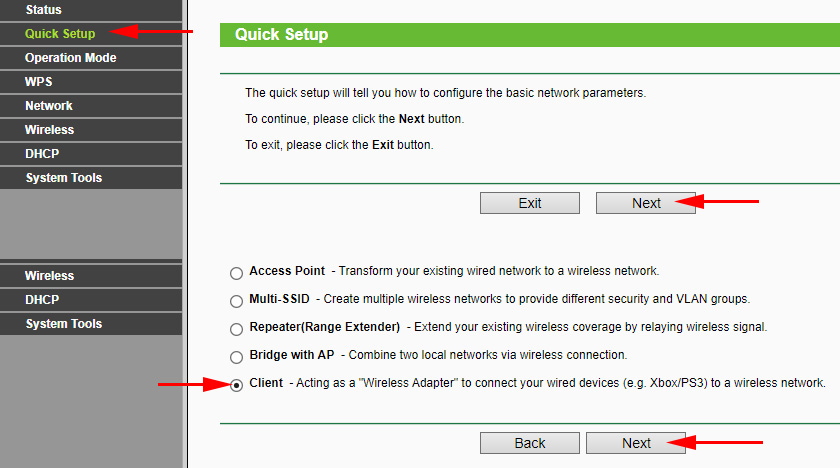
The best way to configure the access point in repeater mode is through the Quick Setup wizard. Open “Quick Setup” and click “Next”.
In the next window, select “Repeater (Range Extender)” and click “Next” again.
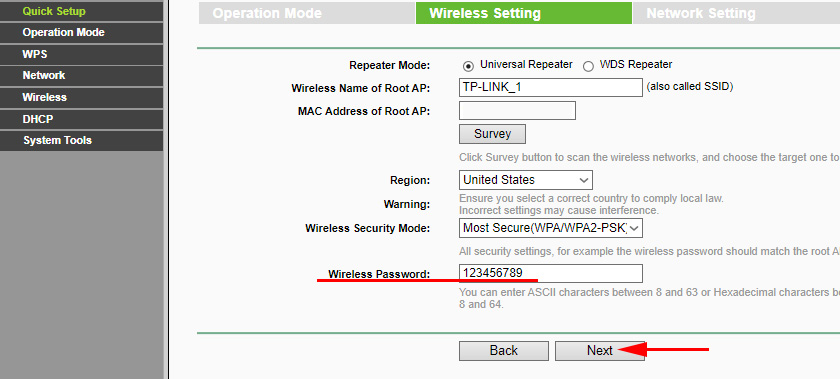
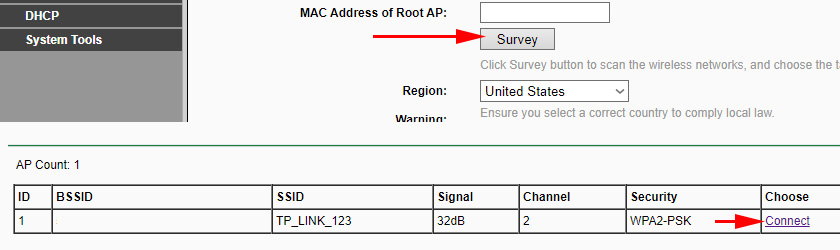
Click on the “Survey” button and click on the “Connect” link next to your network (which you want to amplify).

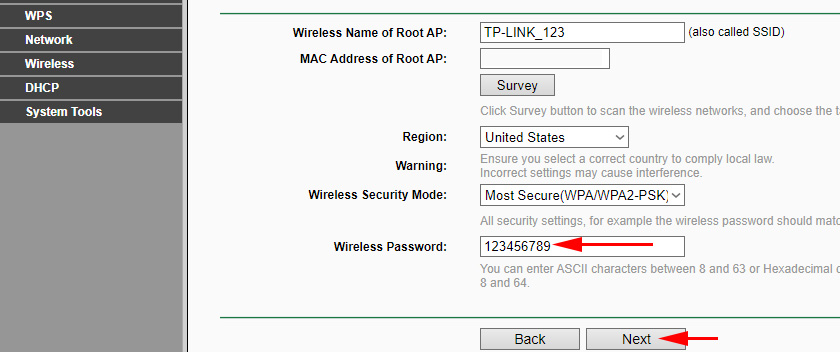
Enter the password from the Wi-Fi network we are connecting to and click “Next”.
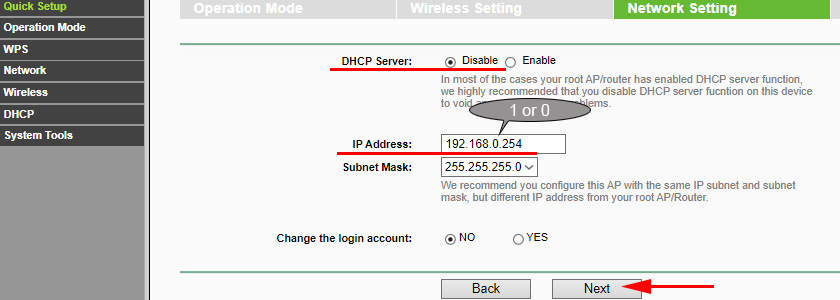
DHCP-server should be disabled. It is also necessary for the repeater and the main router to be in the same subnet. By default, the IP address 192.168.0.254 is specified in the settings. If your router has IP 192.168.0.1 (you can see it on the router itself), you don’t need to change anything. But if, as I have, the IP address of the router is 192.168.1.1, then “0” should be changed to “1”.
Click on the “Reboot” button.
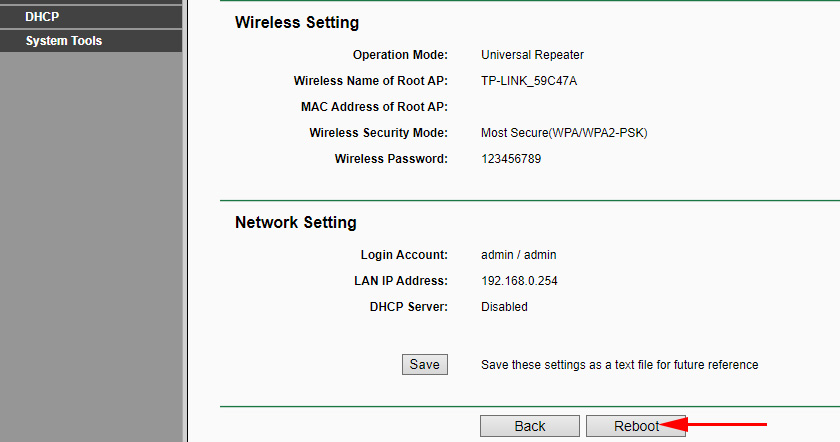
After reboot, there will be one Wi-Fi network is amplified TP-Link TL-WA701ND, or TP-Link TL-WA801ND. Use the address given in the penultimate step to enter the web interface.
Client mode (wi-fi adapter)
In this mode our access point will work as a receiver. Receive internet via Wi-Fi and transmit it via network cable. It will not give out Wi-Fi.
In the “Quick Setup” section we need to press “Next” and selecting the “Client” mode we continue the configuration.
By clicking on the “Survey” button, the list of available networks will appear. Choose your Wi-Fi network.
Having specified the password from your Wi-Fi network, press the “Next” button.
Pay attention to the IP address. It should be in the same subnet with your router. The penultimate digit in the settings should be the same as in the IP address of your router.

Press the “Reboot” button and wait for the access point to reboot.
Everything, the adapter is ready.
You can use it to connect your desktop computer, TV, etc. to a Wi-Fi network.
 Powerline Setting TP-Link TL-WPA4220KIT Adapters
  TP-Link TL-WN781ND-Setting and Installing the Driver
  Tplinkwifi.net does not open. Does not come in and fails to account the site
  TP-Link Archer C60 (AC1350): Review, Characteristics, Reviews