
Netis WF2419R and Netis WF2419 Settings. How to configure the Internet and Wi-Fi?
Netis has two routers that are almost identical. These are models WF2419R and WF2419. The only difference between them is the presence of IPTV support in the first model (the one with R in the name). I’ve already told you in detail about Netis WF2419R. You can read my review if you are considering this router for purchase. Well, for those who have already bought one of these routers, I decided to write a detailed instruction on how to configure it. I will show you by example how to connect and configure Netis WF2419R and Netis WF2419. I think there is no point in making separate instructions. As they will turn out to be the same.

Netis routers have a very simple control panel. I mean the web-interface, where you can enter through a browser and set all the necessary settings. Also in the kit there is a detailed manual in different languages, which can be used to configure the router without any problems. But if you don’t manage to do something, you can always configure the router according to my instructions. Or ask a question in the comments.
A few points:
- Before setting up, it is advisable to find out what type of connection your ISP uses. Does it bind by MAC-address. You need to know the username and password for the connection (if you don’t have a dynamic IP).
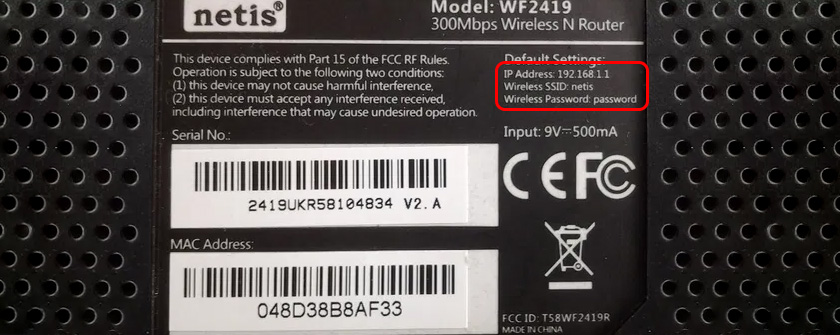
- The factory network name, password and address to enter the settings are listed at the bottom of the Netis WF2419R or Netis WF2419 router.
- To enter the router’s control panel, you don’t need an Internet connection. Just connect to the router.
- If you had a high-speed connection set up on your computer, you don’t need it now. Once configured, this connection will be established by the router.
First things first, let’s get everything connected:
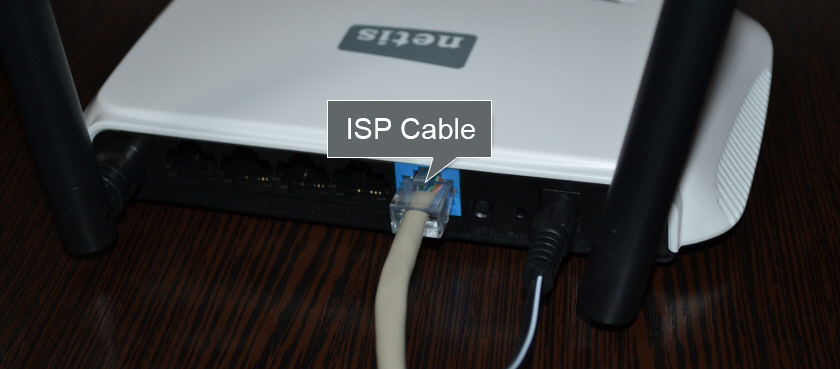
Before we move on to configuring the Netis WF2419, we need to connect it first. To the router, we connect the power. In the WAN port (blue) you need to connect the cable from your ISP or modem.
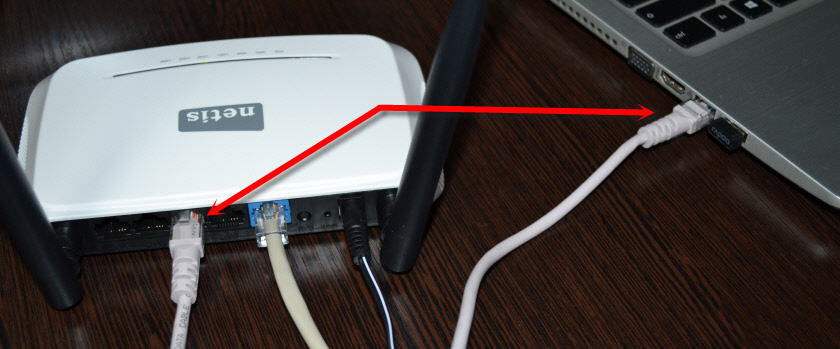
Then you need to connect to the router from the device through which you plan to configure. If you have a computer or laptop with a LAN port, it is better to use it. Using the cable that comes with the kit, connect your computer to Netis WF2419.
If there is no possibility to connect via cable, or you will be configuring your Netis from your phone or tablet, then connect via wi-fi. When the router is new, on factory settings, it distributes Wi-Fi network with the name, which is indicated at the bottom of the router. There is also a password for connecting to this network. The standard password is password.
Just select the network on your device, enter the password and connect.
Resetting Netis WF2419R router settings
It is possible that the router has already been customized. The password was changed, the network name was changed, the password to enter the settings was set. In this case, so that the old parameters do not interfere with us, you can do a factory reset. To do this, press the Default button for about 15 seconds.

It is recessed in the case, so you will need something sharp. More details in this article.
Now we’re done with the connection. As a result, the Internet and the device we are going to configure must be connected to Netis. You may not be able to access the Internet through the router. This is normal at this stage.
Quick setup of Netis WF2419 or Netis WF2419R router
Continuing. On the device that is connected to the router open any browser and go to netis.cc. The address must be entered in the address bar of the browser.

If an error appears and the page with router settings does not open, then try to go to 192.168.0.1. Read more in the article: How to enter the Netis router settings.
The start page should open, where you can set almost all the necessary parameters. Namely: configure the Internet connection and Wi-Fi network.
There are two sections there:
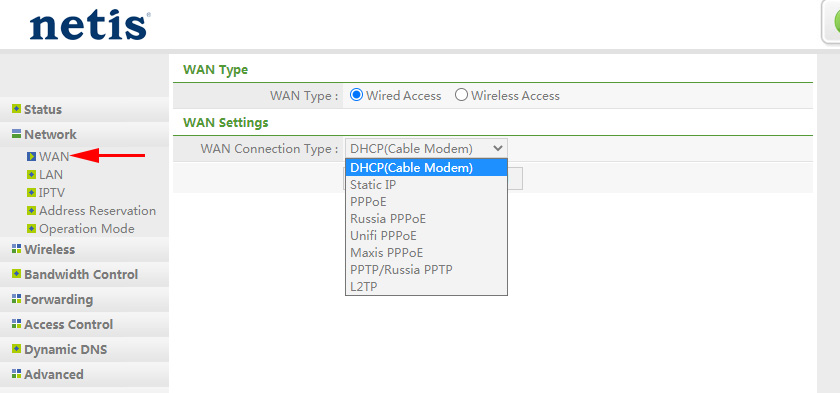
- Internet Connection Type. You need to select the type of connection your ISP uses. If it is Dynamic IP, everything should work at once. Unless your provider binds by MAC-address. In this case (if the router is connected by cable to the computer to which the Internet is bound), check the “MAC clone” box, or look at the MAC address on the router and prescribe it at the provider (by phone, or in the personal cabinet). Static IP – very rare. PPPoE is a popular type of connection. You need to set a user name and password (the provider gives them to you). If you have L2TP, or PPTP, you need to go to the advanced settings (button “Advanced”) and in the section “Network” – “WAN” configure the necessary connection.
- Setting up wireless connection. Here you need to set only a name for your Wi-Fi network and a password. Think up a good password and specify it in the appropriate field. It is also desirable to write it down somewhere.
Here you go:
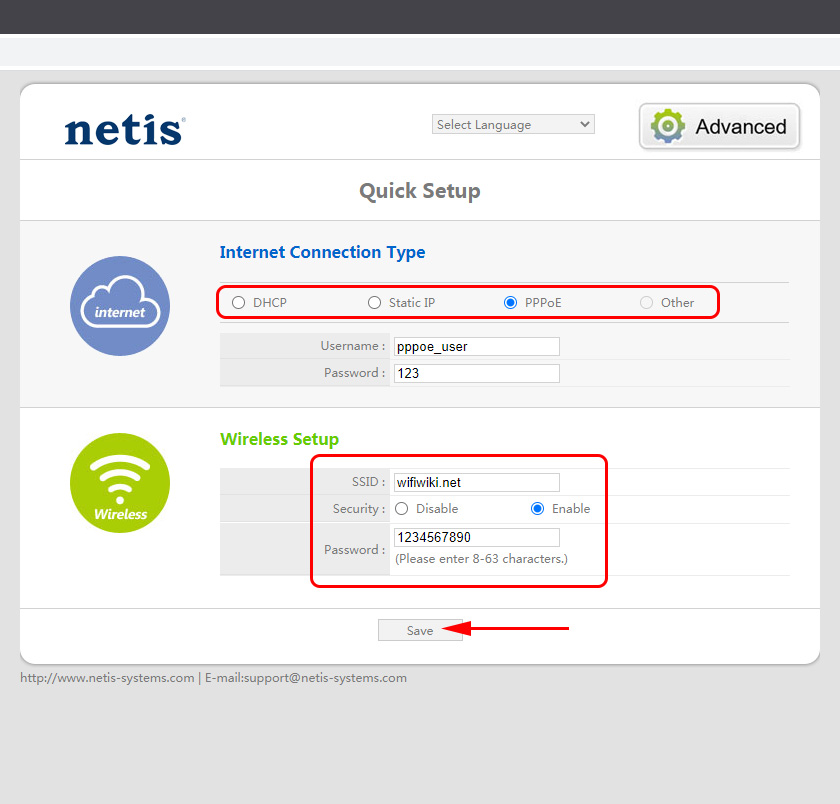
Save the settings by clicking on the “Save” button. Everything will be saved without rebooting. A network will appear with a new name (if you changed it). To connect to which you need to use the set password. Internet through our Netis WF2419R should already work. If it doesn’t work, then go to the settings and check the connection to the provider.
Netis advanced settings
To open the page with all the settings, click on the “Advanced” button.

Here everything is simple. On the “Network” – “WAN” tab, you can configure the connection to the ISP (internet).
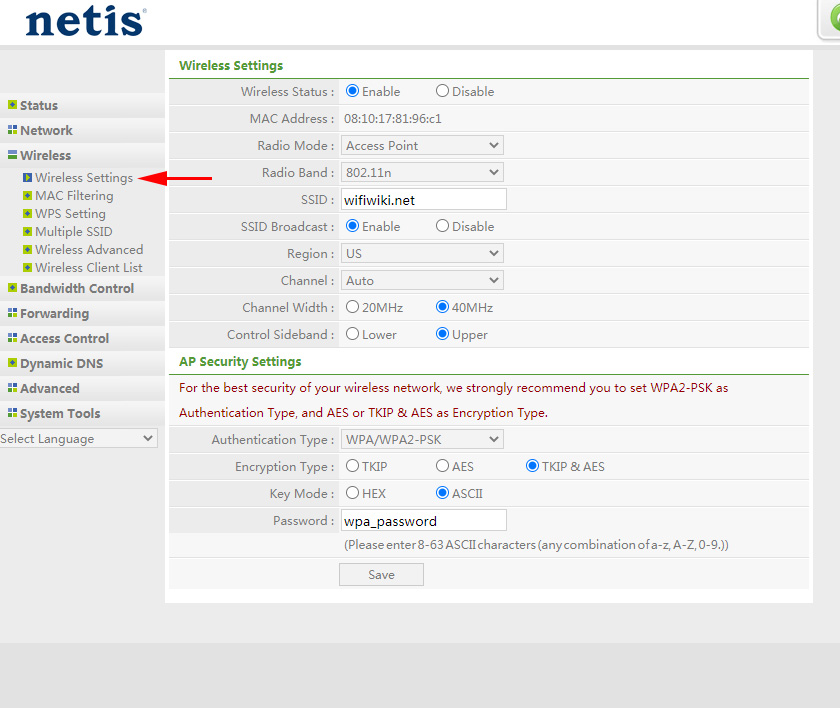
You can configure wi-fi network, set or change the password for wi-fi, change the channel, etc. on the “Wireless Mode” tab. There you can also change the mode of the router to repeater, client, WDS bridge.
These are all the basic and most necessary settings. I also advise you to set a password, which will protect the page with the settings of your router.
Setting a password for the web-interface
Go to “System” – “Password”. Specify a user name (for example, admin) and specify the password twice. Make sure to write down the password so that you don’t have to reset the settings later.
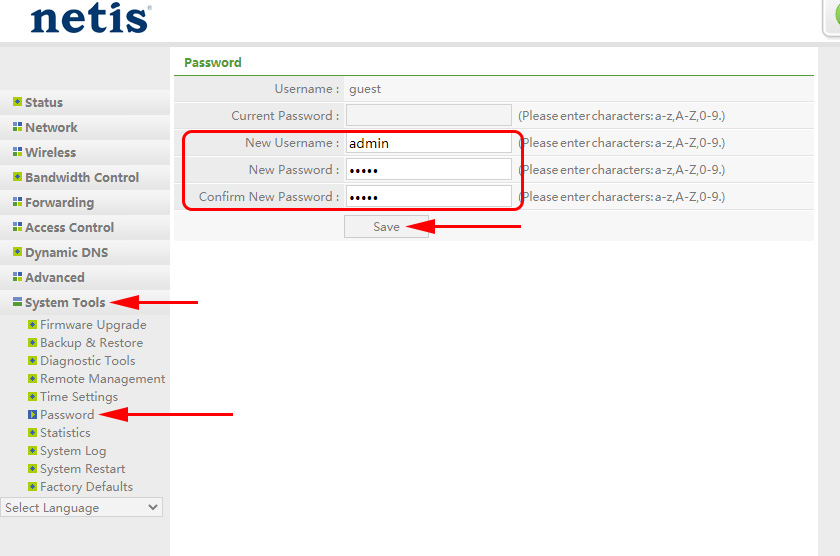
Click “Save”. Now, when you enter the control panel, the router will ask you for your username and password.
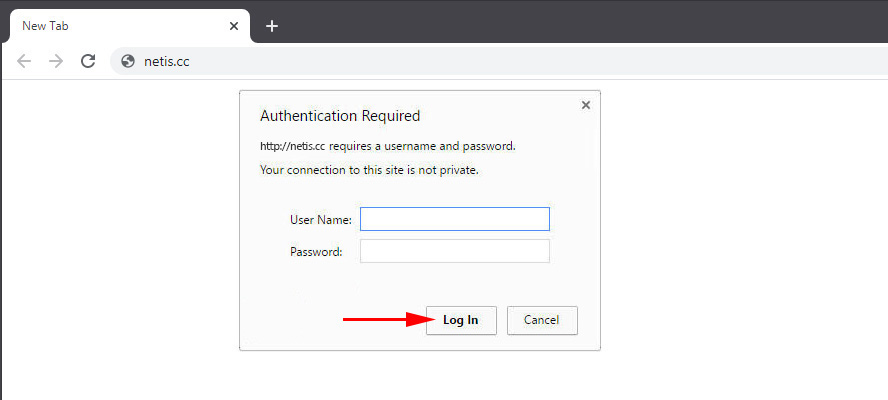
The settings are securely protected. And no one will be able to access them.
That’s all you need for basic router setup. You may have noticed that there are many different parameters, functions, etc. on the settings page. But as a rule, they are not necessary for an ordinary user. And it is better not to change anything there, without necessity.
It may come in handy:
Perhaps you still have some questions about configuring Netis WF2419R or Netis WF2419 routers. You can always ask me a question in the comments below. Also you can share your opinion about these routers. Did you like everything, what are the disadvantages, maybe with some problems encountered. You can never have too much useful information 🙂
 Netis WF2411E - Review and Reviews
  Netis Router as a Repiter, Wi-Fi Network Repeater
  How to Flash a Netis Router?
 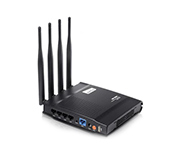 Netis WF2880 - An OverView of A Router, Which Has EVERYTHING NECESSASY