
Netis E1+-review and Setting Up of the Wi-Fi Retransa Network from Netis
In this article we are going to review the Netis Wireless N E1+ Wi-Fi amplifier. This is a compact device at a very attractive price, which will be able to solve the problem with poor Wi-Fi network signal in your house, apartment, or office. In addition to the main mode of operation as a repeater, it can work as a router. In the settings, this mode is called “Travel Router”. It’s something like an access point. But it doesn’t mean that Netis E1+ can replace an ordinary router. You can connect to it via cable the Internet from a modem, or from the local network in the hotel and organize access to the Internet via wi-fi. There is even PPPoE authorization.
Let’s return to its main purpose – to increase the radius of coverage of Wi-Fi network. The topic is quite popular nowadays. Not always a router can provide stable Wi-Fi coverage throughout the house.
Learn more about these devices: what is a Wi-Fi repeater (repeater), how it works, and what does it mean to have a router in repeater mode?
Very often in distant rooms, the signal is very poor, or absent at all. And as practice shows, it is not always because of a bad router, but because of the large area of the house, a large number of obstacles (walls), the thickness of the walls, the presence of metal in them, and other interference. You can see my recommendations on choosing the best place to install a router and tips for increasing the range of the Wi-Fi network.
If these tips do not help, the best solution is to install a Wi-Fi signal repeater. In our case Netis E1+.
Did you know that Netis routers can work in repeater mode? I wrote about it here.
The device is very simple. Just plug it into a socket about halfway between the router and the part of the house where the router’s Wi-Fi network doesn’t reach and configure it using the WPS button or through the control panel. The Netis E1+ will connect to your router and boost the signal. The Wi-Fi network will still be the same. It will just increase the range of the network.
Netis E1+ Overview
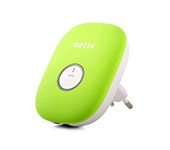
This wireless signal booster comes in a variety of colors. I got the lettuce color. There are also white, blue, pink, orange, purple.
The small box securely packs the repeater itself, power cable and instructions.
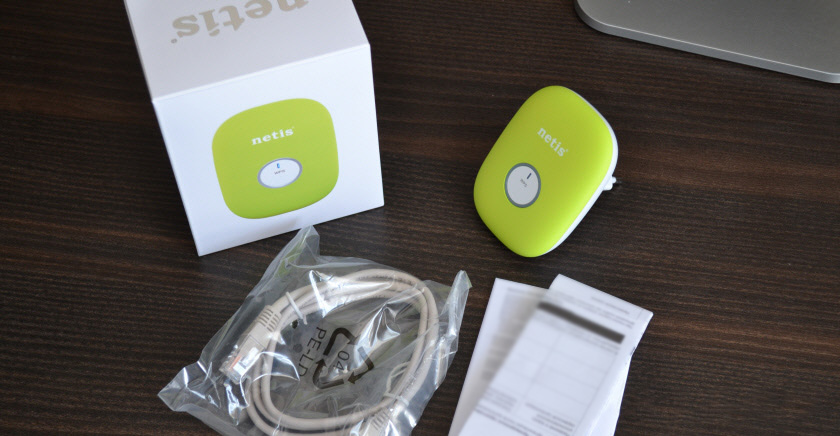
The repeater itself is very nice to the touch. Good plastic and quality assembly.
On the front panel there is a company logo and a WPS button with an indicator. The modes of operation of the indicator are described in the manual. We’ll come back to them.

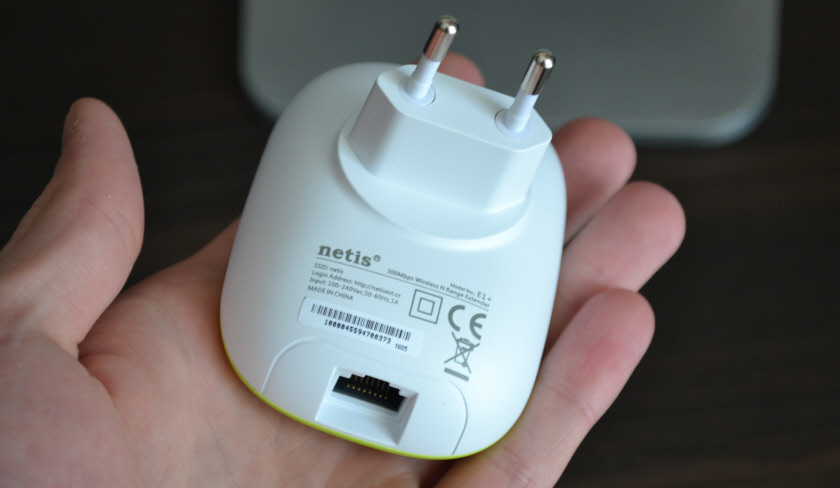
There is a LAN port at the bottom. If the amplifier is configured in the “Range Extender” mode, you can use it to connect a computer, TV, or other device to the Internet via a network cable. It’s kind of like an adapter for devices that can’t connect directly to wi-fi. And in “Travel Router” mode, it connects the internet to the repeater via cable.
It’s a cool device, I like it. Now let’s check it in work.
Configuring the Netis E1+ repeater
There are two ways to configure Netis E1+ as an amplifier: via the WPS button, or via the web interface. Let’s start with the first option. If everything works out, we don’t even need to go into the control panel.
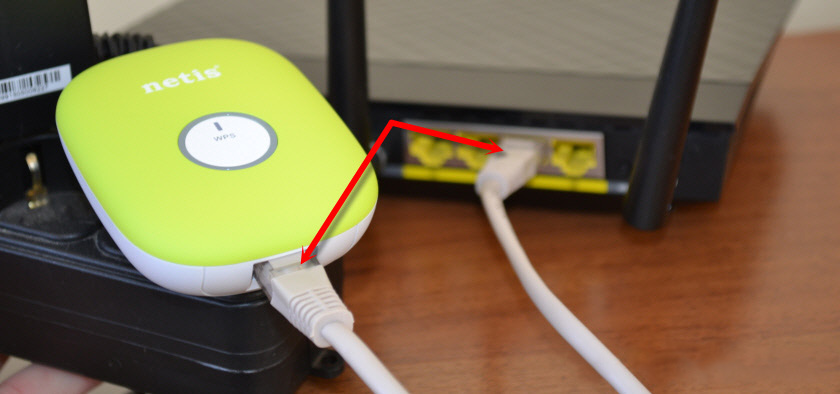
Plug the repeater into a socket. In a place where there is a signal from the router.
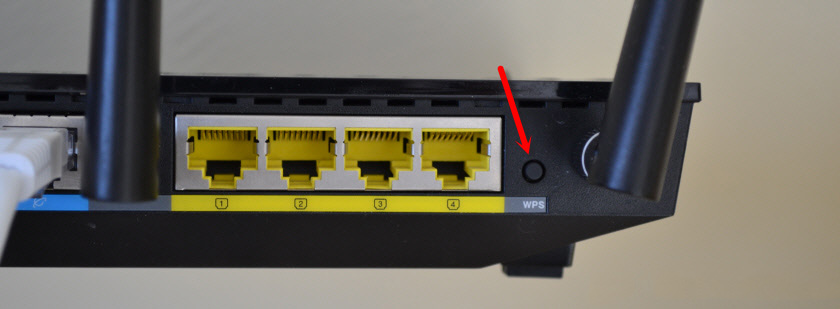
On the router, find the WPS button and press it. You may need to press and hold the button for 1-3 seconds. But no longer than that! The WPS function must be enabled on the router (it is usually enabled by default). The indicator light should flash. Here everything is very individual. It depends on the router model.
Next, on Netis E1+ press the WPS button for 1-2 seconds.
The indicator light should start flashing actively.
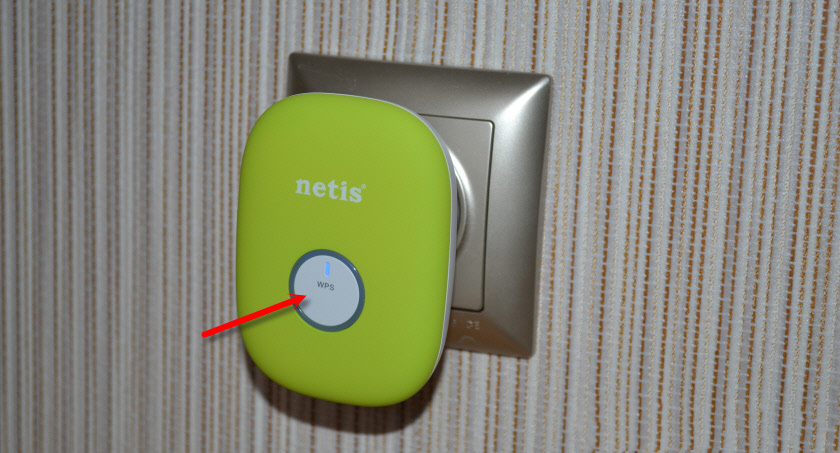
You will need to wait for a while. The repeater should connect to the router. The indicator light should be blue. If it is lit orange, then the signal is bad. Set it closer to the router.
Once it’s set up, there will be one Wi-Fi network. Just like it was before. It’s just that the signal will be stronger. You can turn off the Netis E1+ and turn it on elsewhere. It will continue to strengthen the wireless network.
If you can’t configure it this way, or there is no WPS button on the router, then see the second option.
netisext.cc- setting up the repeater via the web interface
Turn on the repeater and connect your computer, phone, tablet to the Wi-Fi network named “netis”. It is not protected. If there is no such network, do a reset. Press the WPS button on the amplifier for 5 seconds.

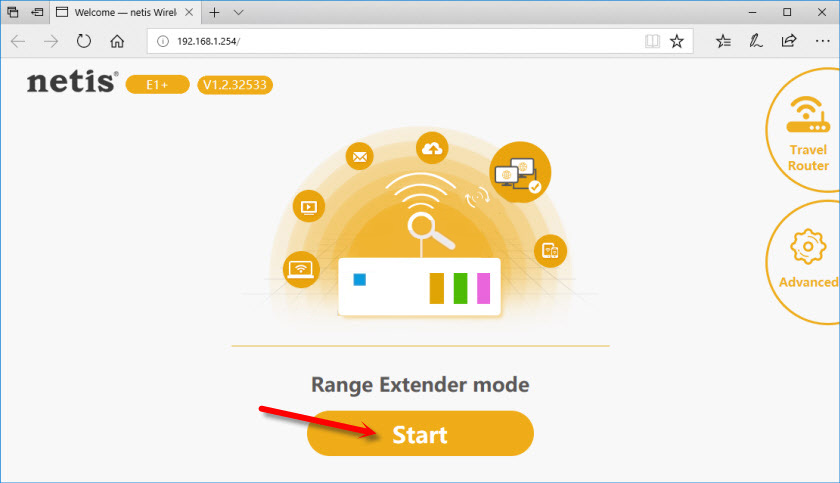
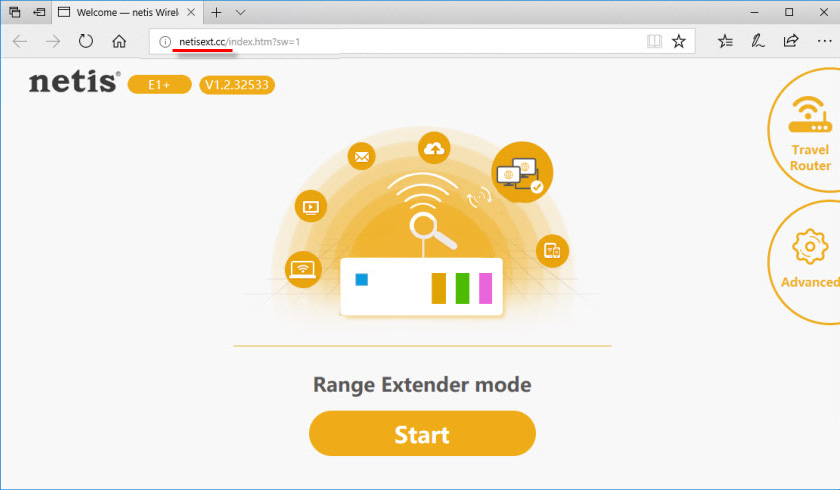
Open any browser. If the control panel does not open automatically, go to http://netisext.cc. Or just netisext.cc. Or to the IP address 192.168.1.254.
Click the “Start” button to begin the setup.
Netis E1+ will start searching for available Wi-Fi networks. Select your network from the list.
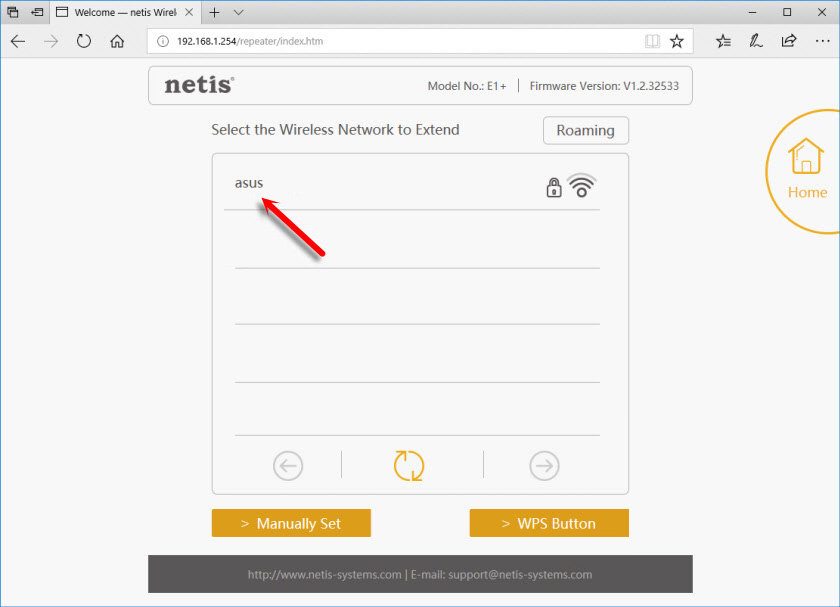
Enter the password from your Wi-Fi network. Just be careful, you need to specify the correct password.

Wait until the repeater establishes a connection with the router. A window with information about the wireless network should appear.
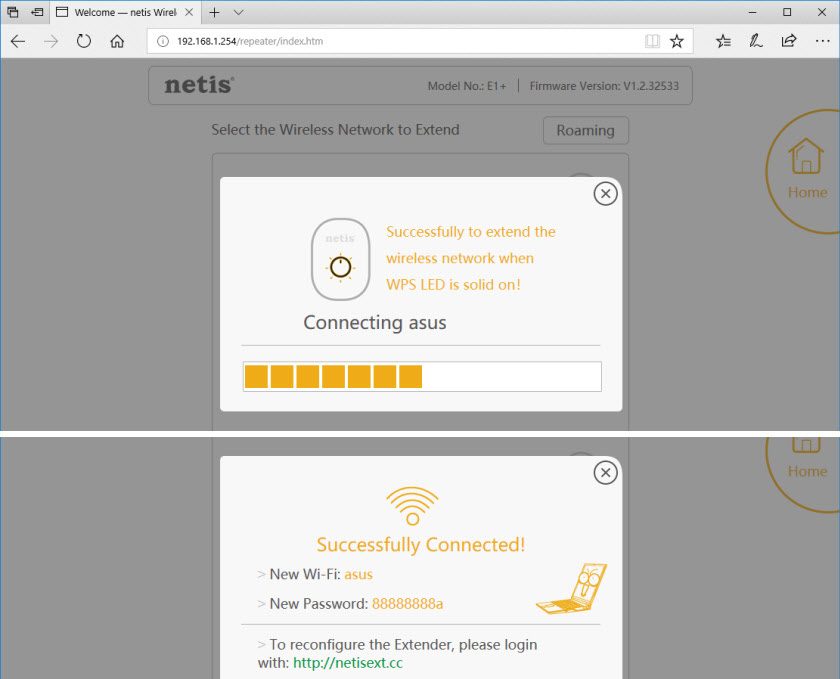
That’s all, Netis E1+ works and amplifies the signal from our router. It is possible that for some time the Wi-Fi connection will be without Internet access. You just have to wait. The network with the name “netis” should disappear.
You can access the control panel at netisext.cc.
Netis Wireless N E1+ in “Travel Router” mode (access point)
If the device has already been configured, I recommend resetting the settings to factory defaults. To do this, press and hold the WPS button for 5 seconds. This is the third time I’ve written about it 🙂
After that, connect to Netis E1+ internet via network cable from your modem, or from an internet outlet (in a hotel, for example). It goes like this:
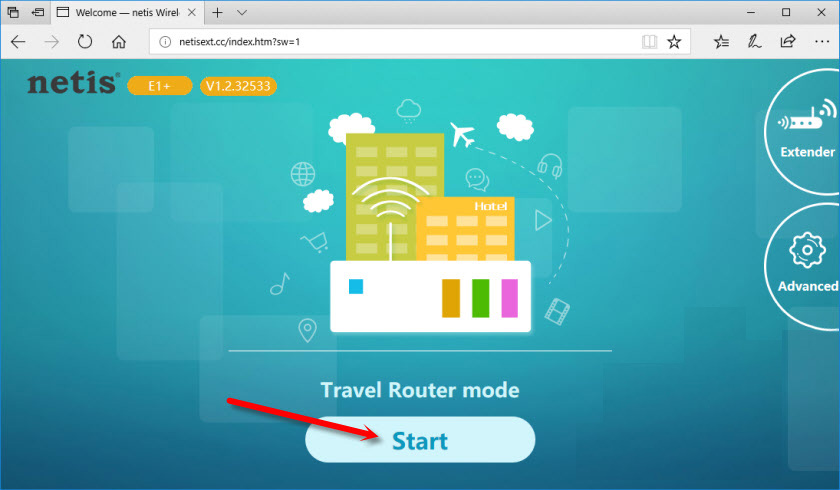
Connect to the amplifier’s Wi-Fi network. Which by default is called “netis” and is not password protected. Once connected, go to netisext.cc in your browser and set the repeater to “Travel Router” mode.
To start the configuration press the “Start” button.
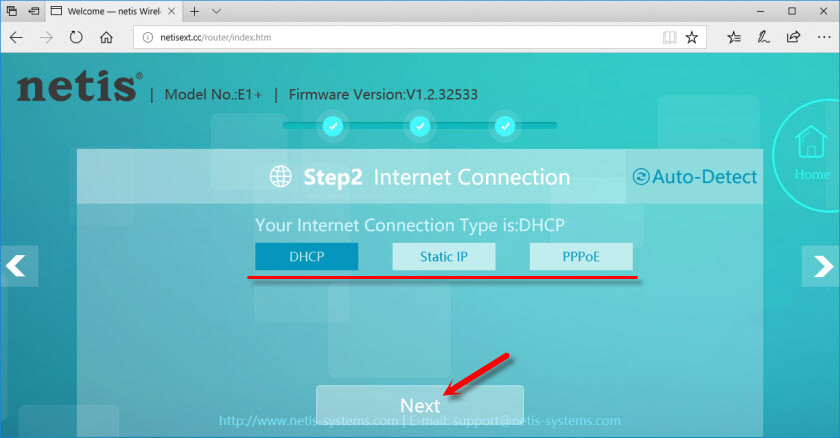
The repeater will optimize the wireless network and offer you to choose the type of Internet connection: DHCP, Static IP and PPPoE. Most likely you need DHCP (automatic address acquisition).
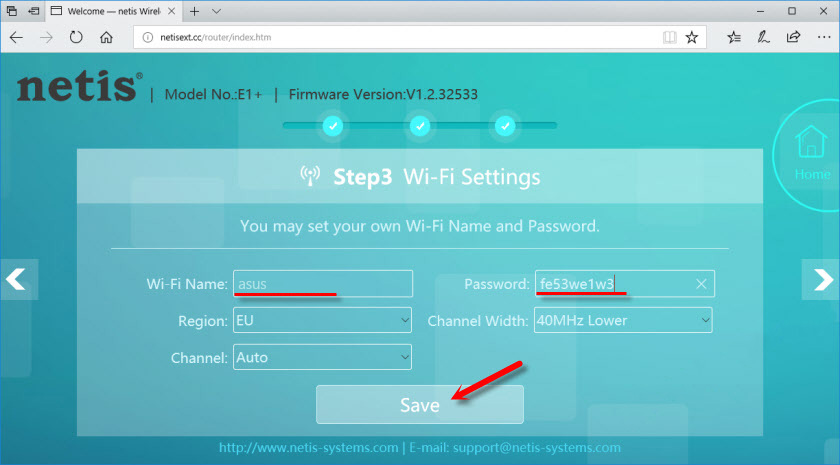
If the repeater manages to set up an Internet connection via cable, it will prompt you to set the Wi-Fi network settings. You can change the network name and password. I do not recommend changing the rest of the settings.
Remember the password that you specify in the settings. To save, click on the “Save” button and confirm saving the settings.
After rebooting, a Wi-Fi network will appear with the name we set during the configuration process. Use the set password to connect to this network. Netis E1+ will distribute the Internet, which it receives through the network cable.
And in the web-interface you will open the information on the wireless network and one more setting. You need to choose the strength of the wireless signal. There are two levels there: Normal and Enhanced.
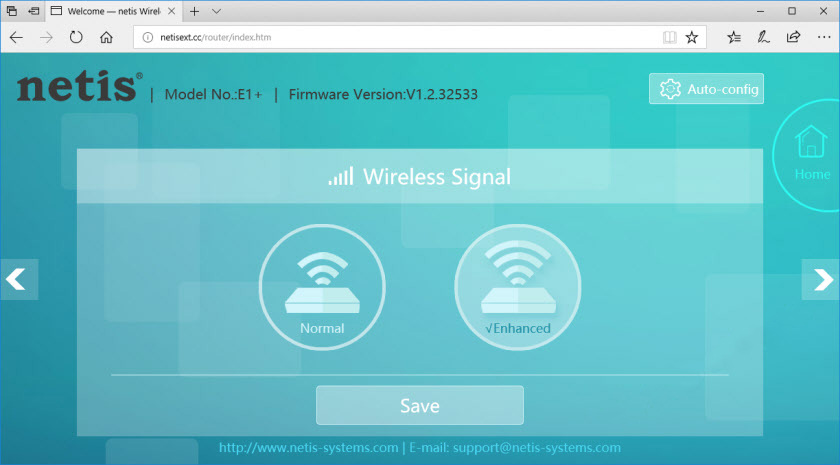
If, for example, you are in a hotel room, Normal will be enough for you. I think, the coverage will be enough for 1-2 rooms. If the area is large, you can choose “Enhanced”. Save the settings.
Netis E1+ firmware and other settings
The current firmware version of the repeater is indicated in the control panel. In my case it is V1.2.32533.
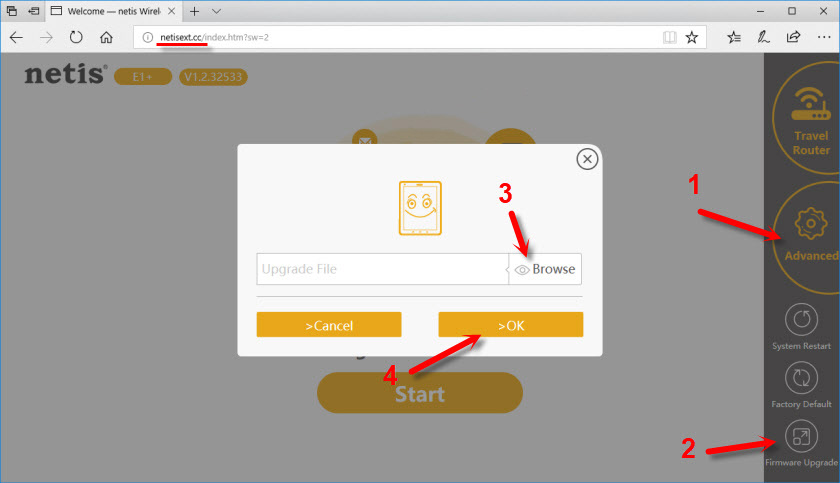
To update it, you need to download the firmware file for the E1+ model from the Netis website and upload it through the web-interface, which you can access at netisext.cc.
Click on the “Advanced” – “Firmware Upgrade” button. Then select the firmware file on the computer and press “Ok”.
As you can see, there are not many settings there. There are two more buttons: “Factory Default” – to reset the amplifier to factory settings and “System Restart” – to reboot the device.
I liked the amplifier itself. Simple setup and clear equation panel. Even though it is in English. Very decent coverage of the Wi-Fi network. Somehow it gave out a stronger signal than my ASUS RT-N18U router 🙂 .
That’s it for now. Leave your Netis E1+ reviews, ask questions and share your tips.
 Netis WF2419R and Netis WF2419 Settings. How to configure the Internet and Wi-Fi?
  How to Open A Port on A Netis Router?
  How to go to the netis router settings?
  How to Flash a Netis Router?