
Error 1747 When Starting the Wlan Service

The WLAN Auto Setup service in Windows is responsible for connecting to wireless networks. And if this service is not running, the system will not be able to find available wireless networks to connect to. I don’t know for what reasons, but quite often, this service is disabled. Especially on desktop computers. When after connecting the Wi-Fi adapter, the search for wireless networks does not work.
In principle, this is not a problem, the service is easy to start. I wrote about it in the article WLAN autotuning service. What it is, and how to enable it in Windows. But very often the WLAN service does not start. A large number of different errors appear. In this article, we will talk about error 1747. This error appears when trying to start the wlansvc service in Windows 7, Windows 8, and Windows 10.
I probably wouldn’t have written this article if not for a comment from Alexey on one of the articles on the site. The essence of the problem: the computer does not see Wi-Fi network, as if the wireless module is disabled. There is a red cross on the connection icon.

Running the network troubleshooter (you can run it by right-clicking on the network icon) shows a message that “Windows Wireless Service is not running on this computer”.
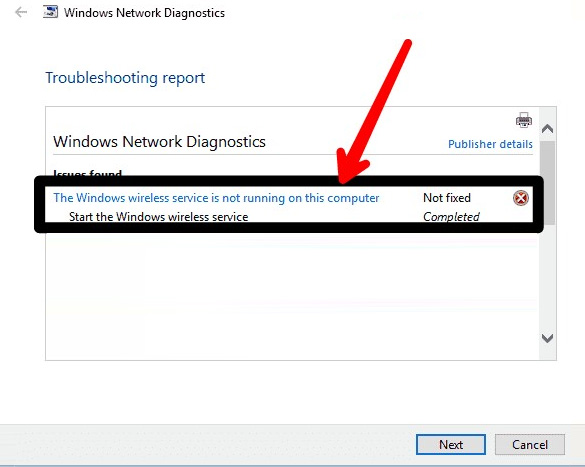
The troubleshooter cannot fix this problem. Well, if the wireless service is not running, then we need to start it. Go to Services, find the “WLAN Auto Configuration Service”, right click on it and select “Run” (or open the properties, set it to start automatically and run it by clicking on the appropriate button). At the beginning of the article I gave a link to detailed instructions.
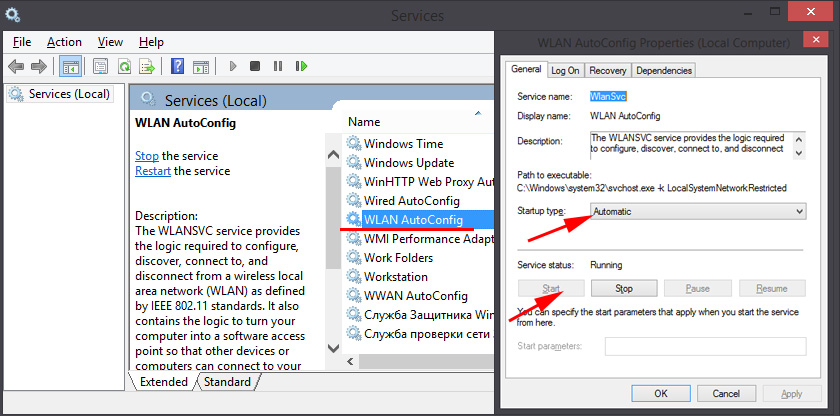
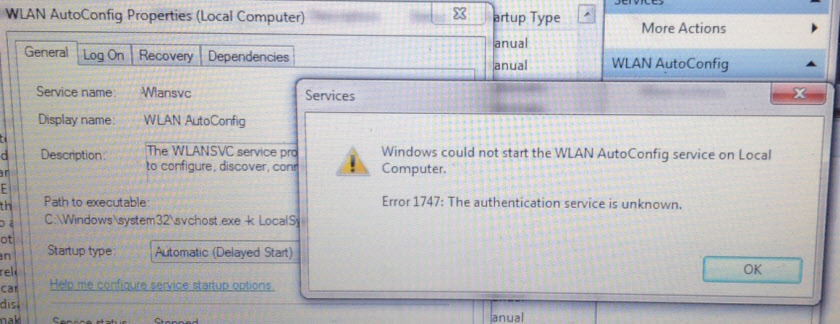
And instead of the service working, and with it the wireless connection on the computer, the error 1747 appears. I wish I had thought of asking Alexey for a screenshot of the error itself. But I found a photo on the Internet. True, it is in English. It says: “Failed to start the WLAN Autotuning Service on the local computer. Error 1747: authentication service unknown”.
That’s the problem. I don’t know what causes this error. But I know how it can be solved. I suggested this solution to Alexey in the comments, and it worked out well for him.
Solution of the 1747 error that causes the wireless network service to fail to start
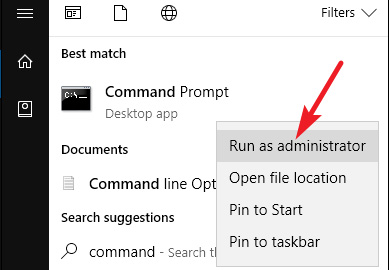
The solution is very simple. You need to run the NetSh WinSock Reset command in the command line running as an administrator. The solution was tested in Windows 7. I am sure that in Windows 10 it will work the same way. Just like in Windows 8 and 8.1.
Run the command line as administrator. You can find it through search (in the Start menu). Just start typing “Command…” (or CMD). Next, right-click on it and select “Run as administrator”. This is how it looks like in Windows 10:
Next, copy the NetSh WinSock Reset command and paste it into the command prompt. Press Enter.
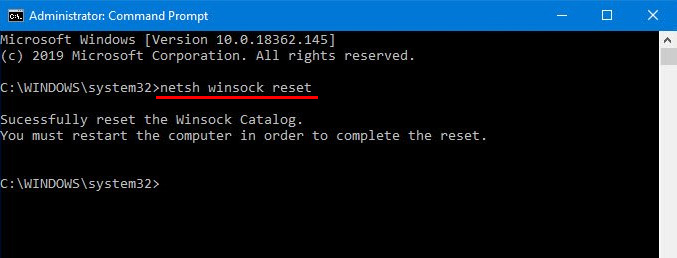
The message “Resetting the Winsock directory was successful” should appear. Reboot the computer.
After the reboot, if the computer still won’t see wireless networks, then start the WLAN service manually. As I showed in the screenshot in this article. Or follow the instructions linked at the beginning of this article.
If the service works, but the available Wi-Fi networks still don ‘t appear (the red cross hasn’t disappeared), then maybe you need to turn on the wireless connection.
Everything should work! All the best!
 Error Connection Iset Err_ConNection_Reset - How to FIX IT In ChRome, Opera, Yandex.Browser?
  Who-Fi Without Access to the Internet, Or is Limited?
  What Driver is Needed to work wi-fi on a laptop?
  Wi-Fi IS Disconnected in Windows 10. Wi-Fi Connection Is Falling Offth A Laptop