Automatic Receept of IP Addresses in Windows. How to Setup?

In the settings of any computer or laptop that runs on Windows, in the properties of the TCP/IPv4 (version 4) protocol of the network adapter, you can specify static IP and DNS addresses. Simply put, in the properties of the connection to the Internet via a network cable (LAN), or in the properties of the wireless adapter (wi-fi). This is necessary in order to be able to manually prescribe the necessary addresses to connect to a modem, router, or ISP equipment in the event that these devices do not work DHCP-server. In case you are not aware of it, DHCP-server is just about automatic distribution of IP and DNS addresses.
Sometimes it is really necessary to specify static addresses in the properties of the network connection. For example, when your ISP does not automatically distribute IPs. How to do this, I wrote in the article How to specify an IP address in Windows 7? Set TCP/IP settings manually. But in most cases, the provider gives network settings automatically. And on all modems and routers DHCP-server works by default. And it means that to connect to the Internet with cable or wi-fi, in the settings of a certain network connection, in the properties of the IPv4 protocol should be set to automatically obtain IP-address, subnet mask, gateway, and DNS-addresses.
If any addresses are set there and you are trying to connect to a router, you will most likely encounter the IPv4 no internet/network access or “Restricted” problem in Windows 10. When you connect to the internet through a router, your computer should get network addresses automatically. Otherwise, you will not be able to connect to a Wi-Fi network and the Internet will not work. And if you have just installed a router, you probably won’t be able to enter its settings at 192.168.1 .1 or 192.168.0.1 .
That’s why I always recommend you to check the IP acquisition settings first of all when you have any problems with Internet connection. Now I will show you how to check these settings in Windows 10 and Windows 7. For Windows 8, these instructions will work as well.
Setting up automatic IP and DNS acquisition in Windows 10
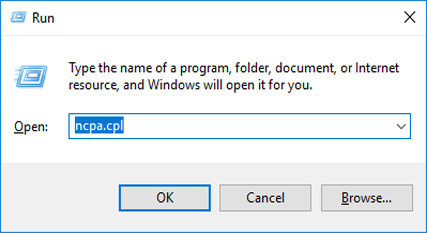
We need to open the “Network Connections” window. There are many options. You can through the options, through the Control Panel, or through the Run window. Press the Win + R keyboard shortcut, copy the command ncpa.cpl, and click Ok.
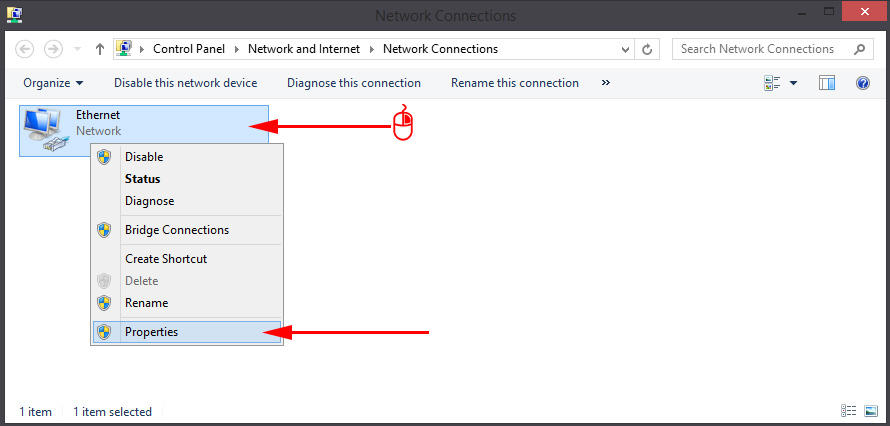
If you are connecting via cable, right click on the “Ethernet” connection and select “Properties “. And if you are using wi-fi, then open the properties of the adapter “Wireless Network”.
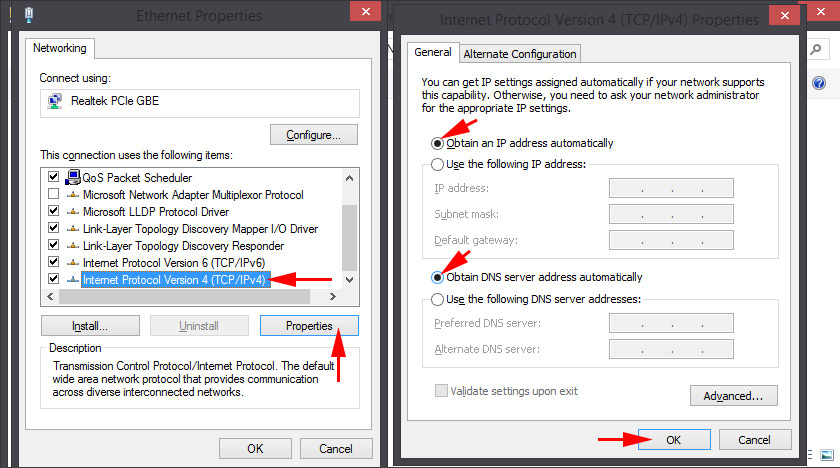
Further, having highlighted the item “IP version 4 (TCP/IPv4) you need to click on the button “Properties”, put switches near the items “Obtain IP-address automatically” and “Obtain DNS-server address automatically” and click Ok (2 times).
Note that the network settings of the network card (LAN) and the wireless Wi-Fi adapter (if your computer has one) are changed separately.
Another option, maybe even simpler for some – you can do a factory reset of all network settings. According to the instructions: reset network settings in Windows 10. By default, addresses are assigned automatically.
Automatic network settings in Windows 7
In Windows 7, everything is roughly the same. Open “Network Connections” can be opened in the same way with a command through the “Run” window, or through the “Network and Sharing Center”, which can be accessed by right-clicking on the connection icon in the tray. There you need to select “Change adapter settings”.
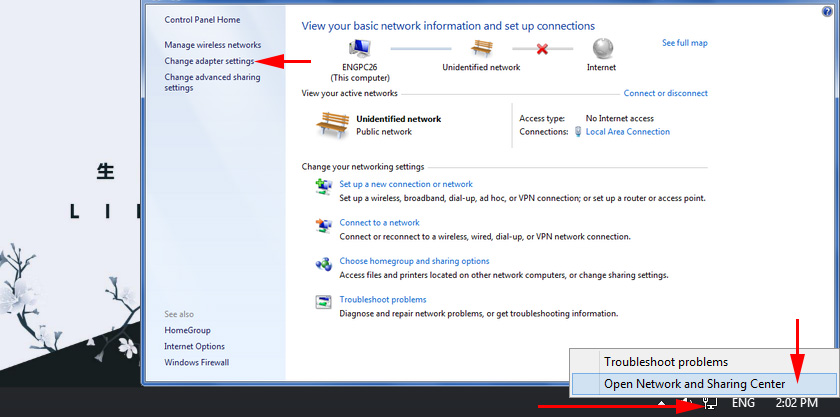
Then you need to open “Properties” (by right-clicking) of the adapter whose parameters you want to change. If the connection is by cable, it is “Local Area Connection”, and if by Wi-Fi – “Wireless Network Connection “.
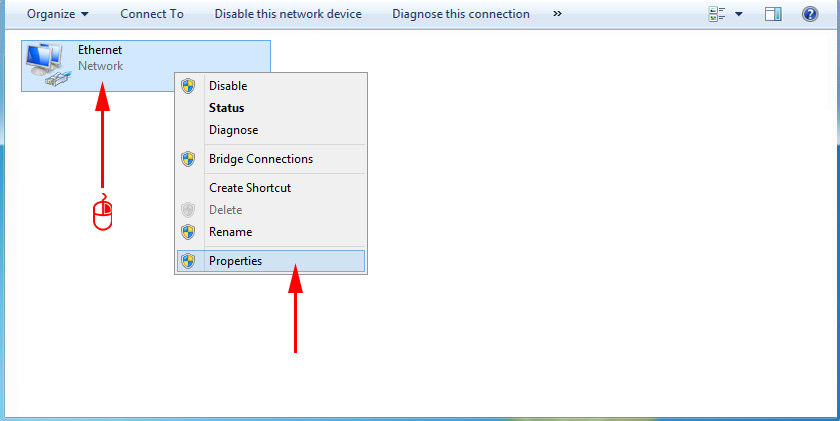
Select “Internet Protocol version 4 (TCP/IPv4)”, click on “Properties”, set the automatic acquisition of IP-addresses and DNS-server addresses, and click Ok.
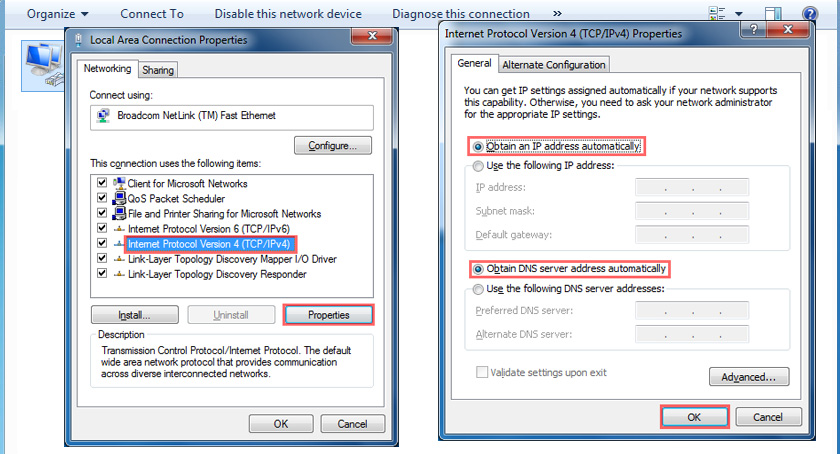
After performing these actions, the computer will receive IP and DNS settings from the DHCP server of the router or ISP.
In the same way, you can reset network settings (including IP) using certain commands, which I wrote about in detail in the article Resetting TCP/IP and DNS Network Settings in Windows 7.

 Error 651 When Connecting to the Internet in Windows 10, 8, 7
  AirPlane Mode in Windows 10. How to Disable?
  Who is there no Network Adapter in the Device Dispatcher?
  How to Disable The Proxy Server in Windows?