
DDNS Settings (DNS DNS) On the TP-Link Router
If you came to this page, you probably want to configure the DDNS function on your TP-Link router. Perhaps for remote access to router settings, for accessing an FTP server over the Internet, or for some other tasks for which you may need to configure a dynamic domain name system. If this is the case, then you have come to the right place. In this article I will show you how to configure the “Dynamic DNS” feature on TP-Link routers with old (green) and new (blue) web-interface. In order to prepare a simple and, most importantly, working instruction, I have already tested everything on my router (even on two). I have made the necessary screenshots, and I am ready to tell you about all the nuances and possible problems you may encounter during the configuration process. Before going directly to the configuration, I will tell you in a nutshell about DDNS, why it is needed and how it works.
The “Dynamic DNS” function, or simply DDNS, allows you to assign the router a permanent address, which can be used to access the router. And also to devices (IP cameras, for example) or servers (FTP, HTTP) that are located (configured) behind the router, or on the router. Simply put, DDNS solves the problem of an external dynamic IP address. The ISP gives the router an external IP address that can be used to access the router. If this WAN IP address is static (permanent) – great, you don’t need to configure DDNS. But usually ISPs give out dynamic IP addresses (which are constantly changing). So, the “Dynamic DNS” feature allows you to bind the router to one permanent address, regardless of the dynamic WAN IP address.
Two important points:
- If your ISP gives your router an external (public) static IP address, you don’t need to perform DDNS configuration on your TP-Link router, as the router already has a permanent address. As a rule, this function can be connected at the provider for an additional fee.
- The DDNS function does not work with gray IP addresses. And this is a big problem, as most ISPs nowadays give out gray, external IP addresses, not white ones.
More information about this technology and how to check what address (white or gray) your ISP gives out , I wrote in this article: DDNS (Dynamic DNS) on router: what it is, how it works and how to use it. Be sure to read it.
How it works: choose a service (which provides this service) from the list of available on your router and register in it. We get a permanent address. In the router settings we enter this address, username and password (from the service where we registered).
TP-Link DNS – only on routers with support for cloud functions
Some router models support the proprietary TP-Link DNS service. It can be configured only on routers that support cloud functions. As a rule, these are new, expensive models (Archer C3150 V2, Archer C1200 V2/V3, Archer C59 V2/V3, Archer C9 V4/V5, Archer C7/V4 V5, etc.). If you have TP-Link Cloud support in your router, I recommend using TP-Link’s DDNS.
First you need to register a TP-Link ID account and log into it in the router settings, under“TP-Link Cloud” on the “Basic Settings” tab.
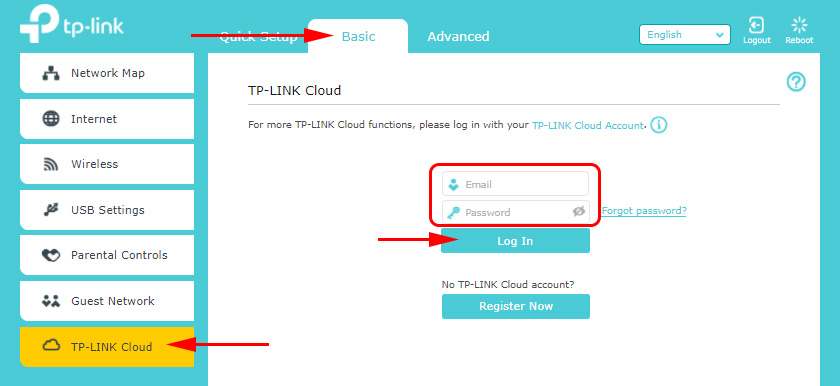
The router will be tied to your TP-Link ID. And, for example, if you log into that account in the TP-LINK Tether app, you’ll be able to control the router remotely. Via the cloud. But this is a topic for another article. And one more thing: after binding the router to TP-Link ID, when entering its settings you will have to enter not the router administrator’s password, but login and password from TP-Link ID account.
Go to “Advanced Settings” – “Network” – “Dynamic DNS”. Set the switch next to “TP-Link” in the “Service Provider” line. Click on the “Register” button. In the “Domain Name” field you need to think up and write down a unique address for your router. Then click on the “Save” button.
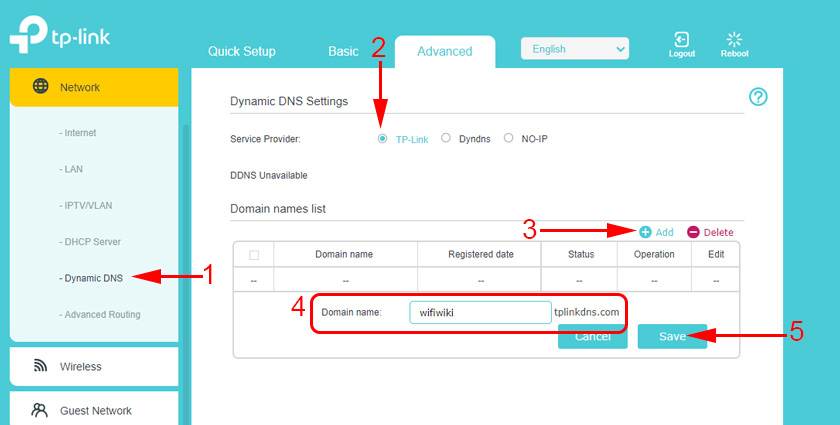
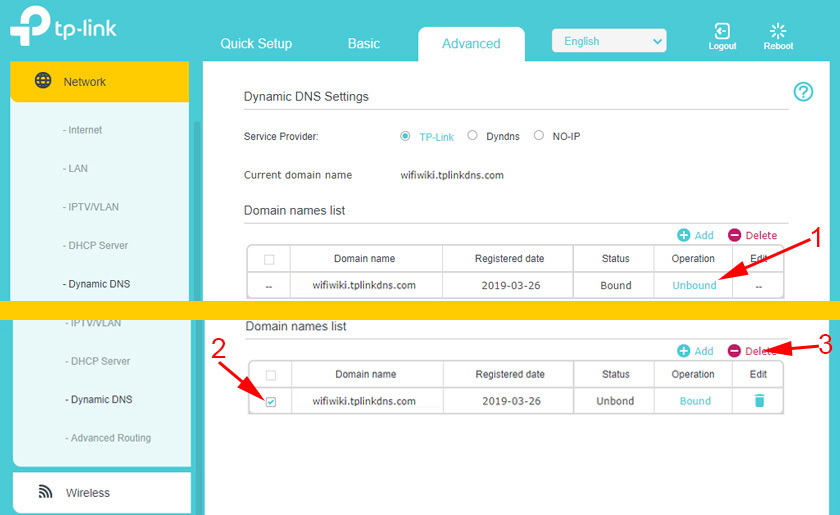
That’s it, now the set address (for me it’s http://helpwi-fi123.tplinkdns.com/) can be used to access the router via the Internet.
You can always unlink this address from the router and delete it. Or create a new one.
If the router supports cloud functions, I definitely recommend using TP-Link DNS. It is set up very simply and quickly, which can not be said about third-party services, which will be discussed further in the article.
Registering DDNS address (suitable for all routers)
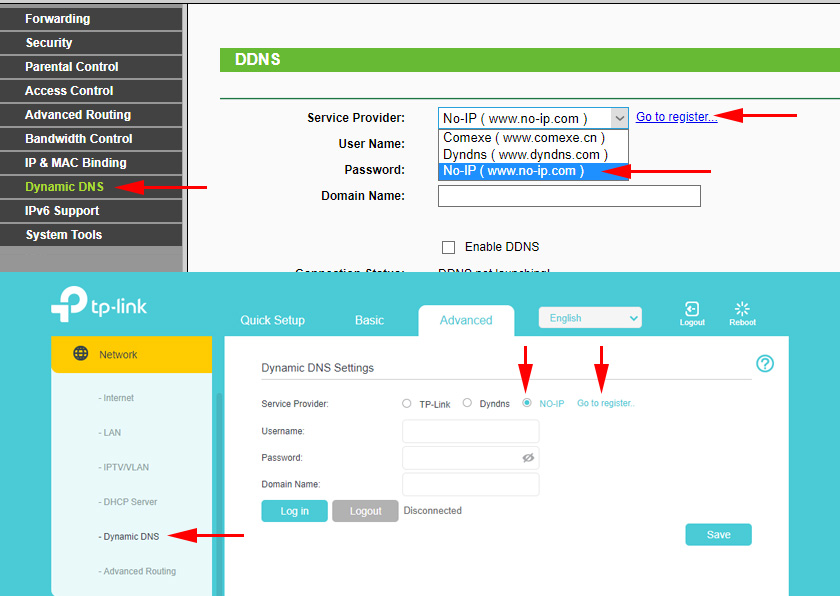
At the beginning of the article I already wrote that first we need to choose a service and register in it. The service should be selected from the list of available services in your router. To do this, go to the settings of TP-Link router and go to the section ” Dynamic DNS” (Dynamic DNS). On newer firmware this is the tab: “Advanced Settings” – “Network” – “Dynamic DNS”.
Choose the required service from the “Service Provider” list and follow the link “Go to registration…”
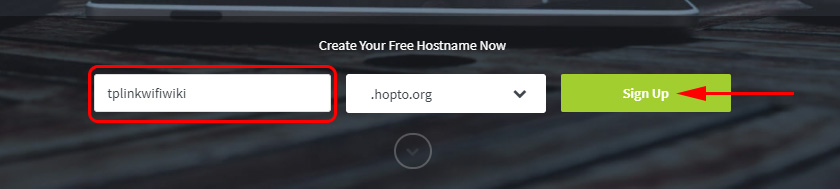
I registered the address on the site no-ip.com. I found it the easiest. You can choose another service.
Go to the link, and immediately on the main page we need to think up and enter the address, which will be used to access the router via the Internet. It must be a unique address. However, if you enter an address that is already used, the service will warn you about it. Think of an address and click on the “Sign Up” button. After registration this address did not appear in my personal cabinet for some reason. I added it again.
Next you need to specify your e-mail, think up and specify a password (we will enter this e-mail and password in the router settings), accept the license agreement and click on the “Get Enhanced” button.
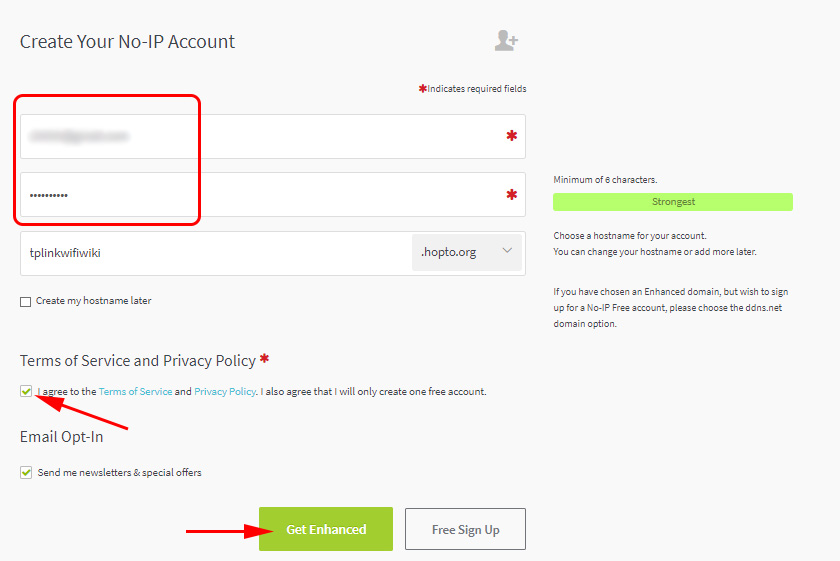
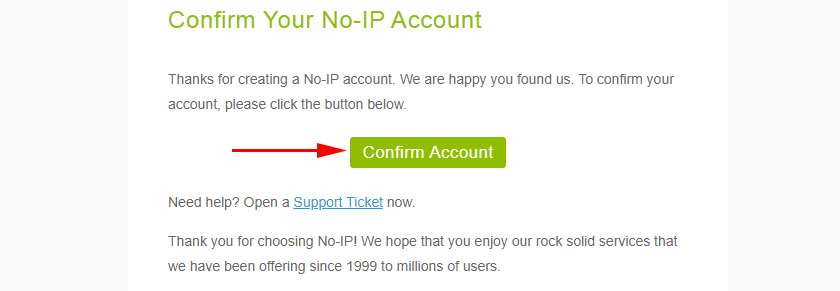
A window will open where we will be offered to pay for paid services. You can just close this window. An email will come to your mail, where you need to confirm your email. Just follow the link from the email by clicking on the “Confirm Account” button.
A page will open where you go to your account (if necessary, log into your account using your email and password).

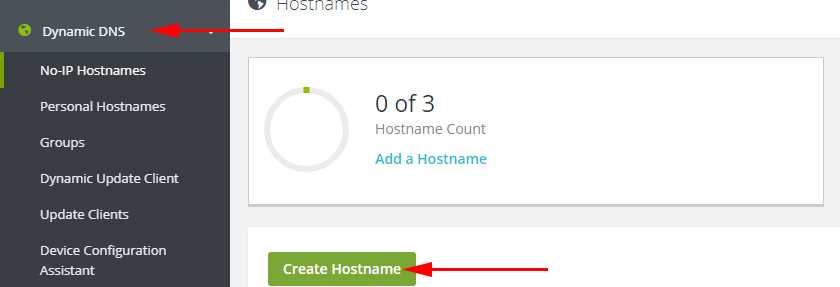
Since the address that I entered during registration for some reason was not created automatically, you need to create it manually. To do this in your account go to the “Dynamic DNS” section and click on the “Create Hostname” button.
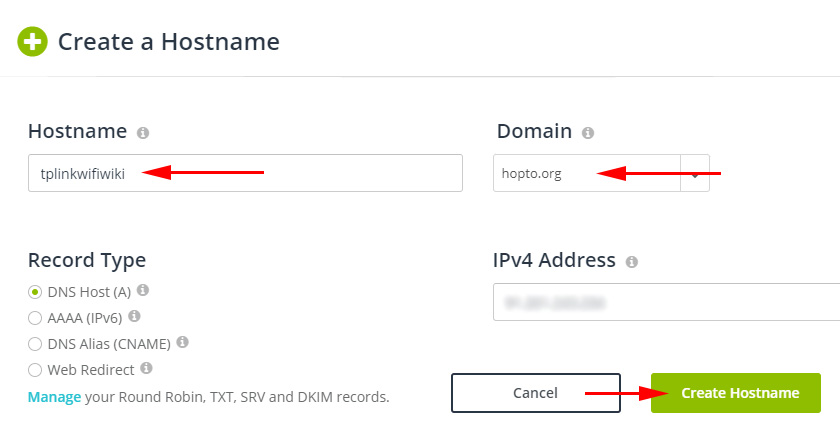
You need to think of a unique address (in the future it will be the address of our router) and specify it in the “Hostname” field. If you want, you can choose any domain from the “Domain” list (it is not necessary). Do not change anything else. Register the address by clicking on the “Create Hostname” button.
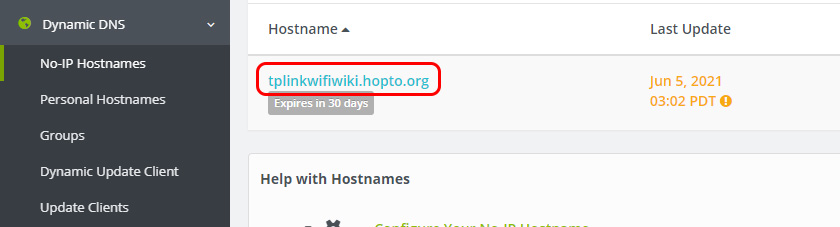
We can see that the address is registered. After configuring the router, this address (domain name) will be used to access our router from the Internet (including FTP server, IP cameras, etc.). In my case, this is the address tplinkhelpwi-fi.hopto.org.
That’s it, the registration is complete. All that remains is to configure the router.
Configuring the “Dynamic DNS” feature on a TP-Link router
Configuring routers with an older version of the web interface. Log in to your router settings (go to 192.168.0.1, or 192.16.1.1) using these instructions.
Open the Dynamic DNS section. In the “Service Provider” menu, select the service where you registered the address.
Next, enter the “Domain Name” that you created on the DDNS service provider’s website (see screenshot above). In the “Username” and “Password” field, enter the e-mail and password that you used when registering on the site (in our case on no-ip.com).
Check the box next to “Enable DDNS” and click on the “Login” button.
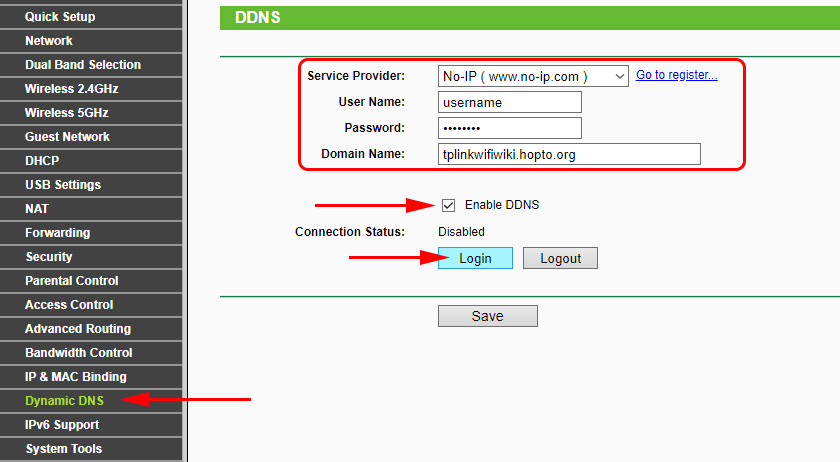
If we have done everything correctly, the connection status will change to “Successful”. Save the settings.

You can unbind the router from this address. Just click on the “Logout” button and save the settings.
Configuring DDNS on a router with a new web interface
Open the router settings and go to “Advanced Settings” – “Network” – “Dynamic DNS”.
Choose a service provider and enter the data that we used when registering on the site. Including the domain name we created for our router. Click the “Sign in” button. After successfully connecting to DDNS, you can save your settings.
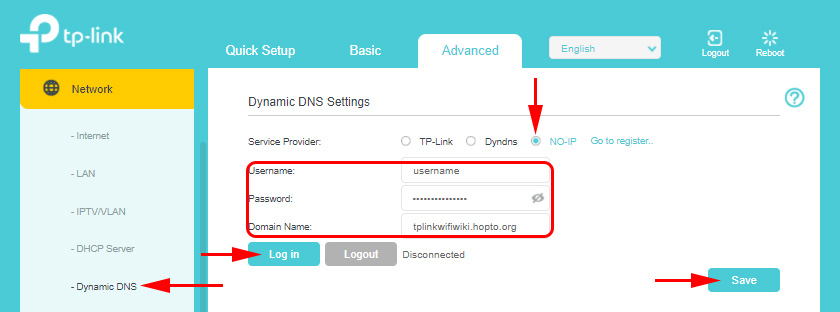
You can stop using dynamic DNS at any time by clicking on the “Exit” button and saving the settings.
How to use?
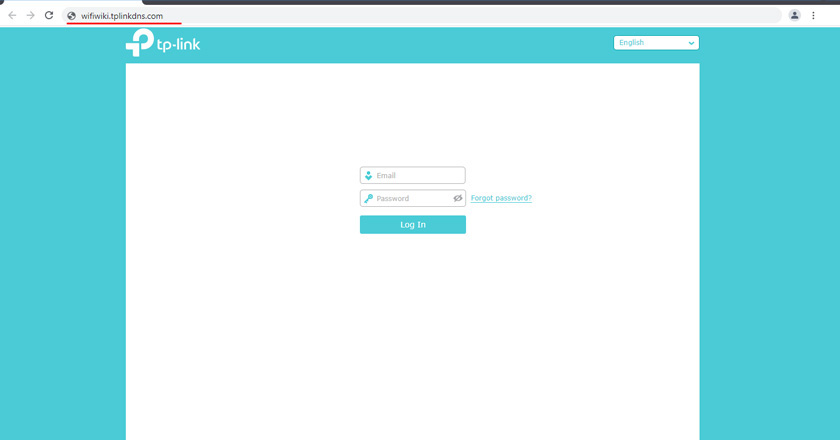
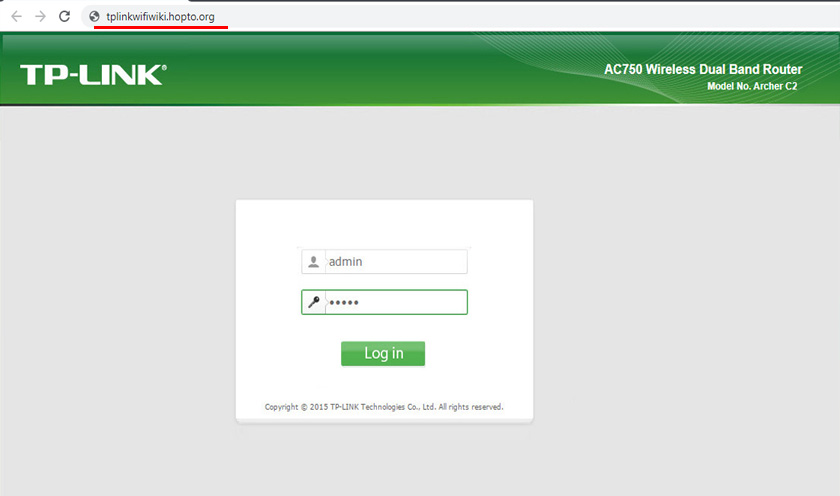
To enter TP-Link router settings via the Internet using DDNS (from any device, wherever you are) you just need to go to the address we got during the registration process in your browser. For example, http://tplinkhelpwi-fi.hopto.org/ (in my case).
But before that you need to open remote access for all IP addresses in the router settings.
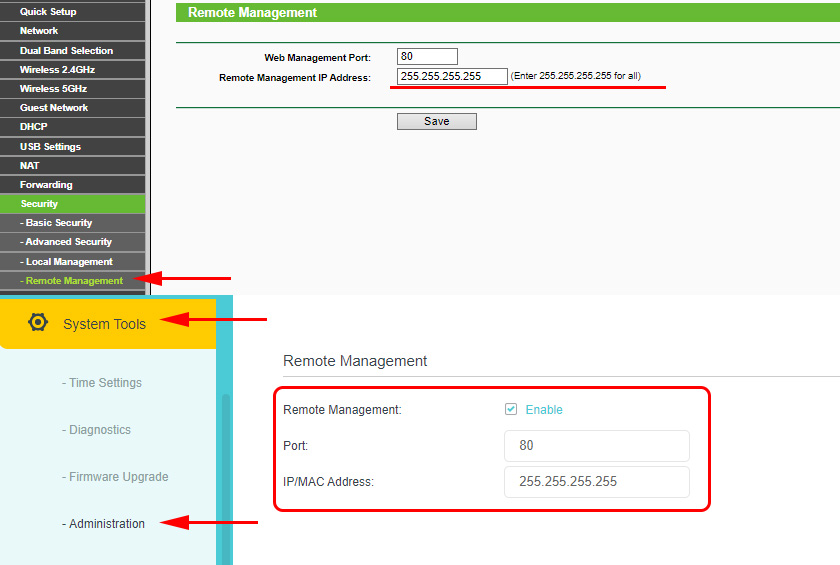
I understand that you can’t open access for a specific IP address (only if your ISP gives you a static IP address). And this is not very secure. Therefore, be sure to set a strong password for the router administrator according to this instruction: How to change the password on the router from admin to another. It will protect the page with settings. Also change the username from the factory admin to another.
This address can be used to access the FTP server (which is configured on the router) via the Internet. In the browser go to this address by writing ftp:// in the beginning. You will get approximately this address: ftp://tplinkhelpwi-fi.hopto.org/.
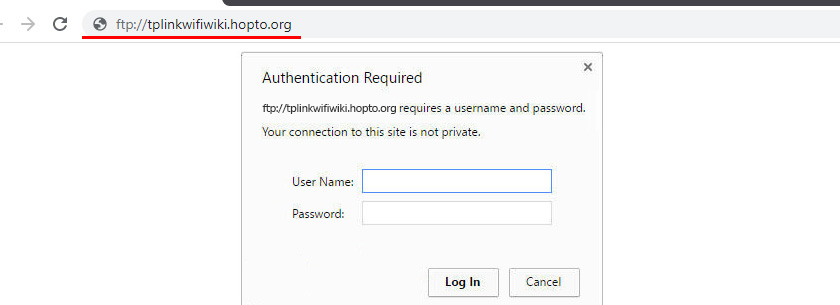
First, you need to configure the FTP server according to the instructions for setting up the FTP server on the TP-LINK router and enable “Internet access” in the settings (for more details, see the instructions at the link above).
 Router Firmware TP-Link Archer C8
  Router TP-Link Archer C2 and 3G/4G USB Modem
  TP-Link EAP245 AC1750 Access Point. Wi-Fi Solution for Restaurants, Hotels, Shops
  Reviews ABOUT TP-LINK TL-WR845N. OverView of the Ideal Router for Home from TP-Link